Showing posts with label bath robe. Show all posts

October 5, 2013

His robe

Oh, I forgot. I did sew something in the past three weeks. A robe for E.
And don't worry, I don't expect this fairly thin cotton to keep him warm throughout the winter. He's got a perfectly fine robe made from thick toweling for that. This one is  meant for winter and those warm days in spring and autumn. Like the ones we're have now.

I made this robe, as mentioned before, from a shirt weight cotton plaid fabric which turned out to have some stretch to it
It's an A-line robe with fitted shoulders and sleeves with a normal, shaped sleeve head. It's got a shawl collar and pockets and it closes with a tie.

Normally, I would put the loops for a belt at the waistline. However, I know they felt too high on the very simple robe I had made for him before. So, I finished the robe, let E try it on and tell me where he wanted the belt. I marked the spot and sewed on loops at that height. Both at the side seams and at center back.

Oh, and here's a detail shot of that pocket. I managed to make the plaid sort of line up in the end. By the way, are you familiar with this type of pocket? It's essentially a patch pocket which is sewn into the side seams but it's sewn on from the inside. If you'd like, I can make a tutorial next time I make one of these.

September 21, 2013

Bleh...

Little progress was made on E's robe over the course of this past week. I cut out the fabric last Sunday. This took a lot of time because I always seem to forget just how time-consuming it is to match checks... Even if I only matched the side seams and the front edge and front facing horizontally, to avoid using even more fabric. The thing already took almost five meters and those front pieces, with their A-line and overlap were just a bit too large to cut out of folded fabric.
After that, my work-week didn't leave any time or energy for sewing in the evenings.
Today, I could finally start sewing. I started with the pockets, which I had cut carefully to match their position on the front pattern pieces.
I interfaced the pocket facings, serged the edges, stitched  the facing down and applied a bit of very thin ribbon at the front.
Then, I put the pocket in its place...

WHAT?!?! I don't think I've ever seen this before. The fabric is a woven check and all pattern pieces were cut from the same length of fabric. That kind of rules out irregularities in check itself. There could be other issues though. After cutting, I noticed there was a little bit of stretch in the fabric widthwise. That could cause some trouble, but not shrinkage. But it does prove that this fabric is not the 100% cotton it was sold as. I suspect the fabric somehow shrunk when I ironed it while shaping that pocket...
So, I tried ironing the front. That helped a little. 

Between the ironing and the stretch, I managed to apply the pockets kind of the way I had meant to. I showed it to E and he claimed the pocket edges were only visible when he looked closely. That's kind, but I know it could have looked much better yet without the shrinking.
Hopefully, I'll be able to finish the robe tomorrow.

September 14, 2013

To the sewing machine!

You would guess that all the new inspiration for autumn would have send me straight back to the sewing machine after my holiday, wouldn't you?
Well... Not so much. I've been sewing all right, but only at work. Which has been pretty crazy this past week and will continue to be so for another two weeks.

But tonight, I plan to start a new project.
It going to be another bathrobe/morning gown/house coat but not for me. It's for the man in my life. 
I made E a very simple cotton robe a couple of years ago which he has worn a lot. However, I was cutting frugally back then and as a result, it has always been a bit on the short side. And it doesn't have quite as much ease and/or overlap as he'd like. This is going to be a more elaborate version.


I planning on making something like this. Ankle length, with a shawl collar and a generous A-line shape, closed and cinched with a waist tie.
E has approved the sketch ;)

And this is the fabric I'll be using. Rather nice, shirt weight, cotton in a black-and-white check. And maybe I'll use some thin ribbon to accent that collar and make the tie in plain black fabric.

I think this robe will meet E's needs nicely. 
I looked at some robe patterns and tutorials (for both men and women) and was surprised to find that nearly all of them had a completely straight body shape. This may be fine for a knee length version (which, of course, many are) but I think it would make for an over-fitted skirt in a long one. 
I'm going to start on the pattern tonight.
I hope to show you the end-result in the coming week.

June 9, 2012

Never to be worn outdoors

Did you ever bother to sew a bathrobe, a morning gown, a house coat or whatever you'd like to call it (and at whichever informal time of day you'd like to wear it...)?
I have, in fact made a very simple one before, both for myself and for my boyfriend. Simple ones, constructed with straight lengths of fabric for the bodies and very simple sleeves. We both own RTW ones in thick terrycloth-like material, so the ones I made are in cotton for warmer weather. However, mine was from a rather small piece of very thin cotton/viscose. It is therefore both rather short and very thin and only suited for very warm summer weather (and I wouldn't think of answering a call at the front door while wearing it...)

So, it was time for another one. A little warmer and quite a bit more respectable. I saw this as a good opportunity to try out another of the vintage pattern things I have recently acquired. 
I own several of these booklets from the 1950's and 60's. They are from an 'easy drafting' series called "with needle and scissors". I've written about the 1960's ones before but back then, I didn't have the sloper required. As it turned out, that was in the 50's booklets I bought a little later (it looks like they did a 'sloper issue' once a year). So now, I could really try and use this method.

From my experience in pattern making, this method is a rather counter-intuitive one. Instead of starting with a sloper darted to follow the countours of the body and then adding ease and shifting darts to create the style you want, "with needle and scissors" starts out with a completely un-darted sloper and tells you where to add waist and bust darts for each style they demonstrate. They obviously didn't want you to start creating designs and patterns all on your own... 
The method for introducing a bust dart is particularly slap-dash. You are suppose to cut the line in the sloper and make a fold in to the armscye, creating an opening which then becomes the bust dart. At no point in any of the booklets do they explain how to calculate the width of this fold. 

I picked the robe on the left for this experiment. I love the look of the one on the right but a fitted bodice doesn't seem very comfortable. This one supposedly has a fitted front and some ease at the back which is fitted to the waist with elastic. 


I followed the book in drafting it, making the darts where they told me to and drafting the collar according to the same instructions. 

Then, I picked a nice cotton from my stash. I like a paisley print, so I couldn't resist this one when I found it on sale for 1 euro/meter. However, it's pretty loud for a dress and I don't like the fact that it has a regular 'set'. In my mind, a paisley print should not have a clear order and repeat. So, this rather nice smooth cotton seemed ideal for this project. I bought some plain dark blue cotton to create a contrast at the collar, the sash and the (introduced into the design by me) sleeve turn-ups and pocket flap. 


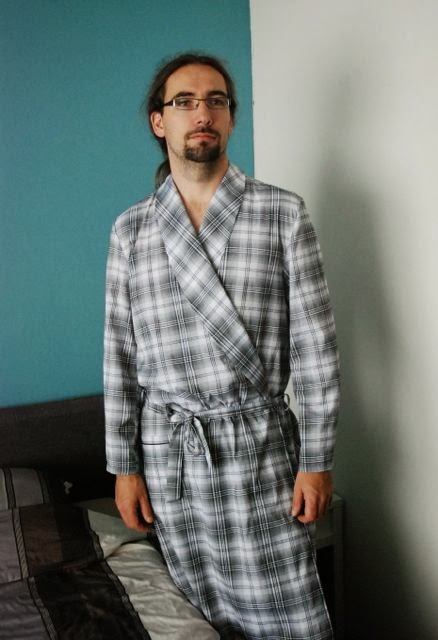
This is how it turned out. I love having a full-length robe (in fact, despite the nice drawing, the pattern was described for an over-all length of 1.20 meter, so  I lengthened it to taste). I've never used facings on a bath robe before and I although the look in great, you have to pay attention to the sleeve facings when putting it on and at this length, the front facing easily shows half-way down the skirt (of course I could sew them down). I'm still not sure about the darts and the shape they make but this was never meant to be a fitted garment. The only real flaw are the drag lines from neckline to armpit, indicating either a too tight back neck (although it was fine in the sloper) or some issue with to collar. Possibly both. It's not uncomfortable, so it won't be an issue for an indoor garment like this but I will have to keep it in mind for any further "with needle and scissors" projects.