Yes! It's finished. My dress from the summer 1965 issue of Frohne. I haven't decided yet whether to call this my second or third item for the Vintage Pattern Sewing Pledge... I guess I'll let you know at the end of the month.
My sewing machine is back in working order. The good folks of Mulder Naaimachines fixed it while I was there yesterday (there are good reasons why I always recommend them and obviously, none of those have to do with compensation, they don't even know I blog...).
So, I could finish that last bit of stitching.
As you may remember, I used the Frohne pattern enlarging system to make this design.
I made a muslin first. That showed me I had to lower the bust darts by two centimeters (which means that when using Frohne, I have to add all the extra length above the bust... interesting) and the front shoulder was about 1.5 cm too wide. Otherwise the fit seemed fine but I decided to add back darts because I didn't like the sack shape there.
I made the dress with those changes. I used a peculiar fabric from which I have quite a bit in my stash: really heavy linen in a black and grey herringbone weave. Not the greatest material for winter but then, this is not the greatest dress for winter, so I don't mind.
Today was the lightest and brightest day in a week but still it was pretty drizzly and gloomy. We took these pictures at 2 p.m. and there were only a few without blurriness. At least E could help me because he was still at home (so rare for him to take sick leave, or need it).
We tried to have a bit of 1960's style fun with the styling and posing but I fear it's all very fake.
I tried a large size hair donut to imitate a beehive and only kept it because E thought it worked. He suggested using the kitchen as a decor, and then I insisted on me having a drink in that case (no alcohol was actually consumed during the taking of these pictures. It's soda in the glass). It's not a retro kitchen so really, it's a bit silly.
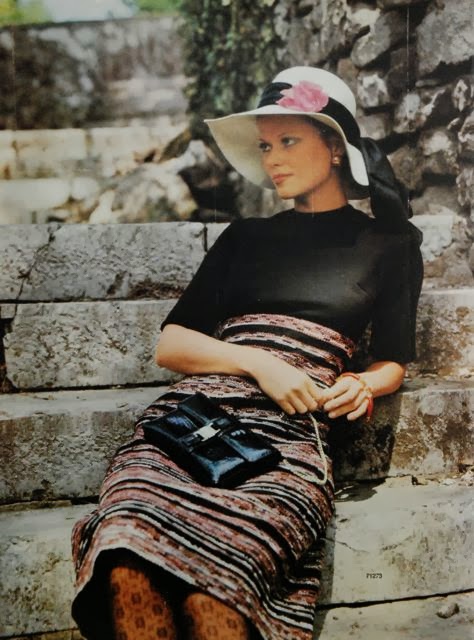
The yellow tights are not wrong though. There was a craze for brightly coloured hosiery in the early 1960's. I know this from a magazine article from 1962 discussing the trend (and coming to the rather tame conclusion that it's OK to wear things like that if you have pretty legs, are young enough and it suits you...).
Frohne patterns don't come with instructions of any kind. I'm very much used to sewing without instructions but that is usually with my own patterns. In which case I've been thinking about construction since before I put a pencil on the paper. In this case, the muslin helped me think about how to sew those little pleats at the corners of the front yoke in such a way that the seams could be finished. And I could test whether or not I needed a zipper. I didn't, even with the back darts.
I attached the center front panel using sew-in snaps. This makes it easier to get in and out of the dress and it gives me an option which was really popular in the 1950's (not sure about the 60's, clothes were getting a bit cheaper then): using panels in different fabrics. I ran out of snaps, so I haven't made any yet, but I will.
I am happy with the finished dress. A semi-fitted sleeveless design like this may not be the strictest test of the Frohne system, as a first experience, it is encouraging. I can definitely see myself making that 1970's suit after all...
And the look... Another new silhouette for me and I like this one as well. This is kind of a transitional 1960's silhouette. No more figure hugging hyper feminine looks but no waistless mini either... It actually looks kind of modern.
Now, I think I'll have to decide on a Lutterloh pattern to try next...
With the deadline looming, I've decided not to give up on my Vintage Sewing Pattern Pledge. I could come up with a whole bunch of reasons why I've only made eh... one and a half of the promised five garments so far. And some of them would even be good reasons. But why waste time on that? The year isn't over yet and I think I will have time to work on this in the coming weeks. I may have to count the 1930's wadder to make five but I think that's OK. After all, it was made from a vintage pattern from my collection...
Anyway, I chose to start out with a design from the Frohne patterns-to-size system. I've blogged about this before and shown you pictures from the book for summer 1961 and winter 1972.
I looked through all the Frohne patterns in my collection (the longlist got its own Pinterest board). Originally, I had always planned to make this great suit from 1972.
Which I still love... but a suit is quite a commitment when following an unknown system.
I also had some 1950's options available but that didn't really go with my goal of using the Pattern Pledge to try out some new-to-me fashion eras. Then, I thought I could be clever and make something which would help me fill a gap in my wardrobe. Make a top. But who wants to make a top when there are so many cute dresses?
This left me with a choice between two designs:
The dress in the middle, from 1961. Very cute but definitely a fabric hog with that pleated skirt.
And one on the left here, from 1965. Simple but sweet with that collar.
That's the one I decided to go with.
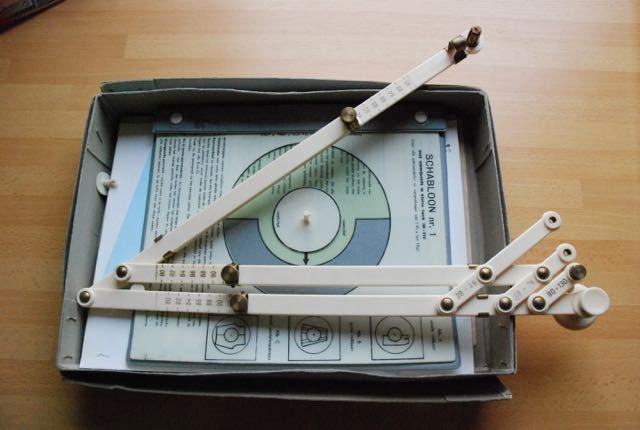
As a system, Frohne is related to Lutterloh. You get miniature patterns with dots on them and, so they claim, you can use a special tool to enlarge those to whatever size you need. Lutterloh's tool is a special ruler (I will make a Lutterloh pattern next, so that's when I will try and show that in more detail), Frohne's is a bit more complicated:
This is the Frohne toolbox.
It contains the tool, templates which supposedly make its use easier, an instruction book and a book with basic patterns (a new on-trend pattern book came out twice a year).
To make a full-size pattern, I scanned and printed the mini one (I guess you were supposed to cut it out but no way that I'm doing that). After that, I followed instructions.
You set the tool by adjusting each of three interconnected sliding rulers to the number of your bust measurement. Then, you take the template and position it over the miniature pattern (it may be possible to put it in one position which will work for all pieces but I moved it a couple of times) and secure it with a plastic pin.
On the top of the pin, you place the tool itself.
Now, all you have to do is 'walk' the pin, near the joint of the tool, to every dot on the pattern.
This will put the pencil in position to make a dot for the full-size pattern for your size. This is not difficult at all although you have to be careful. A slight wobble of your hand can easily move the pin a millimeter or so, which could translate into a bit of a problem.
This is not all though. Everyone who has ever graded a pattern, will know that the vertical difference between sizes is only a fraction of the horizontal one. And this system treats all measurements equally. The good people at Frohne have thought about this though. The instruction book contains tables with back length measurements. You can just compare the one given for your bust size with your own and add or substract according to need (the book even tells you how to do that). Frohne seems to consider a bust circumference of 96 cm as 'normal', so that got their 'normal' back length of 39 cm (less than today's patterns where it is usually 40 or 41 cm). My size, bust 90, ended up with a back length of 36.5 cm. Since I have a modern normal height and back length (1.68 meters in length with a back length of 40 cm), I had to add 3.5 cm to all pieces above the waistline.
The book contains more tables which can be very useful to adjust a pattern to size but luckily, I didn't have to use those because my proportions are, apparently, very normal by 1965 standards. Those tables show the relationship between bust circumference and other measurements according to Frohne. You can check your hip size, upper arm circumference and neck size there. If your measurement are closer to another size than the one you were using overall, the book instructs you on the adjustments you can make.
I thought that was really good. Recognition for the fact that all bodies are different and a fairly easy way to deal with that. Frohne is by no means a pattern drafting system but the way the patterns and instructions are presented makes it, I think, easier for an unexperienced seamstress to start making necessary adjustments.
Nevertheless, I don't think I'll completely trust the theory. There are just to many variables to any human body. I'm going to make a muslin first.
On the same day I found and bought the Harmien's patterns, I found something else: Two pattern magazines which belong to the Frohne system (a system like Lutterloh, with miniature patterns which you have to enlarge using a tool which you used to buy with your first set of patterns. Lutterloh uses a scale ruler, Frohne's is a bit more complicated and resambles a big drawing compass. I bought a 1950's set of patterns with this tool last year but I still have to try it out), autumn 1971 and winter 1972.
I'll show you the first one in this post.
I don't usually go for 1970's patterns. Just a bit too recent for me. I have a couple of Marion magazines from the decade, but that's it.
I like these though.
Although, 1970's coats are nearly always to my taste. I would definitely wear these.
And the one here on the right.
I'm less sure about the suits and dresses.
As you would expect, 1971 still looks pretty sixties in a mainstream magazine like this. If I only saw the picture of this suit, I'd date it a couple of years earlier.
Apparently, loud prints and weaves in bold colours were all the rage.
These two pairs are the only trousers in the magazine. The slight flares look like a shape I've worn a lot. I don't know about the outfit on the left but I would love to have those boots…
Oh, and the hooded dress is fun too.
Compared to the earlier Frohne publications I have, these designs are very nicely illustrated. Back in the 50's and early 60's, you would get just a couple of photographs (usually in black and white) and drawings of (often) mediocre quality for the rest. Clearly, printing techniques had improved over time and the reproduction of (colour) photographs was much cheaper in the 1970's than before.