Showing posts with label progress. Show all posts

June 15, 2020

Subtraction cutting again!

After my very simple dress, I decided to change gears and make something more complicated. I didn't make all those tiny dresses for nothing after all...

The design I used as a starting point is the second one from this post. In many ways, it is the simplest one I tried and probably the least typical for the technique. But that also makes it the most likely one with which to get a wearable result for what is really still just me trying it out. 

Most of the subtraction cut dresses you will find online have very simple, loose fitting sleeveless tops. I didn't really want that and I have cut the same bodice as the one I used for my recent dress. It will have buttons from the waist up and a side zipper.
Because I got the scale of the bodice wrong on the tiny dress, I didn't have quite as much length to cut holes for the skirt as it seemed in small scale. When I was marking the circles out for cutting, I realized that the bottom set on the front of the dress would end up too close to the hemline. So, I didn't cut those holes. (I'll make a proper pattern lay-out drawing when I post about the finished dress)

If you read about subtraction cutting, some people who tried it are very enthusiastic about how quick this technique is. If you read that, have a good look at the pictures. Many of those quick dresses are no more than muslins with raw edges at the armholes and neckline and over-long, unhemmed skirts spread on the floor. In my book, those are not finished dresses. 
Making it a nicely finished dress doesn't require any special skills but it does mean constantly dealing with quite a lot of fabric around the sewing machine. 


So far, I have put the bodice together but it still needs sleeves and a collar. I have also sewn up those holes.
The skirt doesn't have anywhere near the volume of that in the tiny dress (but a bit more than it seems on the dummy).


The strange thing I noticed when I tried it on was this:


The hole from the back is all the way down at my ankles. Deeply unpractical and it doesn't really do anything for the shape of the skirt. I tried connecting it to the top one at center front and that seems to work well. It creates that bustle-effect at the back which attracted me in the tiny dress (you can kind of see it in the side views but not really well enough. The lighting doesn't help. I'm sorry about that but I didn't have much time to take pictures)
The skirt is also too long. On the dummy, it almost looks like I could make that second set of holes after all but when I wore the dress, I really didn't think so. What I think I'll do is simply cut off about 40 cm at the bottom and then hem it. Unlike on the first dress I tried, the bottom edge of this one doesn't cross extra seams. That should mean I end up with a hi-low effect because the bustle hangs down to about the ankles. And the cut-off length will give me the extra fabric I need for the sleeves. 

I'll keep you posted on the progress!

November 13, 2016

Sew slow

This must have been my longest break from blogging in quite a while... I didn't mean to do it, it just happened. 
I still couldn't figure out what to make from that flannel. I was very busy with work and social obligations. I spend another weekend climbing in the Ardennes (in the last weekend of warm sunny weather... It was great!). I was just very busy and didn't sew that much anyway...

In fact, I have done a bit of sewing during the time that I wasn't blogging. Because I couldn't decide on what to do with the flannel, I put it back on the shelf. Instead, I started on another dress, which I have been working on slowly, in left-over moments, for the past week and a half (which is not my normal kind of sewing progress at all!).

I'm making this dress, in black cotton. I made this technical drawing quickly in Illustrator so it is not very pretty but it does show the shape of what I'm working on. 
The bodice is the one I originally drafted for the flounce dress but this time, I gave it full length sleeves. I made those a little bit fuller and I'm going to add sleeve slits and cuffs. The skirt is a simple half circle with slant pockets with fold-back flaps (a very popular detail in original 1950's designs). I cut the skirt in six gores but didn't put that detail in the drawing. The center front pleat was a bit of an afterthought. When I was drafting the skirt pieces, I was a bit sleepy and I didn't realize that I had included the front overlap on the bodice in my measurement for the skirt piece. I only noticed that when I was pinning the waist seam. A pleat was by far the easiest way to fix the issue...

The dress should be finished at some point in the next week. It only needs cuffs and a hem now. When it is finished, I will show it and discuss any other issues I may have with it...

And just in case you were wondering how I went from colourful flannel to black cotton, there was a reason. This dress was planned as a kind of "background dress". The sort of garment which can be combined with other things to create different looks. Usually when I try something like that, I either end up always wearing it plain or I settle on one look and stay with that. Which doesn't mean I don't like the idea...

This time, I came back to it after buying these two scarves (my apologies for the horrible cell-phone pictures, taken with the use of a dirty mirror):


They're huge and soft and warm and a lady at my local market was selling them for 3 euros a piece or 5 euros for 2. I have looked at similar scarves before but I never bought them because I don't usually wear square scarves, but at that price, I couldn't resist. 
Now, these scarves are so big they can completely take over any outfit so I don't really have to make anything to wear them with (they look great with jeans and a long-sleeved t-shirt) but they were still my reason to start making this dress. I'm not sure it will end up looking good worn with either scarf but I suppose that's a risk worth taking. 

October 2, 2016

Making jeans

Not too long ago, I read post on someone else's blog about jeans. It once again reminded me that I could use another pair myself. The post also contained a bit of a surprise for me: There was a picture of the insides of the finished jeans and none of the seam allowances had been finished in any way. There was topstitching along some seams but all the edges were raw. 
Not a treatment I would ever recommend for denim. This, rather experienced, seamstress told me she had never had any trouble with the particular kind of high quality denim she uses. 

And now, I am making jeans again. Another pair of my close-fitting jeans, using stretch denim. I'm making them using my normal method. I've done this for quite a while and generally don't give it a lot thought. However, based on that recent discussion I thought it might be worth showing after all.


I like to use flat-felled seams on my jeans. I use them on all those seams which you will usually see flat-felled or topstitched in RTW. Yoke seam, center back seam, inner leg seam. 
Years ago, before I had a serger, I would sometimes try an flat-fell the outer leg seam as well as the inner leg seam but I would recommend that. It's really fiddly. 

This is what I do now:

For my flat-felled seams, I use topstitching thread in sewing machine's needle and regular thread in the bobbin (topstitching thread is thick and likely to get stuck in the bobbin). This works really well but it does mean that you had to plan ahead where you want the contrast stitching to show.

The first step is to sew the seam with the wrong sides of the fabric facing each other and stitching on the side you want to be on top in the flat-felled seam.

This is what the other side looks like.

Then, I press the seam allowances open,

trim the seam allowance on the side that has the stitching in the regular thread

and fold and press the other seam allowance around and over the trimmed one. 

You could pin it down at this stage but I usually don't. Denim can pressed really well and tends to stay in place just fine. In fact, I think having to remove pins might make your stitching more wobbly. Just stitch close to the folded edge, keeping an even distance to the first line of topstitching. 

Maybe a bit tricky if you try this for the first time but not difficult. And you get nice, strong seams and a clean, smooth inside of the garment. 

Years ago, I used a different method: I would first stitch the seam in the usual way, with the right sides facing and using regular thread. Then, I would press, trim and fold the seam allowances on the inside and then stitch along the folded edge. However, when using topstitching thread, I would have to stitch from the outside of the trouser leg, with those folded seam allowances on the inside. I made it work but that was really tricky and it involved much more re-threading of my sewing machine.
There is one area where I might try it again though: The center back seam.

Mine looks like this. I'm actually not that bothered by mismatched point but I know some people like to sew their jeans which real points.

And on the inside, that is just what I have. If I were to use my old method for flat-felled seams on the center back seam (and the regular method on the yoke seams) or even to make a fake flat-felled seam by serging and topstitching, I could have this perfect point on the outside. 
I won't try and change it on this pair of jeans though. 

Oh, and just in case you are wondering about the blue lines and the stamp on the wrong side of the fabric: This was the beginning of the bolt. I originally bought just enough for two pairs of jeans and this will be the second one. I had to be really careful with my pattern lay-out to squeeze it out of the remaining fabric so I was obviously not going to avoid those lines on the back. 


July 31, 2016

The nejiri and the stopper

And now for something completely different! I haven't used the Pattern Magic books in a while, have I? 
Well, I decided it was that time again. This time, I was going for something fairly simple: the nejiri or twist. A design which appears both in Pattern Magic 1 and in Pattern Magic - Stretch Fabrics, all be it with some differences.

I made a nejiri top based on the instructions in the first book way back in 2011. I didn't even blog about it but I did put it on Burdastyle. This is the picture I showed there. I don't have it anymore. The fabric got a bit worn out and I remember finding it annoying that I had to keep adjusting to the top to keep that twist in place. This is something which is hinted at in the book. And in the third book, there is a version of this top in which the issue is addressed: The twisted top with stopper.

This one. 
There are some differences in the drafting instructions (like the amount of horizontal shift and whether or not the armholes get shifted too) but the twist principle is basically exactly the same. The top itself is not quite the same. In the older instructions, the twist is added to a basic sloper (without waist darts, but still), in the newer book, the top itself has straight sides and would, without the twist be loose-fitting. 
I decided to try out the new version as described.

This also gave me a good opportunity to investigate something I have wondered about for a long time: Are the shifts on the front and back pattern pieces the same or mirrored? 
When I made my original top, I followed the instructions given in the book to cut the whole top as one big pattern piece. This meant both front and back curved in the same direction. Later, I saw a blog post by someone else who had made this top but seemed to have mirrored the pieces. 
Now, it was time to try out. Luckily, I had enough fabric to cut three body pieces and those stoppers (which are just bands of fabric). 

These are the pictures of the top with the same pattern piece used for front and back (my apologies for the lighting issues in all the following pictures. I was in a bit of a hurry and didn't check them properly).


The twist looks pretty much like that in the picture in the book (especially if you keep in mind that the "stopper" at the bottom will help to keep that waist twist in shape).
Laid flat, it looks like this:

Do you see the way the seam curves to the front?


And this is the result with a mirrored piece for the back. I somehow thought it might provide more relaxed twisting but I think it may be a bit too relaxed...


It was really hard to get the top on the dummy in such a way that the armholes were more or less at the same level while there is no real twisting at the waist.
Flat on the table, this one looks quite interesting:


This shape might work better in a more fitted garment but I think my test here proves I did understand the instructions all along. The nejiri top can be a bit fussy to wear, but I did make it the way the book intended and I will do that again.
Now, I just have to put on those stoppers!

July 20, 2016

Progress... of a sort

So, I have made the pattern for that striped dress. I agreed with those of you who commented on my previous post and went with sketch number one. 

Making the pattern, based on my knit sloper, was really easy. The difficulty with this dress was always going to be found in cutting and sewing those stripes to match. 
And when I started on that cutting, I made an unwelcome discovery: No matter how much I tried, I couldn't manage to fold the fabric in such a way that the stripes matched. It even seemed like the same stripes weren't even similar in width across the entire width of the fabric...
Obviously, I gave up on folding the fabric. I decided to go with a single layer lay-out. Then, I realized that one of the selvedges was putting tension on the fabric. So, I cut it off. And then, I realized that there was yet another issue. An issue which is not uncommon for jersey fabrics but I had hoped this one wouldn't suffer from it: The selvedge was not at a square angle to the stripes at all. 
This is common because a lot of jersey is knitted in the round (which is much quicker and therefore cheaper than knitting flat). This means that there are no separate rows of knitting, just an almost endless spiral, which, in turn, makes all the stitches slightly slanted in the direction of the knitting process. Sometimes the resulting big tubes of fabric are sold like that but more often they are slit open and the cut edges are finished with something that kind of feels like glue.  That cutting isn't necessarily done with great care. The round knit fabric didn't really have a perfect straight grain (which is actually an incorrect term when it comes to knitted material) to start with and the rough cutting means you can be in serious trouble with fabric like that.
In this case, the selvedges didn't look like they had been cut. So, I thought it would be fine... No such luck. 
After messing with it yesterday, I decided to preserve my sanity and double the pattern pieces. So, today I had another go at it.

Much better!

This simple thing caused so much fuss that I almost felt like giving up on it. Now I'm glad I didn't. I just machine basted all the seams where the stripes have to match. Like most of the time, all is well as soon as I start sewing.

June 30, 2016

Finally sewing again

I didn't manage to fit in a lot of sewing last week. First I was really busy and then I got a nasty cold. I'm OK now and moving on with the plans I mentioned in the previous post: I'm making a bag.
First, I did some research. In this case, that meant looking at examples of the kind of bag I want sold in online stores (and in a real store, now that I think of it). I quickly found a shape I liked which also didn't look to hard to make. 

Although I was planning to use stash material (an off-cut of a black-out roll curtain, to be precise) I also looked for "fabric". It turns out you can buy that stuff, from which near-indistructable bags are made, by the meter. You know, that plastic on a woven back which is used for covers on trucks too and for good quality banners for outdoor use. The name of the material, at least here in the Netherlands, is bisonyl, the standard width is 250 cm and it comes in lots of colours. 
The bag I am making now is a bit of a test-case but I definitely consider buying this stuff for a later, fine-tuned, version.

Sewing-wise, I had to start with the most difficult part: Inserting the zipper in a shallow U-shape. Fortunately, I could study the construction on my old sports bag. That is how I found out that the edges were bound with nylon tape and the zipper sewn in with single lines of stitching close to the edges.
I didn't have a lot of material which could make a sturdy enough binding and had the right width. Just enough for one edge of the zipper, to be precise. So, I decided to use it on the inside edge and just sew the zipper directly to the cut edge on the outside.

It was fiddly but it worked.

Like the bisonyl, my "fabric" shows its weave on one side and a smooth plastic layer on the reverse. I'm using the woven side on the outside of the bag but I thought it would be better to add a second layer, with the smooth side facing out, on the bottom.

And of course, I am going to need a separate compartiment for my wallet, keys and phone. I'm making that on one end. I'll just double that piece (although I will have to use a different material on the inside, I'm out of curtain)  and put a zipper in the outside.  
With these bits done, it is time to pick some strategic places for straps and then put the whole thing together.

May 26, 2016

Bits of progress and some plans

Just some bits of hand sewing to go and then the 1943 dress will be done! There are so many different fasteners in this one dress... I'll show them to you later.

This dress is a very different look for me. I like it but I'm not completely convinced yet. The proof will, as usually be in the wearing. 
Progress is fairly slow because I've been busy with other things. And yet, I am thinking ahead to next sewing projects. 

I will have to re-make some of E's summer trousers because the old ones don't fit well anymore. Actually, that should be my next project. Although it's not that warm at the moment, it is almost June so he is definitely going to need more summer clothes soon. 

For myself, I should probably re-evaulate some of my wardrobe too. A year of climbing has left me smaller in some places (hips, for example) and bigger in others (biceps etc...) than ever before. The changes aren't very big so in some clothes, they are barely noticeable. In others, they really are, sometimes in a good way, sometimes not. Actually, it may be because of these changes that the 1940's dress is working for me now...
It has been clear that I will have to re-make my slopers for a while but I didn't want to do it straight away. No use drafting new slopers only to have to replace them again a couple of months later. However, if I don't start taking any serious "strength for bouldering" training sessions (there are several on offer right now. I am serious about becoming a better climber but most of these seem to focus on strong arms while I think I have most to gain by improving my technique,   understanding and core strength) I think my shape should be stable. After all, my body is used to climbing three times a week now.
In fact, I guess I should even take another look at my bra block... I haven't gone down a whole size but I think it might be wise to adjust the fit a little bit before making new bras. 

If I don't feel like drafting new slopers, there are several vintage patterns I could consider sewing up. Like the two 1940's dresses I pointed out in the previous post. Or more 1960's shift dresses. They also make great summer clothes. 
And my old slopers are not so far off in size I can't use them anymore. They are still fine for designs which are either tried-and-tested so I can easily judge how to alter them while drafting or easy to adjust while sewing.  
In particular, I am thinking about making a simple summer dress using both jersey and a woven fabric.

This is what I had in mind all along. Blue jersey for the bodice and either a matching blue cotton or a print with that blue in it for the skirt. The skirt itself can be a half circle or pleated (also depending on the fabric choice. One of the two printed fabrics I am considering is really narrow). 

And then, last week, I just thought of this option. I think I have some black pointe knit left over which might be enough for this skirt and for the bodice I could use that black cotton with the white dots/stars which I didn't end up using for the yoke of my 1952 blouse. There should be just enough of it. 
I am not entirely sure about this style for me though... It might be just a bit ehhh... "mutton dressed as lamb". What do you think? 
Of course, especially because it could be made using leftover bits of stash fabric I could just try. If it works, it work and if it doesn't I don't really loose anything. 

So many plans, so little time.


May 14, 2016

Not too bad...

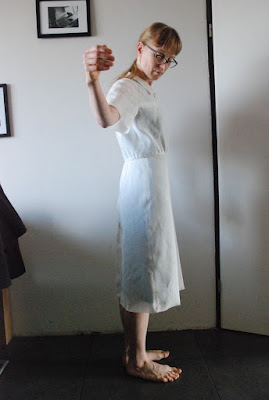
Before you get into this blog post, let me just apologize for the pictures... I asked E to take some quick snaps of my toile for the 1940's dress and he did. Very quickly. Clearly, he never zoomed the camera out of its wide-angle setting which causes weird distortions and neither of us noticed how the light seems to highlight my bare feet (made to look even larger by the already mentioned wide-angle effect...). But despite all that, these pictures do work to illustrate the fit of this pattern.

And in fact, I was pleasantly surprised. I have often read about how 1940's patterns can have huge amounts of ease in the bodice. This one is blouse-y but not crazily so. And I sometimes have issues with pattern companies assuming proportions which are very far from mine. This thing seems to be fairly close at least.

There are a couple of issues, which you will no doubt spot, but they all seem to come from the thing. An issue I definitely didn't expect: The front bodice is too short. That is an issue I would mostly associate with the problems of larger bust sizes so I didn't expect to find it on little old me. And yet here it is, clear as day. 
It didn't seem so bad before I pinned the opening at the back neck so I wondered if it was just caused by a too tight back neck or a short back pulling at the front. However, with the back opening closed, the seam over the top of the shoulder and arm looks pretty straight so it really is a front issue. 
Based on the fit like this, I will have to add about 2.5 cm at center front, tapering to nothing at the sides. And I'm not even wearing a bra here so I guess it might be wise to add even a little bit more. I think I will add about 2 cm of that at the front yoke which seems to be pulling up a bit.

The other issues visible here look like consequences of the too short front bodice so I think they will get solved automatically when I solve that. They are a weird flare to the front in the skirt and too wide bit of skirt just below the waist seam. 

The alteration shouldn't be difficult and I think I will have time to sew tomorrow. Now I just have to decide on fabric. I may have blue and white stripes and solid blue, to make a dress like the one in the illustration but I had kind of earmarked those for different projects. I've also been thinking about combining two solid colours: blue or blue/purple or black bodice with and orange, grass green or bronze/brown yoke and collar. And I'm kind of obsessed with the idea of a black or blue dress with a yoke in a matching lace. Because the collar is a separate piece, it would be possible. I just don't have suitable lace in my stash...

March 5, 2016

Testing...

Alright, so I still haven't moved passed sewing toiles... I hoped to get some real sewing done today but it just didn't happen. However, I did get pictures of the muslin for that 1950's Bella dress. 


I have to say I was pleasantly surprised by it. The skirt has an interesting style: It is only moderately full and cut in six gores with flat pleats at the two front seams. Of course the whole thing looks much more flamboyant in the illustration but I think the real thing comes close, once you take into account the proportions of a real body.

I think the waistline is just a bit too high on me though... I feels a little bit snug at the bottom of my ribcage and is clearly already flaring out at my actual waist. 

And then, there is the bodice style... while I was sewing this, I was a bit concerned that the bust on this pattern might be way higher than mine... And indeed, that curved horizontal seam hits just below the apex of bust, not under the bust like design features like this usually do. 

But that is also how the bodice looks in the drawing... And if the seam was below the bust, that slit neckline would gape... So, maybe that bust seam is a design feature.

As it is, I consider adding the extra bodice length I need above the bust seam, which will bring it down a little but but keep the overall effect it has now. Other that that, the dress looks promising. I just don't know which fabric to use yet.

January 25, 2016

Comfort sewing

This weekend, I started sewing a new dress. Not a vintage style dress and not a modern one. A comfortable dress, a garment to put on after a long day, to wear when snuggling on the couch with a good book. Or when sewing ;)
I know people wear things like yoga pants with t-shirts for such occasions but, let's face it, that is just not me.

My apologies for the sketch. I know it's hard to see those pencil lines.

Obviously, the right fabric for a project like this is jersey. Soft and stretchy. And I happened to have a piece of black cotton jersey of almost 3 meters. A nice fabric but not suitable for many things. There is no lycra in that fabric at all and, as a result, it has no recovery. I made a top from it once but it bagged out during wear and didn't really regain it shape in the laundry. Oh, and it had no vertical stretch at all
Odd properties which make it unsuitable for fitted garments but great for a skirt.
And the one fabric in my stash which I really liked with that black stuff was this burnt orange jersey. A nice colour, but the fabric is thin and soft. Viscose jersey. I thought it might stretch out badly with that big heavy skirt, so I decided to underline the bodice. I used grey striped lycra, the material I have used for slips before. 

I'm not sure about neckline yet, or about the sleeves really. But I did decide on a fitted bodice and a gored skirt, to be connected in a way which is interesting and yet not too difficult to sew.

And it is working.
So, now I am sewing skirt pieces to that double layered bodice and wondering whether or not I will really end up liking this dress style-wise. 

January 10, 2016

Testing...

Just a word of warning: These are not my usual kind-of pretty pictures. These are what you get if I manage to squeeze in the sewing of a toile in a rather busy weekend and then run downstairs and demand from E that he take a few pictures right there and then. Scruffy hair, no shoes and a photographer who is looking down at the model...

Of course, I started to second-guess myself about that 1920's dress. The fabric I had in mind might have been cheap, it was also kind of earmarked for a very different dress. One which, in my mind's eye, actually looks a lot better in it. 
So, I decided to make a muslin after all, using this pale green fabric. It came from my stash and was as cheap as the other fabric but I didn't really know what to make of this stuff. And it seemed to have the right hand for this design.

Ehm... What can I say. It's a genuine 1920's dress. The size and proportions look right for the period but not exactly flattering.

To be honest, I was almost ready to just add this one to "interesting experience" and leave it there. Even if I found the perfect fabric for this dress, would I wear such a sack-shaped thing?

Then I went upstairs again to take it off. And I looked in the mirror and played with it a bit... And I came to a very similar conclusion as before: It wouldn't look quite so sack-like and unwearable if I made a tuck on that waist seam. On the front in this case. That would also draw in the front bodice enough to make the armscyes sit properly (the front bodice is extra wide. In theory, this should provide the neckline drape but in practice, unless it is pulled in at some point, that extra width just spreads out and puts the armscye in an annoying low position).

So, I guess I will be looking for the right fabric after all. I know I do not have anything suitable in my stash (the vast majority of my fabrics has a lot less drape and is more suitable to post-1947 looks). And it looks like a nice colour would help with this dress. No black this time...