Showing posts with label pattern magic. Show all posts

August 31, 2016

Well and twisted

This is the last thing I made before going on holiday. I just finished it a few days before I left and it has stayed unblogged since: My new nejiri or twisted top!

The pictures aren't that good. I asked E to quickly take a few snaps when he got home yesterday. He obliged but we were both kind of tired and distracted so the result is eh... less than great.

Anyway, I have made this top, from Pattern Magic - Stretch Fabrics. The design is very similar to the nejiri from the first book (a design which was also intended for stretch fabrics) which I had made years ago. I've explained the differences, and my quest to better understand the design, in this blog post.
Coincidentally, I happened to have a fabric in my stash which looked very similar to what was used in the pictures for the book. A kind of olive-y, brown-y cotton jersey. So, obviously, I used that. 

I started using my own sloper, not the basic pattern from the book and I seem to remember I didn't add quite as much length as the instructions tell you to (I think I left out about 5 cm and also didn't make the bottom band quite as wide). I am slightly taller than the average Japanese woman these designs were created for but I noticed before that I apparently make different style choices when it comes to the length of tops. As it is, the top is still pretty long by my standards but I think the length is needed to make the "stopper" end up in a place on my hips where those are at a fairly even width. 

The looser shape of this top (compared to the previous nejiri) is interesting. In a lot of places, it doesn't show. All of the excess width there is taken up by the twist. But at one side of the bodice, there clearly is some extra ease. 

Oh, and those stoppers? They really work! At least, the one on the bottom does. My old top would start moving back the moment you had put it on with the twist in place. This one seems MUCH more stable. At the armholes and neckline, the bands are not as snug and there is less twisting in those areas. I don't think those stoppers really make a difference.

All in all, it was a fun experiment and it led to a wearable top. I think I will wear it but it doesn't feel completely "me".

July 31, 2016

The nejiri and the stopper

And now for something completely different! I haven't used the Pattern Magic books in a while, have I? 
Well, I decided it was that time again. This time, I was going for something fairly simple: the nejiri or twist. A design which appears both in Pattern Magic 1 and in Pattern Magic - Stretch Fabrics, all be it with some differences.

I made a nejiri top based on the instructions in the first book way back in 2011. I didn't even blog about it but I did put it on Burdastyle. This is the picture I showed there. I don't have it anymore. The fabric got a bit worn out and I remember finding it annoying that I had to keep adjusting to the top to keep that twist in place. This is something which is hinted at in the book. And in the third book, there is a version of this top in which the issue is addressed: The twisted top with stopper.

This one. 
There are some differences in the drafting instructions (like the amount of horizontal shift and whether or not the armholes get shifted too) but the twist principle is basically exactly the same. The top itself is not quite the same. In the older instructions, the twist is added to a basic sloper (without waist darts, but still), in the newer book, the top itself has straight sides and would, without the twist be loose-fitting. 
I decided to try out the new version as described.

This also gave me a good opportunity to investigate something I have wondered about for a long time: Are the shifts on the front and back pattern pieces the same or mirrored? 
When I made my original top, I followed the instructions given in the book to cut the whole top as one big pattern piece. This meant both front and back curved in the same direction. Later, I saw a blog post by someone else who had made this top but seemed to have mirrored the pieces. 
Now, it was time to try out. Luckily, I had enough fabric to cut three body pieces and those stoppers (which are just bands of fabric). 

These are the pictures of the top with the same pattern piece used for front and back (my apologies for the lighting issues in all the following pictures. I was in a bit of a hurry and didn't check them properly).


The twist looks pretty much like that in the picture in the book (especially if you keep in mind that the "stopper" at the bottom will help to keep that waist twist in shape).
Laid flat, it looks like this:

Do you see the way the seam curves to the front?


And this is the result with a mirrored piece for the back. I somehow thought it might provide more relaxed twisting but I think it may be a bit too relaxed...


It was really hard to get the top on the dummy in such a way that the armholes were more or less at the same level while there is no real twisting at the waist.
Flat on the table, this one looks quite interesting:


This shape might work better in a more fitted garment but I think my test here proves I did understand the instructions all along. The nejiri top can be a bit fussy to wear, but I did make it the way the book intended and I will do that again.
Now, I just have to put on those stoppers!

May 3, 2015

Structural progress

With the inner layer of the bodice (of the dress I'm making to wear to a friend's wedding on Friday) finished, I decided to direct my attention towards the skirt and bolero. 
You see, for the bodice I will use a technique of which I have often seen the results and which I understand very well in theory but which I have never tried yet: Draping fabric over a shaped under-layer. It would be almost impossible to determine the size and shape of those pieces beforehand. In fact, in all the wedding dresses I've seen with such designs, the draped fabric was usually sticking out irregularly in the seam allowances. So even in mass production, they don't pre-shape those pieces completely.
So, it seemed wise to cut the other essential pieces before getting stuck in with this tricky process. I don't want to run out of fabric half-way through...

Anyway, I thought the bolero would take a lot of work to deal with issues of gaping edges and maneuverability but it was almost right after the first slap-dash draft. Based on the fit of the muslin, I narrowed the ends of the sleeves a little bit, but that was it. It's just one pattern piece with a fun bat-like shape and I plan to line it.

For the skirt, I wasn't sure. I had two options in mind. Unfortunately, I can still only show you the faint pencil sketches:

Big flounce at the back,

or sort-of sarong-style front drape.
E said he preferred the second option and at first, I didn't agree. That peacock tail back just seemed so alluring...
Then, I started thinking. What would make more sense for a day which will include a lot of sitting and standing around talking to people? 
And yet, I tried a muslin for the back drape option. Maybe just because that 1950's dress looked so good with it...

The thing is, I know how a shape like the one in the sketch would be made using the conventional method of the wedding dress industry: It would be a straight skirt with a big godet at the back and a draped bit over the top. 
But I don't like that. I suppose I have a bit of a Bauhaus attitude to pattern making: I want there to be a real connection between form and function. 
And for this skirt, I kind of liked the idea of eliminating the side seams (even if it were only to avoid having to match them to the bodice side seams). And I had decided I didn't want an actual bow at center back. Too uncomfortable when sitting down. Oh, and to suit the style of the dress, there should definitely still be some draping at the front, like in the picture.
I tried to make a muslin combining all those requirements and it didn't look good at all. So, I got sensible and tried the other option. In this case, I thought tying a bow would be nice so I went with the ultimate style which combines a bow, draped detail and a way to add walking ease: Pattern Magic's knot design (from the first book).

I loosely followed the instructions for the knot dress but placed the knot half-way down on the left front dart. Because the dress will have a back zipper, the skirt had to have a center back seam and that is in fact the only full-length seam. 

I tried it out in some fabric which was left over from a skirt for my sister years ago. On me, the hem looked much more even but at least you can kind of see the effect like this. The knot creates random pleating at hip level which wraps to the back a little bit. There's a fairly deep pleat belong it which will allow me to walk without any trouble. 
Does it work? I've decided to go with it.

I have cut the fabric this afternoon: corselette pieces, bolero and skirt. 

A bit to my surprise, I only used about half of my fabric for the skirt and bolero (which have only one pattern piece each. I didn't plan for that, but I rather like it). So I certainly don't have to worry about having enough fabric for the draping on the bodice. 
Just to clarify: Because the skirt is asymmetric, I'm cutting in a single layer and I traced the sides of the skirt on different pieces of paper but the open space between the straight edge is actually part of the pleat.

I hope I'll get some of the real sewing done tomorrow.


October 4, 2014

That's the POINT...

It may be October, but this past week felt much more like summer than autumn. E and I even had lunch outside today...
Nevertheless, the sewing I've done this week has been autumn-y: Long sleeves!

May I present my new top?

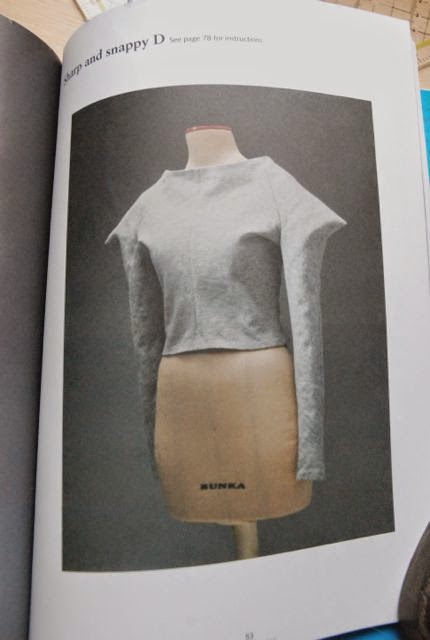
It's "Sharp and Snappy D" from Pattern Magic 3 Stretch Fabrics.
I always thought it would be one of the more wearable designs in the book, even though I haven't seen many versions of it on other blogs.
As usual, I used my own sloper-for-jersey instead of the pattern which comes with the book. And I chose a length which I find comfortable and practical. For the rest, I basically just drafted the top according to the instructions. The was one thing I didn't agree with: The use of the same pieces for front and back. The book has you use the same armscyes and necklines on all pieces. I adjusted the armscye on the back bodice, kept the sleeve the same after considering and measuring it and kept the back neckline a bit higher than the front. After trying the top on, I cut the front neckline a bit lower yet. Oh, and then I finished the neckline with a band rather than turning it in. My fabric has no vertical stretch, so some parts of the neckline wouldn't have liked that treatment.

I made this top rather quickly because I wanted to test the fabric. I had found it on the market for only 1 euro a meter and bought 5 meters because, hey, it's black cotton jersey. However, I had had some bad experience earlier this year with cotton-jersey-from-super-sale. I bought both an off-white and an orange/red variety which turned out to have no recovery at all. So, I thought I would test this fabric straight away, by making something from it and buy more if I liked the way it behaved (because you can never have too much good quality, cheap, black cotton jersey...).

I am quite happy with the fabric. It has some bulk to it and no vertical stretch so I wouldn't be suitable for every type of project (twist designs not recommended) but it would serve really well for a lot of others. It works really well for this top because it has enough body to make those points stand out (unfortunately, E took these detail pictures with the black bean bag behind me. Still, I hope you can see the sleeve shape like this). 
However, more people must think like me because on the next market day, they were all out of this fabric... Oh well, I still have about 3.5 meters left...

I like the top. It's a bit crazy but not too much so for me. And I did actually need some nice long sleeve tops for when the weather cools down...

March 30, 2014

It's a kind of magic...

Pattern magic, that is.

I think this top will look familiar to those of you who know the third Pattern Magic book, Pattern Magic: Stretch Fabrics. It's based on the design on the cover: Straight lines and curves A.

Obviously, I didn't make it entirely as it's shown in the book. I used my own knit sloper and I really didn't think that the cropped design would be very practical in  wardrobe. 

This design is all about creating shapes in knit fabric by stretching some parts to others. In this case, you draw curvy lines on the top edges of the the front and back pattern pieces and sew them to a straight strip of fabric over the shoulder line which you stretch to fit the curves. 
The fabric I used is a navy coloured rib knit, I thought that would work well for the stretching.

It's a bit of a different look for me, with the prominent shoulders. On the other hand, it kind of reminds me of more regular puffy sleeve designs. Just different.
I originally made this top to go with my most recent pair of jeans but the proportions don't quite work with those. Fortunately, they will work with other things in my wardrobe.

It was nice to try another bit of Pattern Magic. This was actually a very simple trick which creates quite a dramatic result in a stretch fabric. The book also contains a Straight lines and curves B but I'm not such a fan of that design (a loose fitting top with bulges at the shoulder blades). However, I could try and come up with some variations of my own.

November 18, 2013

Making Pattern Magic

These past two Sundays, I've been teaching Pattern Magic at iFabrica in Amsterdam.

As I announced before, it was a two day course. Participants had to have some sewing experience and it was my aim to let them get to grips with Pattern Magic. I've heard so often (both online and in real life) from people who own and admire the books, but are too intimidated or puzzled to make anything from them. That was the main thing I wanted to tackle in this course. 
Judging from the reactions I got, I think that worked.

Both of the ladies who signed up for this course, and both ladies from iFabrica who took part as well, were, nice enthusiastic people who wanted to be able to incorporate Pattern Magic designs into their sewing. 

On the first day, we made slopers (not the Bunka block. I don't think a waist-length sloper is very practical on its own) via a shortcut. My regular pattern making book contains slopers in standard sizes on tracing sheets. We used those and altered them to fit each individual. Much faster than drafting from scratch. 

Because the group was small, dividing attention was not a problem. So, everyone could pick their own project to work on. Drafting those started on the first day and continued yesterday. The was not enough time for finished products but everyone's patterns were finished and tested so I have no doubts those will become great garments.

I've thoroughly enjoyed the experience, and I hope that counts for everyone. 
I've got another course coming up next month. It's one day and it's about upcycling and making bags and you can still sign up.  

May 7, 2013

Flip turn

Those of you who follow the Me-Made-May 2013 Flickr Pool may have seen this already, but I thought it did deserve a post of its own as well.

It is a new t-shirt in marl grey rib knit. 

I used the "flip turn for a draped effect" design from Pattern Magic 2. Although it doesn't get a big picture in the book, it is probably one of its most popular designs. Which is why I hesitated about making it at first. But it's also one of the most wearable designs and ideal for a fabric like rib knit which looks the same on both sides (for the un-Pattern Magic-initiated: in this particular kind of twist, one piece is folded over so the wrong side of the fabric ends up on the outside of the garment). 

As usual, I used my own knit sloper instead of the Bunka block. I also wanted to make sure my version would be clearly asymmetrical, not hesitantly so, like it seems in the book. And I decided to bind the neckline by serging on a strip of fabric. To do this, I sewed the shoulder seams first, then applied the neck band and only then I proceded to assemble the front with the flip turn. 

I think it makes for a nice top which I will wear a lot.

February 20, 2012

Once more - the curve collar

Several people asked me for a close-up of the Pattern Magic curve collar. I should have thought about that. Not everyone reading this blog actually has those books...

Today, I took some pictures of the shirt on the dress form.


February 15, 2012

Pattern Magic - the curve collar shirt

Well, here it is. I made a shirt with the curved collar from Pattern Magic 1.
In fact, this is a fairly easy little project, but I'll try to show you a bit of the construction because, if you're used to sewing regular shirt collars, it is a bit counter-intuitive at times.
I tried to take pictures to clarify the steps but it is really hard to take clear pictures of sewing-in-progress by lamp-light. So please, let me know whether or not this actually helps.

First of all, it may not have been clearly on display in my previous post about this shirt, but this is the actual pattern piece for the collar.

This is my version, which includes a 1 cm seam allowance. I normally use 1.5 cm, but I really recommend going for less here because these seams will all end up inside the collar and it will be much easier to manipulate its curves and angles with a smaller seam allowance. Just remember to match this 1 cm seam allowance on the collar edges of the bodice and on the neckline of the facing. And, as I mentioned before, you really need a facing for the front and back.
I cut the collar with the larger piece, the actual collar, on the fold and used a light fusible interfacing.

When sewing the shirt, the first step is to sew and finish the shoulder seams on the bodice and facing and, if you make a shirt like mine, sew the back pleat.
Then, close the center back seam on the curve-bit of the collar and press open.

Then, pin and sew the 'gap' which exists now. To do this, you pin the center back seam to the center back of the collar piece and sew from point to point (I marked those points with a little hole on my pattern piece and with chalk on
the fabric) like a double ended dart.

After that, sew the front edges for the collar by folding it right sides together (I marked the middle of the collar piece, where you should fold it, with a notch) and sewing it down. Make sure not to sew down the seam allowance at the edge.

That's the prep work on the collar done. Now, it's time to start attaching it.

First step is to sew the point-bit of the collar pieces curve bit to the point at the front bodice. This is exactly where you took it out in the pattern making stage. Refer back to that and it can't go wrong. Just make sure not to sew down to far.

The next step is to sew the collar edge onto to bodice, beginning and ending at the ends of the seams you've made in the previous step. This should give you neat little corners on the front bodice.

Now, sew the facing to the collar neckline (the curvey bit) and along the front opening.
With that, the construction is basically done. Pattern Magic tells you to stitch parts of the collar to facing by hand. I opted for stitching in the ditch (not all the way round. Just a couple of cm at the front points and along the center back) instead, which so far seems to work just fine.

To add some details about my shirt, the fabric is a cream coloured, fairly soft cotton. I don't normally go for this kind of embroidery decoration but I bought it, once more, on crazy sale at the market, so I figured I could always use it for muslins. As it turned out, I actually like it.
As mentioned in my previous post, I made a center back pleat which I closed from the waist down so the shirt can be tucked in neatly. I added very simple plain three quarter length sleeves, on a natural shoulderline. After some consideration, I added one chest pocket. With that it's not just about the collar.

When I wore this outfit to take a picture, my boyfriend came in. He first said he liked the look. Only then, he asked: 'is the collar supposed to stand up like that?' Of course, I said yes and he said it was nice, but the point is this: it is both a very strange and a very subtle detail. Just how I like it.

February 5, 2012

Curve-collar shirt - a start

Once again, I've sort of promised you something of which I wasn't quite sure how to do it. And then, I didn't get to it in the time I said I would. I know: What else is new?
Luckily for me, I didn't promise a how-to (mainly for reasons of copyright. if you want to know how to draft that collar, you'll have to buy or borrow Pattern Magic 1).

So, here's my not-a-how-to of the pattern for my design including Pattern Magic 1's curved collar.

I started out with the pattern I made for my little silk shirt which, at least in my mind, is a pretty basic semi-fitted shirt (if it got a tiny bit snug in the bust in its silk incarnation, that's because of those pintucks).
I kept the bust dart and folded the front pattern piece at the center front line. From there, I followed the instructions for the collar as they are explained in the book.
At the back, I decided not to use the waist dart. I also added 6 cm all along the center back (which was already meant to be cut on the fold) for the back pleat. If I decide to have it stitched up from the waist down, I may still remove the extra fabric below that point. But for now, I keep the options open. Here as at the front, I just followed the book's instructions for that neckline.

After following the directions for the collar itself and adding a simple, straight threequarter length sleeve, these are my finished pattern pieces:

What you may not realise if you use Pattern Magic in Japanese, is that you will need a front and back facing which reach up to the actual neckline of the garment (so, the inner neckline of the curved bit, not the 'neckline' on the bodice pieces).
Now, I've cut these pieces from my fabric. I've placed the center back of the collar itself (and not the curved bit) at the fold, so I'll let you know whether or not that was a good decision. I intend to use a lightweight interfacing on the collar and facing.

I'm going to start sewing now. I'll be back with an update as soon as I have anything to tell.

January 17, 2012

Pattern Magic collars

When posting about my sewing plans for 2012, I mentioned wanting to make more garments with Pattern Magic details. Although I won't have much time for sewing this week, I want to make a careful little start on this.

What I want to start with, are shirts with the nice, unusual collar designs from Pattern Magic 1. I've seen the double collar on a blog once, and the curve collar never. This may be because, like Carolyn (link goes to her blog, I can't find the specific post) mentioned, these projects describe the collars only, not full garments. It's not hard to incorporate them in any old shirt pattern though. Or indeed, to draft one using a sloper. Which is what I'll be doing.

These are the designs I have in mind. For both collars, I tried to come up with blouses which, in my opinion, suit their shape and style.

There's something soft and rather Japanese about the curve collar. Which is why I think it will go well with a fairly loose fitting body with three quarter length sleeves (either straight or with some fullness lightly gathered at the bottom). I added a back pleat simply because I like to do something at the back as well. This particular kind of back pleat (stitched up at the bottom) is a common feature in 1930's clothes and will look well with the shirt tucked in. Obviously, the bottom of the pleat could be left open for a more flared shape.

The double collar vaguely reminds me of those rigid Edwardian stock collars. Because of that, I saw it immediately with a fitted and detailed kind of shirt. So: armhole princess seams and a pleated lower back panel. Long sleeves with french cuffs. If you want to go for a real Victorian inspired look, you could make leg-o-mutton sleeves, but I won't this time.

I am going to make both of these shirts. If anyone would like to make something similar, I'm happy to share the drafting process here on my blog. I'm not going to make this a sew-along, so you don't have to want to make this right now. Also, I'm not going to show how to do the collars exactly because I think that might a violation of the Pattern Magic copyright. So, it's basically for anyone who has the Pattern Magic book but doesn't get around to making a 'detail' project like this.
If you're interested, just say so in the comments and tell me which shirt you'd like to see/try first.