You know I draft most of the patterns for just about anything I make. And you know I'm fond of special pattern making tricks, like those in the Pattern Magic books. And of 'object' garments (like this Burdastyle cardigan, these retro designs from Studio Faro and several of my own creations, some of which I made tutorials for which are in the list on the right of this page).
Well, I often combine all those likes and loves and experiment. Especially if I have just found a lot of appropriate fabric, cheaply. In this case, I was already eyeing up the tweed-y knit I used for E's cardigan. I could make something like a knitted 1950's suit from that stuff. Or a dress.
And then, I suddenly decided to make this:
I've always loved the neckline/collar thing you get in Pattern Magic's "Wearing a square" and in the those 'object' retro tops... What if I tried to combine that with normal pattern making for jersey fabrics? I had considered a design like this before but at that time, I didn't want to risk it because I couldn't figure out how to make sure it wouldn't be too confining for arm movement.
This time, I decided to just go for it and worry about practicality later.
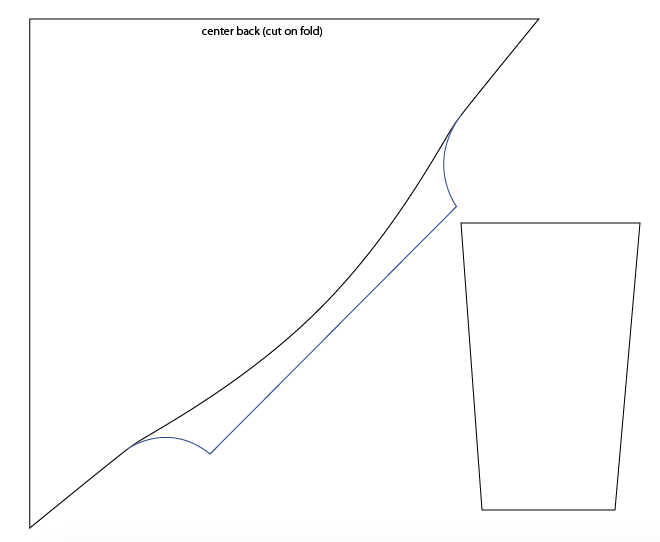
These are the bodice pattern pieces (none of these drawings are to scale).
And this is the dress. It came out looking (even) more 1950's than I had expected. Not that I'm complaining though.
These are not the prettiest pictures. Most days are pretty glum and cloudy these past weeks and I had been wearing the dress for more than a day before it was light enough for photographs (that and the high heels are why the back looks so folded). However, they're good enough to do what I really needed from them: Just show the dress.
And of course, arm room is an issue. This is as far as it will go without seriously pulling the whole dress up.
It doesn't make the dress completely unwearable but it leaves considerable room for improvement.
There are several options for change, depending on where I want to go with the design.
- It would be possible to cut an armscye in the one-piece bodice and use a more normal sleeve. In that case, it would make sense to also adapt the bodice under the sleeve and make it more of a normal bodice and less of an object there. I've drawn this particular sleeve with a point because I think that would work well with the shape of the collar. All this would make the whole look more 1950's and less Japanese.
- Another option would be to make the 'object' bodice larger on all sides and mount it over a fitted lining of a thinner fabric (lycra, for example). In that way it would blouse over the sleeves and skirt which should allow for a wider range of movement. This would emphasize the free-form look.
- Related to the previous option, I could also treat the entire 'object' bodice as a capelet instead of a bodice. Again, over a thin and smooth lining, probably connected at the shoulders. Depending on the proportions and the styling of the skirt, this could look either Pattern Magic-esk or almost 1930's.
- Going back to the basic shape the dress has now, the least invasive thing to do to it would be to insert underarm gussets. This would work and it would still look fairly 1950's. I just really don't like the mess of seams you'd get at the sides.
- Of course, with this shape of the bodice, the arm-room issue could also be solved by adding room at the top of the arm and shifting the sleeve up. That would mean making a shoulder seam and flaring it up from the shoulder point (the long red line in the picture would be the seam, the small wedge would have to be added to each side, but I thought adding two might make the drawing more confusing). It would work but these seams would meet in a single point at the back of the neck. Which doesn't work with the cut-on facing I've been using and I don't really like that look anyway.
- Building on the idea of adding room at the top of the arm, I could consider adding a gusset there.
- And because that would mean attaching the sleeve to the area where the gusset is, wouldn't it be better to integrate those two?
- And because the sleeve is closely fitted, it might be better to shape both pieces so they can be made to properly encircle the arm.
I had some other ideas somewhere along the line, like one involving a side panel for the the bodice which would extend into the underarm gusset, but I think these were the main ones. I think I like the first and last idea best, depending on how vintage or modern I want the end result to look.
Oh, and there is one other, important alteration which I am considering for those styles which should not look very 1950's: In the design sketch, the diamond shape of the 'object' bodice is much more pronounced than in the actual dress. I would like to be able to make my creation look like that.
It doesn't because I've mixed pattern shapes for loose, free-hanging shapes with pieces of a fitted design.
If I want the dress to look like the drawing, I should make an alteration like this, which will add extra material to follow the skirt to my sides. And of course, any alteration I make to the shoulder (apart from those where I also want to change the bodice under the arm) can than be applied to this shape.
I haven't made any of these alterations yet, but I'm sure I'll try my favorites. And I thought you might like this little look into how my mind works with these things.