In the previous post, I promised to show you what the "pattern" for my dress looks like. And here it is (as usual, the drawing is not to scale):
As you can see, the pattern is perfectly symmetrical.
I started with two pieces of fabric which were 140 cm wide and 3 meters long.
I used my favorite shirtwaist bodice in which all the dart width at the back has been converted into those pleats under the back yoke. On the front bodice, I combined the waist and bust darts into a single French dart. The front bodice piece is drafted to extend 2 cm beyond center front, to create an overlap for the button closure. In the subtraction pattern, left and right front bodice are placed edge tot edge (with added seam allowance, of course) and then cut.
To make that work, I added extra width to the circle just below the waistline (not in the picture). 6 cm to be precise, the 2 cm for the overlap and 1 cm seam allowance, both times 2.
I managed to cut out the facing pieces from the cut-out fabric around the bodice but used an extra bit of fabric (in fact, the 40 cm bit I cut off at the bottom) for the collar and sleeves.
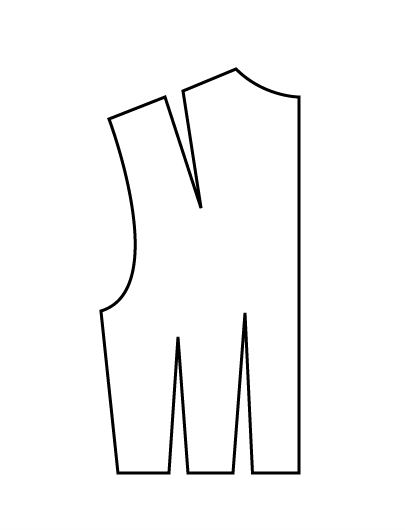
As you can see, I cut out the bodice pieces with sharp angles to the "side seam". In the small scale dresses, I preferred the look of that. Waist definition.
It did mean I had to treat those points with care. I fused small circles of lightweight fusible interfacing to them, then sewed the seams and cut to the seamline. At least, that is what I did on the right side. On the left, I put in an invisible zipper.
When I first tried the dress on, I was disappointed to find the bottom loop around my shins. I considered partially sewing it to the waistline but I didn't do that in the end. Instead, when I put the dress on, I make sure my body passes through that loop first and then through the "top" one. The top loop can't sag down because it is connected to the front waistline. So, it keeps up the other one between waist and hip. This adds to the skirt volume at the sides, which I really like.
To me, this dress is much more wearable than my first attempt (the brown-and-stripes one in this post), which was more of a "normal" subtraction cut dress. In fact, this one goes a bit against the spirit of the subtraction cutting technique. I used small scale experiments to take out the risk of experimentation and I made the bodice using normal pattern making techniques. I is what works for me though.
I think I will enjoy wearing this dress although the amount for fabric means it is not really an every day kind of thing. I would also like to continue experimenting with this technique and I think I will go on to do so in my way, with scale experiments and added normal pattern making.
Showing posts with label pattern. Show all posts
July 23, 2020
June 3, 2020
The action back
Fitted bodices can really limit your range of movement. Of course, that can be down to a fitting issue but not necessarily. Some styles are just inherently restrictive (just ask anyone in a tailored jacket to hold out his/her arms out to the side at a right angle to the body). Perfect, individualized fitting can make the most of any style but that is a difficult job (one I should try and tackle once I'm fairly certain my shoulders will stay the same shape for a while).
Styles which allow for a great range of movement are traditionally wider and more casual in look. I say traditionally because a lot of that job is done nowadays by elastane.
The pattern adjustment I used for my dress and jumpsuit is intended for fabrics without stretch. In fact, it is kind of like the "action back" on some casual jackets (for men as well as for women) from the 1940's. The adjustment adds room for movement but confines it in the general, fitted shape of the design.
It is easy to make using a sloper or a tried-and-tested pattern for a fitted bodice with sleeves (as ever, my drawings are not to scale)
Your pattern will need a waist seam to make this adjustment possible. If your sloper doesn't have a waist seam, just cut it at the waistline.
Draw a line for the back yoke. My sloper has fairly long shoulder darts so my line crosses the shoulder dart. The line should be between a third and half the height of the arm scye when measured from the top.
Trace the yoke pieces fit them together. Here you can see that my drawing isn't very good. There shouldn't be a big dent in the shoulder line (there will probably be a small one. If there is, just keep it).
Clean up the shape of the yoke. It will end up with a slightly curved bottom edge.
Draw lines from the tops of the waist darts (or dart, if the pattern you are using has only one) to the bottom of the shoulder dart. If you had a shorter shoulder dart, draw the lines to the point on the yoke line under were it ends.
Cut the lines and close the darts. This will transfer all the width from the darts to that one point on the yoke.
Mark the edges of the pleat.
Add seam allowance to the pattern pieces if you like. Both pieces should be cut with center back on the fold.
Fold the pleats closed before sewing the lower bodice to the yoke.
I usually cut the yoke piece twice. I use one as a lining and sew the yoke seam and shoulder seams so that all seam allowances will be encased between outside and lining.
May 4, 2020
Make your own 1950's style t-shirt!
Do you like 1950's style cardigans, sweaters and the occasional t-shirt (those were not commonly used in ladies' wear yet)? Designs like this one?
Well, I do. Unfortunately, this is one of those styles which seems hard to translate to the present day. I have tried some original knitting patterns but the result was always disappointing. They are often a bit too short for me but what is worse, even if they're not, they won't sit well. The part from the waist down is usually knitted as a straight bit of rib knit. This means that although it will stretch over the high hip, it just creeps up.
And it seems like such a nice day-to-day style, you know, to be worn without all the period accurate shape wear...
So, I did what I usually do. I tried to make a pattern to get the result I wanted. I took a bit of experimentation but I ended up with something I really like (the dummy doesn't do them justice...). The first two were made in winter, I used a fairly warm knit and gave them a nice high turtle neck. When the weather got warmer, I tried thinner fabrics and a different neckline (and different sleeve length, of course). And that neckline became my absolute favorite.
If you have a tried-and-tested t-shirt pattern, making this pattern won't be difficult. However, it may require a bit of to get it exactly right for you. After all body proportions vary, as does posture and then we haven't even mentioned preferences.
I'll give you the pattern instructions in this post and I'll come back tomorrow with some extra information about fabric and construction.
Oh, and one more thing: my pattern pictures are not to scale. Proportions can be a bit off, in this case, they are on the sleeve. And unless I write otherwise, they are without seam or hem allowance.
All right. You should start with your tried-and-tested pattern. Preferably one with a marked waistline which is right for you and no darts. If yours has very straight bodice pieces, you may want to try your t-shirt on and check the fit at the waist, you might want to take the pattern in at the waistline to get a shape a bit like this.
Now, if you are trying on the t-shirt anyway, have a careful look at the neckline. Does it sit perfectly or does it pull back it bit? Slightly gaping at the back neck while it sits high against your throat? It that is the case, you will need to make an alteration or my high, straight neckline will quite uncomfortable.
Put the pieces together at the shoulder line and draw a new shoulder line, mine was 1.5 cm to the front. Move center front and back as well and draw the new neckline (don't worry about getting it perfect, it won't be used in the end result).
Separate the pieces again mark a point 2 cm outside the under arm point (the point on the bodice where the armscye meets the side seam. If your pattern has quite narrow sleeves which pull into the armpits a bit, you may also want to drop this point by 1 or 2 cm.
Also mark a point 1 cm above and 1.5 cm out from the shoulder point. Draw the new shoulder lines like the blue ones in the picture.
Draw a new armscye. It should not cross the old one.
Now, slash both pattern pieces at the waistline and open up by 3 cm. Draw your new side seam from the under arm point to the lower waistline.
Draw the bottom edge of the shirt. Mine is usually about 10 cm below the waistline but this is based on your preference. I also keep the bottom edge as straight as possible because I love to use fabrics with stripes for this design.
You can use the pattern like this if you prefer your usual neckline To get my favorite neckline, there is one more step:
Mark a point about half way on the shoulder line and draw a straight line from that point to center front and back. You want this line to be the same length on both front and back.
This neckline should be made with a cut-on facing. You make this by mirroring 4 cm over the line you just drew.
And now, you still need a sleeve pattern. The upper bodice is fairly loose fitting and so is the sleeve. This means you can get away with drafting a very easy pattern:
Draw a vertical line about as long as you want your sleeve to be. Square across at 9 cm below the top.
Measure the front and back armscye are draw diagonal lines from the top of the vertical line to the horizontal one with those measurements.
Draw in the sleeve head. At the front, it should cross the help line at about 1/3, at the back at about 1/2. Measure the sleeve head and remove any excess length at the edges.
Draw the side seams, you'll want these to be fairly tapered.
Your pattern is now finished. Add seam and hem allowances to your preference.
Well, I do. Unfortunately, this is one of those styles which seems hard to translate to the present day. I have tried some original knitting patterns but the result was always disappointing. They are often a bit too short for me but what is worse, even if they're not, they won't sit well. The part from the waist down is usually knitted as a straight bit of rib knit. This means that although it will stretch over the high hip, it just creeps up.
And it seems like such a nice day-to-day style, you know, to be worn without all the period accurate shape wear...
So, I did what I usually do. I tried to make a pattern to get the result I wanted. I took a bit of experimentation but I ended up with something I really like (the dummy doesn't do them justice...). The first two were made in winter, I used a fairly warm knit and gave them a nice high turtle neck. When the weather got warmer, I tried thinner fabrics and a different neckline (and different sleeve length, of course). And that neckline became my absolute favorite.
If you have a tried-and-tested t-shirt pattern, making this pattern won't be difficult. However, it may require a bit of to get it exactly right for you. After all body proportions vary, as does posture and then we haven't even mentioned preferences.
I'll give you the pattern instructions in this post and I'll come back tomorrow with some extra information about fabric and construction.
Oh, and one more thing: my pattern pictures are not to scale. Proportions can be a bit off, in this case, they are on the sleeve. And unless I write otherwise, they are without seam or hem allowance.
All right. You should start with your tried-and-tested pattern. Preferably one with a marked waistline which is right for you and no darts. If yours has very straight bodice pieces, you may want to try your t-shirt on and check the fit at the waist, you might want to take the pattern in at the waistline to get a shape a bit like this.
Now, if you are trying on the t-shirt anyway, have a careful look at the neckline. Does it sit perfectly or does it pull back it bit? Slightly gaping at the back neck while it sits high against your throat? It that is the case, you will need to make an alteration or my high, straight neckline will quite uncomfortable.
Separate the pieces again mark a point 2 cm outside the under arm point (the point on the bodice where the armscye meets the side seam. If your pattern has quite narrow sleeves which pull into the armpits a bit, you may also want to drop this point by 1 or 2 cm.
Also mark a point 1 cm above and 1.5 cm out from the shoulder point. Draw the new shoulder lines like the blue ones in the picture.
Draw a new armscye. It should not cross the old one.
Now, slash both pattern pieces at the waistline and open up by 3 cm. Draw your new side seam from the under arm point to the lower waistline.
Draw the bottom edge of the shirt. Mine is usually about 10 cm below the waistline but this is based on your preference. I also keep the bottom edge as straight as possible because I love to use fabrics with stripes for this design.
You can use the pattern like this if you prefer your usual neckline To get my favorite neckline, there is one more step:
Mark a point about half way on the shoulder line and draw a straight line from that point to center front and back. You want this line to be the same length on both front and back.
This neckline should be made with a cut-on facing. You make this by mirroring 4 cm over the line you just drew.
And now, you still need a sleeve pattern. The upper bodice is fairly loose fitting and so is the sleeve. This means you can get away with drafting a very easy pattern:
Draw a vertical line about as long as you want your sleeve to be. Square across at 9 cm below the top.
Measure the front and back armscye are draw diagonal lines from the top of the vertical line to the horizontal one with those measurements.
Draw in the sleeve head. At the front, it should cross the help line at about 1/3, at the back at about 1/2. Measure the sleeve head and remove any excess length at the edges.
Draw the side seams, you'll want these to be fairly tapered.
Your pattern is now finished. Add seam and hem allowances to your preference.
December 5, 2016
Life and sewing
There's no point in denying it anymore: I just really don't have the kind of time and energy for sewing and blogging that I used to. Between work and climbing, there is just not that much left over. I tried to deny it for months, occasionally blaming myself for not sewing or blogging in the evenings I was at home.
I'm not going to do that anymore. I love sewing and I love this blog but there are just 24 hours in a day and sometimes, I'm just tired.
I'll just have to change the way I plan my sewing projects. Plan them in way many of you probably always have. Just make simple things when I'm busy or prepare for a well-considered bigger project in the weekend and keep working on it in short little installments during the week.
I started with the first option last weekend. I finally tried out Studio Faro's Kimono Twist Dress. Basically, it is just a variation on the kind of twist I have often used before but I thought it looked quite elegant from the first time I saw it.
As usual, I didn't quite follow all the instructions. Those are for a dress in a woven fabric with a soft hand, with the twist at the high hip. I'm old-fashioned and I like the narrowest point of a dress to be at the narrowest point of me, so I put the twist at the waistline. I also made the dress in jersey so I used my sloper for fitted knitwear.
I also kept the pattern in two pieces. Much more economical in its use of fabric.
I thought it was an easy pattern to draft but I was a bit nervous about the end result. In the original instructions, it is described as "a little daring, showing lots of leg and décolletage". That twist is the only thing holding the dress together at center front.
My fears were justified. I will take pictures later this week. The dress covers enough if you are standing perfectly still but move around in it and it gets a bit too revealing. I'm not feeling to bad about it though. It will serve me well as a light robe and working on this helped me develop other ideas.
More about those and pictures of the dress soon!
April 12, 2016
Bits of fabric
Just a quick question: Tomorrow, I hope I will have time to get started on this blouse.
That yoke looks ideal to use up an odd little off-cut I was given when buying fabric at one of my usual places last summer.
One of these, to be precise, on black. Both are too small to be used on their own but seem big enough for the yoke, collar and cuffs of this blouse.
So, the question is: Which one would you like to see?
April 7, 2016
1950's blouses
A big "thank you" to those of you who replied to my previous post! And if you didn't but would like to weigh in after all, please do. I read all comments, also those on older posts.
I am glad I asked because your answers actually surprised me. Both on the Pinterest board of the Vintage Sewing Pattern Pledge and on We Sew Retro, I see so many dresses compared to anything else, I assumed you would all refer those. Instead, the votes were clearly in favour of separates and hats. I promise I'll look for a hat pattern in the coming two months (probably a 1930's one...) but today, I have a blouse from the 1950's. It is another one of Bella magazine's "draft-as-instructed" projects and this one is actually in my size so I may just try and make myself one next week. Whether or not I do that, I will give you an additional little tutorial about making other collars than this really high and tight one (I'm usually not such a big fan of those myself...)
The blouse comes from Bella magazine nr. 16, August II, 1952 and is for ladies with a bust circumference of 88 cm. The editors of the magazine had this to say about it:
Blouse and skirt are especially popular this year and now that the summer is getting towards its end and lots of suits will be worn again, it seemed right to Bella to dedicate the instructed pattern to this.
The designs depicted here all have cut-on sleeves and a standing collar with rounded fold-back corners. Three of them have yokes which allows for interesting design variations. You can see a nice example with stripes used in different directions and it is easy to imagine other variations on this theme. Something similar can be done in a fabric with a check. To make the yoke, its pattern piece should be separated from the front of the blouse. Depending on the thickness of the fabric you can make the yoke in a double layer or make a 4 cm wide front facing in which you make the buttonholes (either way, I would recommend using a lightweight interfacing at that front edge where you will add buttons and buttonholes). The front of the blouse is stitched onto the yoke. Close side-, sleeve- and shoulder seams and add the cuff of a double layer of fabric to the sleeve edge (this double layer remark makes it sound more complicated than it is. It's a normal cuff which means each one consists of two pieces of fabric). Sew on the interfaced collar, sewing the neckline edge between its layers.
For a more dressy look, you can stitch a pleated strip of fabric in the yoke seam. In this case, the pleated fabric was first basted along the folded-over edge of the yoke which was then stitched onto the front of the blouse. This allows the pleats to fall out. You can also let the pleats fall in by following the order of construction mentioned before. It will look no less lovely (I'm not so sure about that...).
The blouse is also nice in two different fabrics, don't you think? Here you can also see how it can be worn over the skirt with the addition of a knitted waistband. In practice, this will work especially well if you use a wool fabric. Of course, in this case, it is required that you find a perfectly colour match between fabric and yarn.
To make this blouse, you should use the waistline in the drawing as the bottom of the pattern. For the waistband, cast on 170 stitches and knit 2, purl 2 for a chest circumference of 88 cm (they do not mention a needle size or anything. Most 1950's knitting was done on thin needles though. 2.5 is very common). Knit to a height of 10 cm. Stretch the waistband while sewing it on.
Then, the blouse can also be made in its simplest form, without a yoke. In that case, you have to make a front overlap of 2 cm along the entire front edge and add a 4 cm cut-on facing that. A big or small bow looks nice under a standing collar like this.
And if you do not plan on removing the jacket of your suit, you might as well make a dickey instead of a blouse. It would save you on sewing and on fabric and you could even make the back from a cheaper material. The dotted lines form the sides of the dickey. The front and back are connected at the waistline by two pieces of elastic of 15 cm long.
As usual, we didn't mention all the possible variations. So, if you do not quite like any of the options shown here, you can use your imagination to create your own version. Surely, that will give you even more satisfaction!
In this case, it is pretty obvious what each pattern piece is (although just to be sure: the collar is on the left, the cuff on the right).
When drafting the pattern, make the rectangles first and then put in the measurements mentioned along the sides, draw the lines inwards to make the points for the pattern. All measurements are in centimeters and there is no seam allowance included.
Oh, and although the blouse looks quite sleek in the drawings, that is just because it is worn tucked into high waistbands. It has no darts so it is basically a fairly loose-fitting design.
April 1, 2016
A pattern question
There's something I would like to ask you all: What kinds of freebie pattern would you like?
You may or may not remember, but when I took the Vintage Sewing Pattern Pledge this year, I also promised to share six projects from my vintage collection. So far, I translated one "draft-to-instructions" pattern from Bella magazine. In that case, I picked a stylish dress for a larger size: bust 112.
For the next patterns, I would like to ask you what you want: More projects like that one in different sizes? And which sizes? Separates? Accessories like cut-and-sew hats or collars and dickeys? Knitting patterns? Or even something for children (I think I even have a boy's pattern or two)?
Just let me know and I'll see what I can do.
February 20, 2016
Pattern nr. 1
My sewing for the for 2016 Vintage Sewing Pattern Pledge is going nowhere fast... I may have started even before the new pledge was announced but I still haven't found a suitable fabric for that 1920's dress and I didn't start on anything else either.
However, I also promised to share the vintage pattern love by trying to share patterns and projects from my collection. And this is my first attempt at doing just that.
This a a "draft according to this diagram" project from sewing magazine Bella. Back in the day, readers could also order this pattern in two sizes from the magazine's mailorder service.
This particular issue of Bella was the first one for October 1950 (it appeared twice a month). The pattern is a ladies' dress for a bust size of 112 cm.
I think the design is pretty typical for one from Europe in that year: Chique but practical and still fairly modest in its use of fabric.
The A-line skirt with pleats would have been very useful to the average Dutch lady at the time: It is a skirt in which you can easily ride a bicycle!
Although active resistance to the New Look had died out by spring 1949, many women (at least, according to the magazines which wrote for them) were happy with the overall simpler, narrower and shorter lines of the fashions of 1950. And we shouldn't forget that here in the Netherlands (Bella was a Dutch magazine after all) fabric rationing ended in 1950 and when it did, fabric was still very expensive for most people.
In Bella, the "draft it yourself" pattern always came in four different looks with a brief explanation on how to adjust the design for each of them. In this case, the different looks are purely based on fabric choice and trim. But hey, surely we can forgive them for that... The dress has fancy pockets!
The drafting and sewing instructions are pretty limited but I will give a translation of what little there is. As for the pattern, I am including the original diagram.
Here we have a dress which will also dress the less slender lady very well and which can be executed in different ways. The first picture shows you the dress made up in a plain fabric with nice decorative topstitching. The pattern also offers possibilities for the use of a stripe or check in different directions as well as for the use of two different fabrics. We can only give you one example of each of those options but you can imagine the other variations yourself. In the last drawing, the dress is decorated with an embroidered border along the princess seams and the pockets. Of course you could use braid or some other decorative tape for that.
Made up in a plain fabric without nap you will need for this dress, for a bust size of 112 cm, about 3.25 m of 140 cm wide or 5.50 m of 90 cm wide.
If you wish, you could add a seam at the waistline.
Dutch words in the pattern drawing, from left to right, with my descriptions per pattern piece:
The pattern piece in the top left corner is the center front of the bodice, with the lapel cut on. the fold line is for the lapel. If it is cut along the dotted line labeled "beleg" it forms the facing for that lapel. There is a notch on the lapel which shows where it should meet the collar.
vouw = fold
beleg = facing
m.v. = c.f. (short for center front)
the bottom left piece is the center front skirt. It has a full, waist-to-hem length in the middle but the pocket shape is cut away at its side. The pattern piece also contains a quarter of the front side pleat.
middenvoor = center front
plooi = pleat
On the top row, second from the left, there is the side front bodice piece which includes the pocket. The pattern doesn't include separate pocket pieces but they are drawn in here: I think you should only use the outside shape for the front side bodice and draw those two curved pocket pieces separately.
voorzijpand = front side pattern piece
zak = pocket
Below it, there is the front side skirt, which included three quarters of the pleat.
voorzijbaan = front side gore
Then there is the sleeve. It is a shaped sleeve with two elbow darts and markings which suggest that the sleeve head has to be eased in. There is also a notch to indicate where the cuff opening should go.
mouw = sleeve
Below that, there are two small pieces. The top one is the cuff. As you can see in the pictures, the finished cuff should have the points sticking out.
manchet = cuff
Then, there is the collar. There is a notch which should match the notch on the lapel. Don't be tempted to draw a sharp corner on the bottom edge of the collar. This a not a shirt collar but a notched collar in a slightly simplified version. It's a curve.
kraag = collar
The next piece is the side back. This is a full-length piece although you could follow the suggestion in the text and make a waist seam. This pattern piece includes a quarter of the back pleat.
achterzijbaan = back side gore
And then, finally, there is the center back piece with three quarters of the pleat.
middenachter = center back
And, as mentioned before, the pattern is for the size which (according to Bella) corresponds with a bust measurement of 112 cm. All numbers are for measurements in centimeters. In those cases where there is a number inside and one outside the black rectangle, the one on the outside refers to the distance down from the top corner, the one of the inside to the amount of centimeters inwards from that height.
Take care about marks like the notches and the X-s on the lines where the pleats meet the skirt.
Oh, and there is no seam allowance included. It is not mentioned anywhere, but I am pretty sure you should cut both the center back piece and the center front skirt on the fold.
And there is a little bit of instruction about construction (italics for translated text, normal letters for notes from me...):
You connect (which I think just means sew) the pleats and put X on X. With the pleats falling to the inside, sew together the back pieces.
You sew to facing to the center front piece and make the buttonhole. You attach the pocket pieces (you could also make it as one piece) and stitch them onto the hip piece. Between the pocket and the edge of the hip piece, there should be an edge of 2.5 cm wide (not counting seam allowance) The front side bodice is then attached to the center front bodice and the skirt (which suggests you should already have sewn the seam inside the pleat, put the pleat in place by matching those X's and sewn the center front waist seam).
Close side and shoulder seams (although I really think you will need something like a side zipper because that front opening is only in the bodice).
The sleeve gets to elbow darts which take up 3 cm of fabric each. The bottom is sandwiched between the two sides of the cuff, starting at the notch. When inserting the sleeve into the bodice, ease in the sleeve head.
Sandwich the neckline edge between the two halves of the collar (I am translating literally here but I suggest you deal with this "sandwiching" business by simply sewing on the outside cuff or collar to the sleeve or neckline and then pressing in the seam allowance on the inside pieces and then sewing those in place by hand)
The belt is 104 by 4 cm. It is highly recommended not to add too thick a shoulder pad.
I know this is not really a simple project to make from such limited information but if you have experience making dresses and collars and cuffs, it is possible. And if you do, please let me know!
However, I also promised to share the vintage pattern love by trying to share patterns and projects from my collection. And this is my first attempt at doing just that.
This a a "draft according to this diagram" project from sewing magazine Bella. Back in the day, readers could also order this pattern in two sizes from the magazine's mailorder service.
This particular issue of Bella was the first one for October 1950 (it appeared twice a month). The pattern is a ladies' dress for a bust size of 112 cm.
I think the design is pretty typical for one from Europe in that year: Chique but practical and still fairly modest in its use of fabric.
The A-line skirt with pleats would have been very useful to the average Dutch lady at the time: It is a skirt in which you can easily ride a bicycle!
Although active resistance to the New Look had died out by spring 1949, many women (at least, according to the magazines which wrote for them) were happy with the overall simpler, narrower and shorter lines of the fashions of 1950. And we shouldn't forget that here in the Netherlands (Bella was a Dutch magazine after all) fabric rationing ended in 1950 and when it did, fabric was still very expensive for most people.
In Bella, the "draft it yourself" pattern always came in four different looks with a brief explanation on how to adjust the design for each of them. In this case, the different looks are purely based on fabric choice and trim. But hey, surely we can forgive them for that... The dress has fancy pockets!
The drafting and sewing instructions are pretty limited but I will give a translation of what little there is. As for the pattern, I am including the original diagram.
Here we have a dress which will also dress the less slender lady very well and which can be executed in different ways. The first picture shows you the dress made up in a plain fabric with nice decorative topstitching. The pattern also offers possibilities for the use of a stripe or check in different directions as well as for the use of two different fabrics. We can only give you one example of each of those options but you can imagine the other variations yourself. In the last drawing, the dress is decorated with an embroidered border along the princess seams and the pockets. Of course you could use braid or some other decorative tape for that.
Made up in a plain fabric without nap you will need for this dress, for a bust size of 112 cm, about 3.25 m of 140 cm wide or 5.50 m of 90 cm wide.
If you wish, you could add a seam at the waistline.
The pattern piece in the top left corner is the center front of the bodice, with the lapel cut on. the fold line is for the lapel. If it is cut along the dotted line labeled "beleg" it forms the facing for that lapel. There is a notch on the lapel which shows where it should meet the collar.
vouw = fold
beleg = facing
m.v. = c.f. (short for center front)
the bottom left piece is the center front skirt. It has a full, waist-to-hem length in the middle but the pocket shape is cut away at its side. The pattern piece also contains a quarter of the front side pleat.
middenvoor = center front
plooi = pleat
On the top row, second from the left, there is the side front bodice piece which includes the pocket. The pattern doesn't include separate pocket pieces but they are drawn in here: I think you should only use the outside shape for the front side bodice and draw those two curved pocket pieces separately.
voorzijpand = front side pattern piece
zak = pocket
Below it, there is the front side skirt, which included three quarters of the pleat.
voorzijbaan = front side gore
Then there is the sleeve. It is a shaped sleeve with two elbow darts and markings which suggest that the sleeve head has to be eased in. There is also a notch to indicate where the cuff opening should go.
mouw = sleeve
Below that, there are two small pieces. The top one is the cuff. As you can see in the pictures, the finished cuff should have the points sticking out.
manchet = cuff
Then, there is the collar. There is a notch which should match the notch on the lapel. Don't be tempted to draw a sharp corner on the bottom edge of the collar. This a not a shirt collar but a notched collar in a slightly simplified version. It's a curve.
kraag = collar
The next piece is the side back. This is a full-length piece although you could follow the suggestion in the text and make a waist seam. This pattern piece includes a quarter of the back pleat.
achterzijbaan = back side gore
And then, finally, there is the center back piece with three quarters of the pleat.
middenachter = center back
And, as mentioned before, the pattern is for the size which (according to Bella) corresponds with a bust measurement of 112 cm. All numbers are for measurements in centimeters. In those cases where there is a number inside and one outside the black rectangle, the one on the outside refers to the distance down from the top corner, the one of the inside to the amount of centimeters inwards from that height.
Take care about marks like the notches and the X-s on the lines where the pleats meet the skirt.
Oh, and there is no seam allowance included. It is not mentioned anywhere, but I am pretty sure you should cut both the center back piece and the center front skirt on the fold.
And there is a little bit of instruction about construction (italics for translated text, normal letters for notes from me...):
You connect (which I think just means sew) the pleats and put X on X. With the pleats falling to the inside, sew together the back pieces.
You sew to facing to the center front piece and make the buttonhole. You attach the pocket pieces (you could also make it as one piece) and stitch them onto the hip piece. Between the pocket and the edge of the hip piece, there should be an edge of 2.5 cm wide (not counting seam allowance) The front side bodice is then attached to the center front bodice and the skirt (which suggests you should already have sewn the seam inside the pleat, put the pleat in place by matching those X's and sewn the center front waist seam).
Close side and shoulder seams (although I really think you will need something like a side zipper because that front opening is only in the bodice).
The sleeve gets to elbow darts which take up 3 cm of fabric each. The bottom is sandwiched between the two sides of the cuff, starting at the notch. When inserting the sleeve into the bodice, ease in the sleeve head.
Sandwich the neckline edge between the two halves of the collar (I am translating literally here but I suggest you deal with this "sandwiching" business by simply sewing on the outside cuff or collar to the sleeve or neckline and then pressing in the seam allowance on the inside pieces and then sewing those in place by hand)
The belt is 104 by 4 cm. It is highly recommended not to add too thick a shoulder pad.
I know this is not really a simple project to make from such limited information but if you have experience making dresses and collars and cuffs, it is possible. And if you do, please let me know!
May 20, 2015
An odd pattern
There's nothing like listing your sewing plans to remember other plans... I won't tire you with additions to the list. My mental to-sew list could stretch on forever.
I'm now working on something which was and wasn't on my summer sewing list. These will be sort-of summer weight trousers but not the wide legged ones I mentioned (I still want to make those as well).
Here's the sketch/technical drawing. wrap-over trousers with tapered legs.
I used a similar style in this jumpsuit I made last year and thought it would also be nice to have separates in this shape.
I know there have been patterns for wrap-over styles in sewing magazines but those are usually 'fake'. That is, the wrap-over is real enough but it's just a styling feature not a functional one. Those designs usually have a zipper at the side. Because I'm a bit of a purist, I like mine to use the wrap-over in a functional way, as the actual means to get in and out of these trousers.
And I thought it might be nice to try and explain how to make such an odd thing out of a normal trouser pattern.
For a style like this, you will need a basic pattern which is loose fitting in the seat and thigh areas. I'm using the same adaptation of my sloper as I would for pleated trousers. This version of the sloper has a slightly lowered crotch and a bit of added ease at the hip and thigh.
I'll show you the alterations to the front leg pattern piece. The back leg doesn't have to be changed at all.
If you are using a sloper, it will probably have a small waist dart. Remove that by taking out its width at the side and/or center front.
Draw a line from where you want your overlap to end (I usually put it at the point where the dart used to be) to the knee point on the inner leg seam. Trace the top edge from the beginning of the line to center front on a new piece of paper connected to the rest of the pattern and then cut along the line.
Now, to create the wrap-over fold, mirror that front piece and connect the tops of the center front line and the point at the knee. Trace the top line again.
After that, put the center front piece back on, connecting it two the pleat you've created.
Make sure you mark the beginning and end of the pleat (the black notches) and its center (the red one). The straight grain remains in its original position running along the length of the leg.
Add pockets if desired (and who doesn't want pockets...)
This pattern piece will be used for both the left and right leg and needs to be finished with a waistband which either connects to the entire drape/pleat or only to from the side to the notch closest to CF (which I prefer because it doesn't create as much bulk at the waistline).
I will take pictures while I am sewing to show how this thing should come together.
April 30, 2015
The foundation
In fact, I'm pretty pleased with my progress so far, even though I haven't constructed any part of the actual dress yet. I'm getting a pretty clear idea about how I'm going to make it and that makes a huge difference.
I've started at the beginning: By making the fitted bodice with bra-style cups which forms the basis for this design.
This is a bit of a cross-over between clothing and lingerie patterns so I thought I might talk you through the process I used.
The cup pattern pieces come from my normal bra patterns. A horizontally seamed cup for a strapless design with a curved top edge.
I drafted the bodice from scratch. That seemed easier than fiddling with a body wear sloper with negative and a normal body sloper with positive ease.
To do this you need just a few measurements:
- Waist circumference
- Distance from the waist to the underwire of your bra. To measure this, tie a ribbon or a piece of elastic around your waist, tightly so it automatically comes to rest at the narrowest point, and measure up from there.
- Underbust circumference
- Then choose how far the bodice to reach below your waist and measure your body's circumference at that level (the ribbon is helpful with this as well)
Then, you can draft the pattern like this:
- Draw a horizontal line the length of half the 'hip' measurement and square up from either end and the middle. Also draw in the waist and underbust height.
- Place the center front of your bra band pattern along the center front line and the bottom of the curve for the cup on the underbust line and trace the bridge, cup curve and beginning of the top of the band.
- Mark 1/4 of the underbust circumference from either side on the underbust line. Square up to the tracing of the bra band and shape the top edge of the bodice.
- For the waist shaping, divide the waist measurement by 2 (because we are working on a half pattern here) and then by 12. Take out 3/12 on either side of the center line, this will become the side seam. Then take out 2/12 in the front panel and 4/12 in the back.
- Connect all the points you've measured out and don't forget to mark the straight grain (perpendicular to the waistline). When cutting, mark the waistline on all pieces and match those marks when sewing.
Of course, a pattern like this may need quite a bit of fine-tuning so I decided to sew it up to try the fit, using the fabric I plan to use for this layer.
I made the cups from lingerie foam (I think you have to use a material which can stand up on its own for this shape) in my usual way and sewed them into the bodice.
For fitting purposes, I put a separating zipper at the back.
And this is the fit, with underwires but without boning (and pushed up weirdly at the bottom because of the fabric I put around my hips for the picture). Not too bad, if I say so myself. Later, I sewed poly boning to half of it and it looked even better (I plan on using spiral steel for the real thing).
Based on this try-out I've made a few changes: I cut the pieces with seam allowance on the bottom but I like the length like this, so I will add 1.5 cm. I really didn't like the way the cup and the top of the bodice look like completely different things where they meet at the side. I raised that point by 1 cm to make them join more smoothly. And finally, I shaved of a couple of millimeters at and just below the waist at the side seam and front dart, because it was a bit loose in those places.
After that, I spend a lot of time thinking about the order of construction and the way to finish this thing, with the draped fabric on top, neatly. But more about that later.
P.S. This would also work well as a pattern for a lingerie corset. Just make the center back panel a bit wider compared to the side back, then narrow it about 10% for negative ease. Cut that part out of power net and use something like sturdy satin or lace over non-stretch net for the rest.
March 23, 2015
That skirt with the stick-out pockets
In the comments to yesterday's post, a couple of people asked for a picture of the pattern pieces of the skirt of my orange dress. I decided to go one step further and tried to draw it out (again being reminded of what a frustrating program Illustrator is...).
Please bear in mind that this is not a full-on tutorial. I have included an order of construction but I didn't take any pictures of the sewing. It's not really a difficult thing to make but it includes some tricky bits. Not for beginners, I would say
All the pattern pieces in these pictures are without seam allowance. It's important to remember that.
As mentioned, the skirt has no side seams, that seemed with nicest option because it was clear from the picture that those pockets curved around the wearer's side. So, you start by placing the front and back of your skirt block with their sides together. And because this skirt closes with buttons down the front, add 2 cm along center front.
Then, you draw in the design. I've used red for the alterations on the skirt itself and blue for the other pieces.
I took 1.5 cm from the back dart at converted that to shaping of the center back seam. I knew from my recent re-drafting of my skirt sloper that this suits my figure really well, you don't have to do this. If you don't, simply follow the next steps using the full back dart. If your sloper has two back darts (and you really need them because the combined width is more than 5 cm) I would recommend keeping one in the back skirt.
Draw in the top of the pocket. Mine is 5 cm below the waistline, starts at the front dart position and extends into the back for a bit less of that width. The pocket edges follow the angle of the darts.
Draw in the back of the pocket (the blue line). These are two pieces, with their top edges following the other side of each dart.
The pocket lining follows the bottom line of the backs but its top copies the top of the pocket on the skirt. It looks a bit odd in this drawing but those two lines at the top should get seam allowance added to them to either side and they are essential when sewing this pocket.
And finally, you make the front pleat by adding width (about 14 cm in total) at 4 cm from the front edge (which is 2 cm from center front).
I didn't draw out the pocket flap but that's simply a semi-circular piece with its top as long as the top edge of the pocket.
When sewing the pockets, start by making the flaps.
Then, stay-stitch the corners of the skirt pockets at the stitching line. Place the flaps (wrong side of flap to right side of skirt) so that they reach exactly from corner to corner (on those stitching lines) and sandwich the pocket lining (right side to right side of skirt) over the pocket flap. It is best to sew with the skirt on top, so you can follow the stay-stitching lines.
After sewing, clip the seam allowances on skirt and pocket lining to the corners and turn the lining to the inside. Press and understitch (don't topstitch).
Sew the seam on the pocket back. Pin and sew pocket back to pocket lining. In those vertical-ish bits at the top (right down to the corner), this new line of stitching should be exactly on top of the line of stitching which attached the pocket lining to the skirt.
And that's your stick-out pocket!
November 20, 2014
Some pattern instructions... for that dress
Thank you so much for all the nice comments on my dress!
Because some of you mentioned wanting to copy it (I'm honoured. If you do and blog about it, please let me know), I thought I would try and provide some extra instructions.
As you probably guessed, drafting this dress is not exactly rocket science. Or even proper hard-core pattern making. Anyone with some understanding of sewing and patterns should be able to make it. With the help of a tried-and-tested pattern for a fitted t-shirt with sleeves, that is.
I'm going to explain the steps using just a back pattern piece but the front is the same. If your pattern has bust darts, you can convert those into the seam between the front bodice and the lowest band of the yoke.
The pattern pieces as sketched (nothing is to scale, these are illustrations not actual patterns) don't have seam allowance. When doing alterations like this, it makes you job a lot easier to work like that. Just add them back on to the pattern pieces you end up with.
Before you begin, consider the fit of your pattern. Most real t-shirt patterns are rather rectangular but for this dress you want a fairly fitted waist, so you may have to take the side seams in a bit further at that point (to get a fit like mine, you also shouldn't have a lot of negative ease at the chest but that is a matter of preference). Of course, you can correct this while sewing, if you don't serge on the whole skirt without trying the dress on first.
An easy thing first: That dropped waist seam. Mine sits at 10 cm below the waistline (and I'm 1.68 which I think is still Burdastyle's standard height). It's basically a straight line but the ends near the side seams are curved a bit to form a 90 degree angle to those seam lines. Of course, you should make sure the side seams match up. This is how you avoid strange pointy bits at the side.
Than you have to start planning that yoke. Part of its charm, and all of its difficulty, is that the yoke extends just a bit past the shoulder.
To draft that, split the sleeve pattern piece in half, starting at the notch which marks where it will match up with the shoulder seam and straight down perpendicular to the straight grain line.
Take your half sleeves and trace each onto the appropriate bodice piece. This is hard to draw well, but the top of the sleeve should meet the shoulder point on the bodice, the sleeve head can overlap a bit at the shoulder and there should be some open space left over where sleeve and bodice curve in. Compared to the shoulder, the sleeve will slope down a bit.
Now you can draw in the yoke pieces. This starts at the neckline. If you want a turtle neck, like my dress has, you need a fairly high neckline but it should still be wide enough to fit over your head. I think neckline on the bodice pattern was about 50 cm in total (the turtle neck piece itself is a band of fabric of 40 cm high and 42 wide, including seam allowance. In a firm knit like the pointe, that makes for a rather high neck which I can just pull over my head. I like it, but I have a long neck). Obviously, the front neckline should be clearly lower than the one at the back.
Draw concentric circles around the neckline. In my pattern, the top one is 4 cm wide, the other three are 5 cm. That worked better with the position I wanted for the bottom edge of the yoke (to get rid of the bust dart in my knit sloper).
The actual yoke pieces are shaped as I mentioned it my previous post: They are straight bands of fabric, as long as the measurement of their top edges on the pattern.
There's just one more thing to do to the bodice piece now: adjust the sleeve. A bit of a raglan sleeve effect looks better under a yoke like this, so you adjust the armscye accordingly. Cut off the little piece.
Cut off the half sleeves along the bottom of the yoke and stick them back together. The middle of the top will look a bit odd but you are working with a stretchy fabric. Just connect the sides in a straight line. And add on the raglan-bits. The pieces from the bodice won't fit easily on the sleeve but you use them more as a guide: They determine how much width you have to add to the top of the sleeve and then you just draw gentle curves to the underarm point. Make sure to check if the lengths of the 'armscyes' on bodices and sleeve match each other though.
And the skirt? That is just a rectangle. Mine uses a little less (because the material close to the selvedge was a bit weird at one side) than twice the width of the fabric, so its about 2.60 cm wide in total. The finished length of my skirt is about 50 cm and I made a deep hem.
I hope this will help anyone who wants to try and make this cozy dress for herself. As usual, if anything isn't clear, just ask and I'd love to see what you make from this.
Because some of you mentioned wanting to copy it (I'm honoured. If you do and blog about it, please let me know), I thought I would try and provide some extra instructions.
As you probably guessed, drafting this dress is not exactly rocket science. Or even proper hard-core pattern making. Anyone with some understanding of sewing and patterns should be able to make it. With the help of a tried-and-tested pattern for a fitted t-shirt with sleeves, that is.
I'm going to explain the steps using just a back pattern piece but the front is the same. If your pattern has bust darts, you can convert those into the seam between the front bodice and the lowest band of the yoke.
The pattern pieces as sketched (nothing is to scale, these are illustrations not actual patterns) don't have seam allowance. When doing alterations like this, it makes you job a lot easier to work like that. Just add them back on to the pattern pieces you end up with.
Before you begin, consider the fit of your pattern. Most real t-shirt patterns are rather rectangular but for this dress you want a fairly fitted waist, so you may have to take the side seams in a bit further at that point (to get a fit like mine, you also shouldn't have a lot of negative ease at the chest but that is a matter of preference). Of course, you can correct this while sewing, if you don't serge on the whole skirt without trying the dress on first.
An easy thing first: That dropped waist seam. Mine sits at 10 cm below the waistline (and I'm 1.68 which I think is still Burdastyle's standard height). It's basically a straight line but the ends near the side seams are curved a bit to form a 90 degree angle to those seam lines. Of course, you should make sure the side seams match up. This is how you avoid strange pointy bits at the side.
Than you have to start planning that yoke. Part of its charm, and all of its difficulty, is that the yoke extends just a bit past the shoulder.
Take your half sleeves and trace each onto the appropriate bodice piece. This is hard to draw well, but the top of the sleeve should meet the shoulder point on the bodice, the sleeve head can overlap a bit at the shoulder and there should be some open space left over where sleeve and bodice curve in. Compared to the shoulder, the sleeve will slope down a bit.
Now you can draw in the yoke pieces. This starts at the neckline. If you want a turtle neck, like my dress has, you need a fairly high neckline but it should still be wide enough to fit over your head. I think neckline on the bodice pattern was about 50 cm in total (the turtle neck piece itself is a band of fabric of 40 cm high and 42 wide, including seam allowance. In a firm knit like the pointe, that makes for a rather high neck which I can just pull over my head. I like it, but I have a long neck). Obviously, the front neckline should be clearly lower than the one at the back.
Draw concentric circles around the neckline. In my pattern, the top one is 4 cm wide, the other three are 5 cm. That worked better with the position I wanted for the bottom edge of the yoke (to get rid of the bust dart in my knit sloper).
The actual yoke pieces are shaped as I mentioned it my previous post: They are straight bands of fabric, as long as the measurement of their top edges on the pattern.
There's just one more thing to do to the bodice piece now: adjust the sleeve. A bit of a raglan sleeve effect looks better under a yoke like this, so you adjust the armscye accordingly. Cut off the little piece.
Cut off the half sleeves along the bottom of the yoke and stick them back together. The middle of the top will look a bit odd but you are working with a stretchy fabric. Just connect the sides in a straight line. And add on the raglan-bits. The pieces from the bodice won't fit easily on the sleeve but you use them more as a guide: They determine how much width you have to add to the top of the sleeve and then you just draw gentle curves to the underarm point. Make sure to check if the lengths of the 'armscyes' on bodices and sleeve match each other though.
And the skirt? That is just a rectangle. Mine uses a little less (because the material close to the selvedge was a bit weird at one side) than twice the width of the fabric, so its about 2.60 cm wide in total. The finished length of my skirt is about 50 cm and I made a deep hem.
I hope this will help anyone who wants to try and make this cozy dress for herself. As usual, if anything isn't clear, just ask and I'd love to see what you make from this.
Subscribe to:
Posts (Atom)