When I posted some pictures of my blue skirt on the We Sew Retro Facebook group, some commenters asked about the pattern...
I usually mention that my clothes are self-drafted but I forgot to add that this time. Of course, like all full skirts, half-circle skirts are easy to draft. And splitting the skirt pattern into gores and adding a pocket aren't exactly rocket science either.
The starting point for this skirt is simple (and very similar to drafting a circle skirt). You only need one measurement: the waist (with any ease you may want added to it. If you want your skirt to sit below the natural waist, use the measurement of that point on your body. Just keep in mind that a straight waistband might not work so well in that case).
To find the radius of your half circle, use this formula: (waist measurement x 2): 6.28
It's the formula you use to calculate a circle skirt, times two. Use this number to draw the waistline of your skirt.
Measure from the waistline down to determine the length of the skirt
If, like me, you have used the corner of a piece of paper as your starting point, you now have a pattern which will give you a custom-sized half circle skirt if you cut it on the fold and add seam allowance at the open edge.
I usually don't cut skirts like this in one piece, it's not very economical. I normally split the pattern in half and cut one half on the fold and the other half in the other direction along the selvedge (which gives me a skirt with sides seams and a center back seam).
Using this fabric, I had the nap to think of though (and piecing skirts which are segments of circles changes the grainline which influences the drape of the skirt) so I halved those to pieces again.
Four pattern pieces, for a skirt made up of eight gores.
And then, there is the pocket. Adding pockets to a gored skirt is simple: Just take one of the gores (which now becomes the side front) and draw a line where you want the top of the pocket to be. I like to place it at an angle. Also determine how deep you want the pocket to be and draw its bottom edge.
To make the fold-back flap, first draw it in where you want it to be in the finished product (the blue lines). Then, mirror it over the pocket top edge.
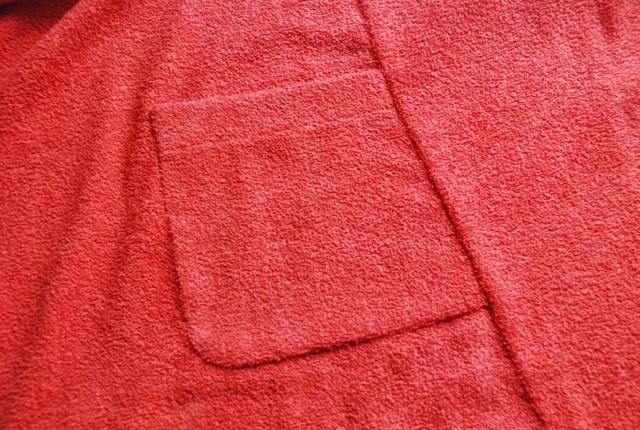
If you have done this, you just have to cut the pieces correctly: You should end up with a top piece/back of the pocket (top of the gore, down to the bottom edge of the inside of the pocket, to be cut from your fashion fabric), a bottom piece with flap (lower part of the skirt with what will become the underside of the pocket flap, fashion fabric) and a piece for the inside of the pocket and the flap (I usually split this piece. I cut the flap and a little bit more from the fashion fabric and interface that. The rest of the inside of the pocket is cut from a lining material)
When sewing the skirt, you will have to decide whether or not you want to sew the flap into the seams (I did this on the front seams). In that case, you only have to sew the bottom edges of the flaps. If you want free-hanging corners, you also have to sew to side. Sew it to the exact point where the flap ends and clip the seam allowances to that point. That will allow you to turn the flap right-side-out while still having normal sides for your skirt seam.
And of course, you will need to finish the waistline. For a skirt which is worn at the natural waist, I like a straight waistband of about 4 cm high. If you want to wear the skirt lower, that might not work so well. In that case, you could also finish the top edge with a binding or make a shaped waistband.
I hope this description helps if you want to make a skirt like this. As usual, if you have any questions, just ask (just remember to give me a way to reply to you directly or you'll have to check the comments to this post regularly) and if you make something using this tutorial, I'd love to see the result!
Showing posts with label pockets. Show all posts
March 4, 2017
March 23, 2015
That skirt with the stick-out pockets
In the comments to yesterday's post, a couple of people asked for a picture of the pattern pieces of the skirt of my orange dress. I decided to go one step further and tried to draw it out (again being reminded of what a frustrating program Illustrator is...).
Please bear in mind that this is not a full-on tutorial. I have included an order of construction but I didn't take any pictures of the sewing. It's not really a difficult thing to make but it includes some tricky bits. Not for beginners, I would say
All the pattern pieces in these pictures are without seam allowance. It's important to remember that.
As mentioned, the skirt has no side seams, that seemed with nicest option because it was clear from the picture that those pockets curved around the wearer's side. So, you start by placing the front and back of your skirt block with their sides together. And because this skirt closes with buttons down the front, add 2 cm along center front.
Then, you draw in the design. I've used red for the alterations on the skirt itself and blue for the other pieces.
I took 1.5 cm from the back dart at converted that to shaping of the center back seam. I knew from my recent re-drafting of my skirt sloper that this suits my figure really well, you don't have to do this. If you don't, simply follow the next steps using the full back dart. If your sloper has two back darts (and you really need them because the combined width is more than 5 cm) I would recommend keeping one in the back skirt.
Draw in the top of the pocket. Mine is 5 cm below the waistline, starts at the front dart position and extends into the back for a bit less of that width. The pocket edges follow the angle of the darts.
Draw in the back of the pocket (the blue line). These are two pieces, with their top edges following the other side of each dart.
The pocket lining follows the bottom line of the backs but its top copies the top of the pocket on the skirt. It looks a bit odd in this drawing but those two lines at the top should get seam allowance added to them to either side and they are essential when sewing this pocket.
And finally, you make the front pleat by adding width (about 14 cm in total) at 4 cm from the front edge (which is 2 cm from center front).
I didn't draw out the pocket flap but that's simply a semi-circular piece with its top as long as the top edge of the pocket.
When sewing the pockets, start by making the flaps.
Then, stay-stitch the corners of the skirt pockets at the stitching line. Place the flaps (wrong side of flap to right side of skirt) so that they reach exactly from corner to corner (on those stitching lines) and sandwich the pocket lining (right side to right side of skirt) over the pocket flap. It is best to sew with the skirt on top, so you can follow the stay-stitching lines.
After sewing, clip the seam allowances on skirt and pocket lining to the corners and turn the lining to the inside. Press and understitch (don't topstitch).
Sew the seam on the pocket back. Pin and sew pocket back to pocket lining. In those vertical-ish bits at the top (right down to the corner), this new line of stitching should be exactly on top of the line of stitching which attached the pocket lining to the skirt.
And that's your stick-out pocket!
July 9, 2014
His pockets
So, I'm finally really sewing again: making that jacket for E. It was about time too, the fabric of his old jackets is pretty much worn out (those were both made from a cotton twill which, in retrospect wasn't such good quality).
I stuck with the design idea I had earlier.
This is my sketch. Pockets at the front, convertible collar, fitted back with a pleat. Vaguely inspired by those 1930's and 1940's sporty men's blazers.
Last weekend, I worked on the pattern. I started out with the casual jacket sloper which I have used for most of E's coats and jackets. I think the thicker wool coats I made from it were great but it was always a bit baggy for a thin summer jacket. This time, I wanted to make it a bit more fitted and yet still give E enough room to move. It should be a jacket he can wear every day.
I'm using the same cotton/linen blend I used for my jumpsuit and I decided not to line this jacket (which kind of means I'll have to make one for in-between weather later on). Because it's going to be unlined, I'm taking care about a neat finish on the inside. I make flat-felled seams wherever possible and use bias tape for seam binding everywhere else.
This is the back of jacket. Outside...
and in. You clearly can see the wide pleat at center back.
And I don't normally do this, but on this jacket, I've topstitched all the folds in each pleat.
You can see it here, in the bottom pockets. It should keep them from getting too much out of shape.
And I thought I would share the construction of those bottom pockets in a bit more detail.
It's basically a cross between a regular patch pocket and a cargo pocket but less work than the latter.
You start out normally: Finish the top of the pocket and press in the sides. My pockets have pleats in the middle, both for looks and to allow them to expand a bit width-wise.
The position of the finished pocket should be marked on the wrong side of the front piece.
Put pins through the bottom corners to make them visible on the right side and position the bottom edge of the pocket between them.
Pin down and stitch.
Put pins through the marks for the top corners and turn the pocket up, positioning the top corners at the pins.
You should now have some excess length in the pocket (for this type of pocket, you need the pocket pieces to be about 3 cm longer than for a patch pocket).
Pin the pocket sides from the top down.
When you almost reach seam allowance at the bottom, fold the excess fabric harmonica-like.
Stitch the sides.
And there is the pocket. Just a bit more three-dimensional and spacious than a patch pocket without being much more work.
At the moment, I really enjoy making this jacket. I may be able to finish it tomorrow and I hope I can persuade E to model it in the weekend.
April 1, 2014
A pocket tutorial
Last autumn, when I blogged about the robe I made for E, I promised you a tutorial about this pocket, if you were interested.
The start is not very special: Put your chosen interfacing on the pocket facings and finish the outer edges (mine were served). You don't have to finish the edge which will be in the seam.
Well, some of you were and I've just made such pockets again (again on a robe, this time one for myself), so here it is.
This is a patch pocket without topstitching. You can only use this technique if one pocket edge is in a seam and you attach the pocket to the body of the garment by stitching from the inside.
Press the facings to the inside. For a normal patch pocket, you would sew the facing to the pocket with the right sides together, to get a neat corner. Don't do that now.
Press the seam allowances to the inside. It's easier to make this pocket if you use a seam allowance of only 1 cm on these edges.
Now, you can position the pocket on the garment front. Of course, it is practical to have the position marked from the start.
Pin down the seam allowance at the top edge and the corner.
Turn the pocket over and pin its side seam allowance down further.
Sew from the top edge along the cease you pressed in. Don't stitch past your pin in the corner and make sure to stitch the bit curve before it in the direction it will need to go in.
Turn the pocket right side up again.
Now, you can pin the bottom edge.
Stitch from the open side to the corner along the crease. To do this, you have to kind of bunch up the pocket and move it along while you sew. It may take some stopping sewing, putting the needle down and adjusting the fabric around it. You should be able to stitch all the way up to the end of the line of stitching you made before. If you can't, don't panic. You could cheat by closing the remaining gap with some hand stitches.
And that's your pocket. No visible stitching on the outside of the garment.
It's all here, on the inside.
Then, you sew the side seam, which closes the other side of the pocket. My robe has an A-line shape, which is why this side is at an angle.
In a plain, slightly fluffy and sort of stable-yet-pliable fabric like this one, this pocket isn't particularly difficult to make. The real test with these is, predictably, making them in plaid or stripes. And I wouldn't recommend slippery fabrics, like satin (although I wouldn't recommend those for regular patch pockets either).
I prefer this type of pocket over regular patch pockets any day (for things like coats and robes. Not for the back pockets on jeans, of course). They don't have any real structural advantage but I just don't like topstitching if I can avoid it.
It's the sort of detail a non-sewer would't even recognize but which makes a nice subtle proof of skill to those-in-the-know.
February 21, 2012
Tangerine Tango?
Last month, Peter wrote a series of posts about the weird world of forecasting and whether or not that effects us who make our own clothes. From that first post, I learned that the trend-colour for this spring was Tangerine Tango (I have in fact seen this colour appear in displays in shop windows since).
Now, it just so happened that I scored 4 meters of this fabric on, again, sale for 1 or 0.50 euro a meter back in, about, October. I had first planned to use some of it for my draft-along dress, but we all remember what became of that... (hangs head in shame...). By the time I read the colour forecast post I wanted to make a circle skirt from it, preferable with flap pockets.
Last week, I finally made something from it.


A high waisted A-line skirt. It's a bit shorter than most of my skirts, it's lined and has these nice curved patch pockets without topstitching.

Here's a close-up of those pockets. You have to apply them before sewing the side seam and I really like their clean look.
Well, I really like the skirt and like this, I have to say I love this colour. It doesn't even have to be worn with black. I would like it with brown, olive green and various blues and greys. Oh, and (cream) white.
I'm not sure this actually is Tangerine Tango and the weight of my fabric is more for autumn and winter but I am sure I still have more than 3 meters of it and it makes me smile...
November 28, 2010
Buttoned, bound pockets
Yesterday, I left a comment on Tanit-Isis's blog about bound pockets with buttons.
I realised later how hard it is to explain such a fairly simple addition without showing it.
So, I'm showing it here. In fact, I'm surprised about how many unbuttoned bound back pockets there are out there, both in RTW and in sewing patterns. I've made those twice myself and I always get annoyed by the pockets pulling up whenever I sit down and staying up.
There are two ways to add a button closure to a bound pocket:

with a buttonhole, usually used with a single welt

and with a little loop, used exclusively with a double welt.
Mine is wrong, the loop should come out from between the welts. When starting on the pocket, I put my loop between the trouser piece and the strip of fabric which was to become the welt, instead of on top of it. I didn't notice until I had cut the pocket and decided to leave it like this.
If you've made bound pockets before, neither of these is very hard to do but unfortunately, both require planning ahead.
As mentioned above, the loop should be inserted right at the beginning of pocket construction, when sewing the welt-strips.
The buttonhole should be added a little later. This is my test for the first single welt pocket I ever made. It shows the stage at which the buttonhole has to be made.

The welt is in place, the pocket has been cut and the actual pocket pieces have been attached to the top and bottom of the pocket opening. They are not yet attached to each other at the sides. Now, you can make a buttonhole in the outside fabric and the pocket piece attached to the bottom of the pocket. Then, you attach the button to the other piece and finish sewing the pocket.
I guess it would be possible to make a hidden buttonhole by only making it in the pocket piece. However that is the piece which is always made from lining fabric so it would kind of defeat the original purpose of the button (which is keeping the pocket neatly in place. the lining fabric would just be pulled up by the back of the pocket). And most buttonhole feet would not be able to cope with the stacked seam nearby (when make the visible buttonhole, you're placing the foot on top of it, making it invisible, you would have to fold the pocket bits in a way which makes the seam allowances at the bottom of the pocket stand up).
I hope this is useful. Let me know if anything needs clarifying.
January 22, 2010
So much to do, so little time
Hi everyone, I'm back! I really didn't mean to stay away for so long and I could come up with several fairly decent excuses but the bottom lines are: 'life getting in the way of blogging' and 'perfectionism'.
Anyway, I'm back and I would like to show you some of the thing I've been up to. You may have seen my posts about my two pairs of trousers in charcoal grey wool (blogged about here and here). They were made from the same piece of fabric. I bought four meters of it (standard discount at that store is 4 meters of thin wool or demin at 10 euros). The two pairs of trousers used up somewhere between 2 and 2,5 meters. So I made a jacket.

I made my own pattern. It's from my 'normal, contemporary' jacket block (I'll explain in a later post, I don't have pictures of the other one now) but this time, I added shoulder pads. I think for the first time. They are rather small pads, so they don't really stand out, but to me, the shoulder really does look more angular and a bit boyish (in a good way).
Then, I only had 0,5 meter left, plus some scraps. So that could
only be a skirt (or a vest, but I never got those to look nice on me). Usually my leftover bits of fabric are a bit longer and a bit narrower and have to become staight skirts, so this one was definately going to be a wide skirt. So it became a pleated skirt.

Irregular pleating scheme made up by me, the same on front and back. Center back zipper (hey, there is only one seam, so how could I have put it anywhere else...)
However, working with M on her latest collection (and maybe reading Dress a day for, I don't know, ever) means that by now, I've been well and truly bitten by the pocket-bug. This skirt just had to have pockets. If I had had more fabric, I would have made scoop pockets but all I had left were some long, narrow strips. So I made bound pockets.

This means, perhaps perversely, that every single item I made form this fabric has some form of bound pocket... Double welts on the sides of the skirt, double welts with button loops at the back of the belt pleated trousers and coat-style single welts on the jacket and the back of the flared trousers...
I guess I shouldn't even try to contemplate what that means about your humble savage seamstress...
Subscribe to:
Posts (Atom)