Showing posts with label sewing. Show all posts

May 5, 2020

Sew your own 1950's t-shirt

So, you've made your pattern, now you can start cutting and sewing. 
You can basically use any kind of knit fabric for this pattern although I wouldn't recommend really flimsy, very stretchy kinds of jersey. Because this pattern actually has ease, you can use those odd knits which hardly stretch at all (you can sometimes find those on the bargain table of your fabric store...). When I use a fabric like that, I cut the top a bit wider by adding 1 cm between the fold of the fabric and center back/front.

When cutting, center back and center front should obviously be placed on the fold. The straight grain line on the sleeve is that vertical help line you drew. And I don't think I have to tell anyone that you can fold your fabric differently than just in half if that makes cutting more economical... Just make sure the folds are straight, preserving the straight grain (which is not really the right term in a knit, but you know what I mean.

Now, the sewing starts. I usually use the serger straight away on a knit fabric but you could also use a stretch stitch on your sewing machine.

The first thing to sew is that neckline.

I've made this top with and without fusible interfacing in the neckline and my choice in the matter depends on the fabric. If it is likely to roll, interface. If not, you can do without. The interfacing gives the neckline a more defined edge, without is a bit softer. Both work well.
If you use interfacing, use quite a thin variety which is suitable for knits (this will still reduce the stretch by quite a bit so if you want to use it, make sure your neckline is big enough to let your head pass through without relying on stretch).

Finish the edges of the neckline facings.

Press the facings to the wrong sides of the bodice pieces.

Pin the shoulder lines, with the front facing in place. 

Fold the back facing over the front facing and pin through all layers. Make sure to remove any pins under the facing.

Sew the shoulder seams, including those facings.

Turn right side out and press on the inside. Now you have shoulder seams and a neatly finished neckline.

Insert sleeves. Pay attention when pinning, there is a difference between front and back of the sleeve.

Sew side seams and arm seams in one go.

Hem bottom edge en sleeves.
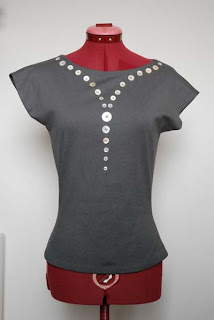
Finished!

May 21, 2015

Sewing the odd trousers

You may have noticed that I edited yesterday's post a few hours after it was posted...
I was sewing up my trousers and I had just found out that I had made a rather stupid mistake in the pattern. A typical example of over-thinking and flawed logic, especially when you know that I actually did it right the first time, while drafting the pattern, and then altered it. 
The mistake was that I had doubled the amount of width needed in the pleat. 

Like this. The fronts of these trousers should be wide but this is just ridiculous. And I had faithfully copied this mistake in the instructions here. So, I took out the "add two more" point and added a warning about the last two drawings. And just before I started writing this post, I re-did those and removed the warning. So now the drafting instructions are as they should be. 

Luckily, fixing this in both my pattern and my trousers only meant cutting a piece off. So, I could continue to make them and to take the promised pictures to illustrate that.
Obviously, you should treat the front pockets and the construction of the back as you would in any trouser pattern. 

Then, you sew up the center front seam (all of it). (I could only take the picture like this because it wasn't until I had sewn one of the side seams that I realized my mistake). Because my trousers are in jeans-blue chambray, I'm using yellow topstitching thread for flat felled seams. 

Sew the inner and outer legs seams.

The unusual bit of construction starts here:

Narrowly hem the edge of the fabric around center front, between the notches closest to CF. I like to taper this hem up so its last bits fall inside the seam allowance.

Sew the curved waistband. This is actually even easier than normal because these have a symmetric waistband. When you start on this, you should decide how you want to close your trousers. If you want buttons, you can just go ahead and make the waistband. If you want a tie, like I used here, you have to insert one tie in the right front edge and another in the left side seam. 
My waistband is is curved and 3 cm high and the ties are 70 cm long and 3 cm wide (finished sizes).

Pin and sew the outside of the waistband to the top of the trousers. the front edges of the waistband should reach exactly to the notches. Press seam allowances up. 

I often use bias binding to finish the edge of the waistband facing and keep its seam allowance pointing down. This keeps the amount of bulk, in the waistband just above the seam, down. In this case, it also helps with finishing.

On the side which will overlap, the right side for the wearer, fold the end of the hemmed top edge back on the seam allowances inside the waistband. Because you tapered the hem, the rest should easily stay on the outside. 
On the left side, don't fold it back.

Pin the waistband facing in place and sew. I usually stitch-in-the-ditch from the outside. 

Now, all you need is a snap or a hidden button at the left side of the waistband. Or if you didn't use ties, also a button at the right side.

My trousers are finished and I'll try to get some pictures soon to show you the end result and how these actually work to wear. 

November 6, 2010

Confession of a sewing addict

First of all: thank you all for the nice comments on my leather jacket! I really appreciate it.

Now, on to the matter at hand: did I really need a fabulous, edgy, original, new leather jacket? (even if it's made from used material) Of course not. In fact, apart from motorcycle gear, I can't imagine a set of circumstances in which one would really, REALLY, need a leather jacket...
And yet, I'm happy having made it. Even though it may soon be too cold to wear it outside, and I personally think leather is usually too warm to wear indoors, I'm still happy with it.
It's an achievement. In design, in execution, in style. It suits that 'ideal me'-dress up doll in my head... not to mention my inner perfectionist seamstress...

Coming to think of it, I've done this sort of thing before, and I will most certainly do it again.
These are some of my best loved creations from the past two years. I still love all of them, but I haven't worn them that much (they're all either too warm or too formal for my every-day life): My first jacket from re-used leather, my lovingly tailored tweed jacket, the 'tsarina' jacket with its labouriously made fake-fur striped edges and the heavy wool block-y jacket which was a triumph in use of the fabric and has my first self-drafted raglan sleeve.
I loved designing these, drafting the patterns, checking and fitting them with muslins and finally sewing them. And I love how they look. Even if they don't really have a place in my day-to-day wardrobe. And it's not just jackets either. Some of my more spectacular summer dresses fall into the same category (shelf-bust dress, anyone?).
And then there's a whole seperate category which deserves the title of "experiments which may or may not work out". Things like my free-form top or my recycled and draped silk shirt.
Fortunately my track record of succes in these endevours is rather good and many of these items make it from experiment to wardrobe staple. Or something to 'achievement project' (see above)...

To sum up: Yes, I am a sewing addict and I freely admit it. Although I sew my entire wardrobe and I try to sort of plan to sew what I will need, I am easily distracted. I love to go for projects which allow me to test or expand my skills or to try out new shapes and looks. I sometimes feel silly for making things I don't actually need, but I can't help myself. Fortunately, I am adventurous enough in dressing to wear all these things out at least sometimes...

What I'm wondering now is this: What is your view on this? Do you sometimes make complicated things just for the sake of making them? Or so can look at them from time to time and feel proud? And if, in doing so, you learn and love it, was it really such a waste of time, effort or material?

October 30, 2010

Some tips for sewing leather

Thank you for all the nice comments on my jacket-in-the-making! I think I should stop calling it the 'Tetris-jacket' because although cutting it out required a lot of Tetris-related skills, the end-result should have little or nothing to do with piled-up blocks... Suggestions for a new name are welcome!

Many of you asked questions about sewing with leather. I'm by no means an expert but I have dabbled before and so I will try and answer your questions, as well as give some additional pointers.

1. There are many different kinds of leather, depending on the animal it comes from and the way it has been treated (e.g. suede is just 'brushed' leather...). Suitable leather for clothing is usually lambskin although goat, calf and pig are used as well. Cow skins are much thicker and usually used for upholstering furniture.
It is often easier and much cheaper to find second hand leather garments which you can cut up and re-use. Not to mention that it's more environmentally and animal friendly... Apart from real motorcycle jackets, all leather used in clothes is of the kinds I mentioned as 'suitable for clothing' above.

2. You can sew 'clothing thickness' leathers on an ordinary sewing machine. For 'furniture thickness' leathers, you would need an industrial sewing machine.

3. You could sew leather using something like a denim needle, but I strongly recommend you get leather needles. And ordinary needle has a point and sort of pokes holes into the material. A leather needle has a knife-like tip which allows it to cut into the leather. This means it puts less stress on the leather and on your sewing machine.

4. Leather doesn't behave like fabric under your presser foot and, as a natural product it can be uneven in texture. It can 'stick' or stretch in places. How bad this is differs per piece of leather and per sewing machine. So, always try out on a scrap first. Using a teflon- or roller foot often helps. If nothing else will help, sandwich the leather between strips of tracing paper, stitch through all layers and tear away the paper afterwards.

5. Make sure you don't have to unpick anything and if it can't be avoided, sew you new seam next to the old one, further into the pattern piece. The holes of the seam are there to stay.

6. Use a narrow seam allowance. 1 cm is enough for a material that can't fray. And you can't alter to make it bigger by letting out the seam a bit anyway, see point 5.

7. There is obviously no grainline in a piece of leather. So, take your pattern pieces and 'play Tetris' to put them as close together as possible, making the most of your material.
8. Leather can't be ironed, so to make the seam allowances lie flat, use glue. Any glue which is claimed to work on leather will do, but try out on a scrap first. You don't want to use a glue which makes your seams hard.

9. Think about the pattern you use. With leather, you could, for example, decide to have unfinished hems or to stitch some of the seams on the outside. However you should avoided crossing seams as much as possible. Seam allowances in leather stay very bulky in comparison to those in fabric.

I hope I've covered all of the subjects which raised questions. If there is anything else you want to know about sewing with leather, just leave a comment.

April 23, 2010

Assignment, part 2


I finished miss V's dress! It's not the greatest picture (I made it a bit lighter to show the details), but she's nowhere near my size and don't feel like padding out the chest of my dressmaker's dummy for just one picture.

In fact it's a fairly simple dress: armhole princess seams, buttoned faux surplice center front panel, skirt with pleats at the center front and back panels. It is made from black cotton twill with a bit of stretch and closes with a blind zipper at the side. It will have long, bare shoulder sleeves with fingerloops, made from lycra netting, when it is really finished. V and I agreed it would be better to fit those directly on her arms once the dress was finished (but when that happens, I'll try to put the sleeves in and finish them straight away, and the dress will go home with her).

I made this dress at her request, and based on her design. This was the original drawing. I may have made it a bit more 'standard' in looks, but I think I had to. After all, I had to deal with things like human anatomy when going from sketch to garment.
I enjoyed the challenge of drafting for and fitting to such a different body shape. Although, I'm glad I decided to fit not just the sloper but also a muslin for this dress on her.
I will get yet more practice at fitting different shapes because next up (as in next serious project, I bet I will do a couple of simple spring-things for myself in between) will be a suit for my friend R (last year in early autumn, when wasn't busy, I persuaded her to let me make her a suit, we fitted slopers and muslins, but we only picked out fabric last month and she lost a lot of weight in the mean time, so there will be more fitting to be done first).

March 27, 2010

Of plans and resolutions

Ok, I admit, I should REALLY stop promising to write another post 'tomorrow'. Because it seems that whenever I do, something gets in the way. I couldn't even really tell what got in the way this time. The week just went by pretty fast, and loads of different things are going on over here.

One thing I worked on this week was this dress for a friend.

This is my sketch of what I am going to make, based on a sketch she gave me several months ago. I made a first muslin a while back but had a lot of trouble finding the right fabric. I found it two weeks ago: a very nice, not too heavy, black stretch twill and lycra netting for the sleeves. So this week, I made a more serious muslin in a fairly similar fabric for a final fitting.
I wouldn't be so fussy about muslins and fittings when making something for myself but this is nice fabric, she will pay for the dress, I know she has been trying to loose weight since the last fitting and I just want her to be happy with it.
She came over yesterday, so I now know what bits of the pattern need to be
tweaked. Overall, she was happy with it though.

I also promised to post some of my spring sewing plans. Well, I have scanned some sketches, but these won't be the first things I'll make. I'm not great at sketching so some things, I just can't put on paper and I usually don't plan ahead very rigidly. These things however, I've been wanting to make for about a year now, and this time I WILL make them.


First up: my bathing suit!
I've got some good double knit lycra which has a dull and a glossy side. I plan on using both sides for the suit's panels. It is supposed to be inspired by 50's pin-up style bathing suits but made up from modern materials with modern day comfort kept in mind.
I know it's got a lot of coverage for a bathing suit, but I really, really don't mind. Tanning and me never go well together anyway.
By the way, for anyone else who considers trying to make swimwear, this website has loads of useful information (although I think the lady behind it wouldn't rate my bathing suit design at all... she and I seem to go to very different beaches)


Second: a twist dress!
I loved the dress in this picture (from a 1930's Sears catalog), and realised it used the same twist detail as the (in)famous Burda twist-top. Interestingly, the catalog calls it a 'Vionnet drape'.
I made a muslin of the Burda twist top last year, just to try and understand the twist, and found more information about it online. I know how it works now and I should be able to make the pattern (the twist on the dress is not in the same place as the one in the Burda top, so lengthening that is just not an option). I will try it out in a grey jersey with a blue spiralling print.

I am really looking forward to making these, however, first I will finish another shirt for E, maybe make something for my sister as birthday gift and make one or two t-shirts and a pair of belt pleated trousers...
Please tell me I'm not the only chaotic planner in the sewing places of the wide wild internet...

March 14, 2010

Because there's always more to learn

I don't think anyone has noticed but, unlike many other experienced seamstresses, I've never made lingerie. So far.
The truth of the matter is, I have tried before. I took part in a lingerie workshop which included drafting a pattern for basic bikini style panties (used as a sloper to base other shapes on). Of course, I had no trouble at all with the pattern making bit but I soon found out that my sewing machine didn't agree at all with my new endevour. This was my old sewing machine, which had some 'minor' transport issues. I could work with those, when dealing with woven fabrics. I was even capable (with a lot of time and effort put in) to force it to produce a few items in jersey. But lycra was a different matter and the sewing of stretched out elastic ,
essential to making lingerie, was absolutely out of the question.
Before the workshop, I had already bought some black lycra and different kinds of trim, but after a few tries with the machine, I just had to give up. Especially when M tried out my machine and gave as her professional opinion that it was absolutely incapable of sewing lingerie, and the experience had made her understand my difficulties with sewing jersey...

These things are all in the past. I now own a beautiful, powerful new sewing machine now, and a serger. I even mentioned my intention to sew 'everything, from leather to jeans, to lingerie' when I went shopping for them.
And yet, so far I had not tried again.
Until last week.
The thought of sewing lingerie had started to sneak its way back into my mind for a little while now, and I found myself trying to decide what to do with some scraps of nice blue jersey. Scraps which were not long enough for a top...
The answer was obvious. I have seen it so many times on Wardrobe Refashion and on other blogs: panties! What better way to overcome my fears of sewing lingerie than to start with a more forgiving fabric?


I tried three different shapes, and a variaty of trims. From left to right: thong (fold over elastic and stretch lace), low legged briefs (picot edged elastic and FOE), and shorts (picot and hemming). They're not perfect, but definately wearable and it wasn't as hard as I thought.

Encouraged by the succes of the panties, I decided to take the plunge and try a
bra as well. I made a pattern as a part of the workshop, but unlike the panty pattern, it had never really been tried out for size. I just made it anyway.

The size is Ok, but it should be tweaked for a better fit and shape. I wanted to insert the underwires from an old bra, but found them slightly too long and not the right shape (they came from a push up bra, I guess). As I used the jersey scraps, and stretch lining and trim of which I have plenty more in stash, and an improvised hook and eye closure (and the shoulder straps are hook-on ones from a too big bra), I don't think it's such a loss. I'm very proud it actually looks like a bra, and now I will know what changes to try and make to the pattern.

I will certainly try again. Next challenge: lycra. And I am once more dreaming of making the perfect retro style bathing suit (my own design and pattern, of course ;)

March 8, 2010

Purple skirt from leftovers


Well, here it is, my purple skirt (worn with the boots I painted). I used up all the fabric I had left from making the purple dress. It couldn't be any longer. It couldn't be any wider. It needed to have a (straight) center back seam just to allow me to get all the pieces out of the fabric.

Because I have often made pencil skirts from small bits of fabric and I now this stuff drapes nicely, I decided it had to be a flared skirt. It is made from ten pieces, which are all the same. It's a very easy pattern to make to your own size. I'll make sure there's a tutorial up by Wednesday.

This skirt is great for twirling!

February 27, 2010

Purple dress, purple dress

I told you I was getting into colour. Allow me to introduce: exhibit nr. 3, the purple dress.


I bought this fabric a few month ago, having fallen in love with the colour. In my mind, this is quite a vintage or retro shade of purple. Too intense and too blue to be a recent fashion colour. Considering the market stall I bought it from (which is forever selling weird fabrics which seem to be very old leftovers from somewhere, at a ridiculously low price) it may well be quite an old fabric. The guy selling it wasn't even prepared to start discussing the fibre content. So, all I can tell you is that I love the colour, it's a crepe weave, and a mystery fibre. From sewing with it, I know there's something quite synthetic in it (it gets slightly static) and some wool (I smelled that when pressing it).

I had bought two meters, and straight away I knew it just had to be some kind of vaguely sixties inspired dress. For a while, I was making other things, shying away from this vibrant colour, but last week, it was time.
I drafted this pattern myself, considering it a bit of an experiment. Usually, I don't make dresses without waist shaping and not a lot of mini things. This one had to be both. I didn't just eliminate waist darts, it also has a back pleat opening up right under the sleeve-line.
Because this fabric was cheaper than the stuff I usually use for muslins, I didn't make one of those.

I first tried it on when I had sewn the body pieces together, and was pleasantly surprised. The fabric turned out to drape a lot more than expected, making the loose shape rather flattering. Originally, I planned to make a fairly high standing collar, but I realised that would make it too strict, so I opted for a fold-over one instead.
The dress has a short placket, using sew-on snaps as the real closure and buttons from gran's stash, covered with fabric, for show.

I still have some of this fabric left, so there will be a skirt as well, fairly soon...

February 26, 2010

From pattern to garment - the tiny shrug


In a comment to my last post, Isaspacey asked for more information on how the pieces go together. Well, this post is for you (and for anyone else thinking the same, but not asking. Which, by the way, you should. In sewing there are no stupid questions and I just love getting comments)


1. Fabric placement: put the two new pieces on the fold, choose you sleeve length.


2. Cutting. These are your pieces.


3. Start sewing. Set in the sleeves. Setting them in flat (before sewing the side seam and sleeve seams) tends to be a bit easier. When pinning the sleeves, the notches for the shoulder on the body and sleeve are really useful, but they don't in this fabric.


4. Sew side seams.


5. Sew short end of edging.


6. Fold in half right side out.


7. Pin to body. Put the seam at the center back of the neckline and stretch the edging evenly to fit the body. Sew.


8. Voila! Your shrug is finished! (Ok, the sleeves still need hemming, but I trust no one needs me to tell them how that is done...)

Any knit or jersey can be used for this pattern, however the amount of stretch and/or drape can vary enormously with each fabric, which is something you should always keep in mind when considering the combination pattern and fabric. For this project, it's Ok if the fabric is a bit bulky, but it shouldn't be too drapy.
Also, I used a serger here but of course you could also make it on a sewing machine, using a stitch appropriate for stretch (if you don't have 'official' stretch stitches, use a small zigzag). Jersey won't ravel but more open knits, like this one, will.
Once again, good luck sewing!

February 12, 2010

'New' skirt

Let me start this post with an apology. I know some of you like my 'weekly outfit' posts, but I won't do one now. I've been feeling a little under the weather all week and right now I neither look nor feel very stylish. I'll make up for it as soon as I feel better though.

Despite the annoyingly low energy level that comes with having a cold, I have managed to get some sewing done. And something that has been on my mental to-do-list for months, no less.
Way back in October, a friend of a friend paid me to make this dress fit her. She had bought it at a vintage shop, loving the colour.
No idea how old the dress was. I would guess at early 70's but if anyone has a better idea, I'd love to hear it.


Whatever the dress was, it was at least two sizes too big for her, and quite a lot longer than she wanted (that dress would have been ankle length for an average sized women, but this lady is definately on the short side). I altered the dress for her, and while doing that I noticed it had to have been homemade originally. It had wide, irregular seam allowances, trimmed with zigzag stitching and the thread colour of that changed halfway through. And those bust darts had been poorly stitched and pressed, resulting in too much of a pointy shape. I fixed that too.
The final result looked great on her and I hope she has enjoyed wearing it since.

Of course, I got to keep the bit of skirt I cut off. The outer fabric is certainly 100% synthetic, probably polyesther. I would never buy that from the bolt, but the colour is great and it has this interesting abstract textured pattern. I also had a piece of lining left, which was rather nice, as lining fabrics go (= it doesn't cling)


The dress's skirt had 7 gores, so I didn't have a great deal of options for the design of my skirt. I knew I wanted pockets though, and no bound ones this time. This is the end result (the actual length is about 10 cm above the knee, but my dummy misses a bit and is therefore stuck at its lowest setting). I'm really happy with it and looking forward to wearing it out.

January 22, 2010

So much to do, so little time

Hi everyone, I'm back! I really didn't mean to stay away for so long and I could come up with several fairly decent excuses but the bottom lines are: 'life getting in the way of blogging' and 'perfectionism'.

Anyway, I'm back and I would like to show you some of the thing I've been up to. You may have seen my posts about my two pairs of trousers in charcoal grey wool (blogged about here and here). They were made from the same piece of fabric. I bought four meters of it (standard discount at that store is 4 meters of thin wool or demin at 10 euros). The two pairs of trousers used up somewhere between 2 and 2,5 meters. So I made a jacket.


I made my own pattern. It's from my 'normal, contemporary' jacket block (I'll explain in a later post, I don't have pictures of the other one now) but this time, I added shoulder pads. I think for the first time. They are rather small pads, so they don't really stand out, but to me, the shoulder really does look more angular and a bit boyish (in a good way).

Then, I only had 0,5 meter left, plus some scraps. So that could
only be a skirt (or a vest, but I never got those to look nice on me). Usually my leftover bits of fabric are a bit longer and a bit narrower and have to become staight skirts, so this one was definately going to be a wide skirt. So it became a pleated skirt.


Irregular pleating scheme made up by me, the same on front and back. Center back zipper (hey, there is only one seam, so how could I have put it anywhere else...)
However, working with M on her latest collection (and maybe reading Dress a day for, I don't know, ever) means that by now, I've been well and truly bitten by the pocket-bug. This skirt just had to have pockets. If I had had more fabric, I would have made scoop pockets but all I had left were some long, narrow strips. So I made bound pockets.


This means, perhaps perversely, that every single item I made form this fabric has some form of bound pocket... Double welts on the sides of the skirt, double welts with button loops at the back of the belt pleated trousers and coat-style single welts on the jacket and the back of the flared trousers...

I guess I shouldn't even try to contemplate what that means about your humble savage seamstress...

January 9, 2010

Shapes of grey


It's been a while since posted about anything I have made. Which doesn't mean I didn't make anything. Not at all.
In my wardrobe, most things are made by me with the notable exeption of t-shirts. Untill I bought my serger, sewing jersey was an absolute nightmare, that's why. This winter, I noticed I needed more fun basic pieces for layering.
I have loved making jackets ever since my first self drafted one a year and a half ago, and I love dressing down my shapely, formal jackets by wearing them over t-shirts. I had two old t-shirts, one bought, one a recycled band-shirt which belonged to my boyfriend in its previous life, doing that job.
So, I needed more. And I could use a simple cardigan with long sleeves (I often make cardigan-like things from odd bits of fabric and that always seems to result in three quarter length sleeves at the very most).

The fabric I used is a cotton double knit jersey. It was for sale at the market (2 euros a meter, but only 1,20 m wide) in a very limited choice of colours. I ended up buying (over the course of several weeks) 2 m of each of the fairly dark and grey colours (this is the lightest, I already made a dress out of the blue/lavender/grey and the dark grey/brown is still in my stash).

I made the cardigan first. The pattern is based of my knit sloper, I just opened it up along the center front and cut out a deep, wide V-neck. I was going to do a 'normal' closure, with a buttonband along the straight bit of the front, but decided on differently when I had sewn together the body parts and tried it on.


Not wanting to put a partly cut length of fabric back in the stash, I moved straight on to making t-shirts. One has cap sleeves and wide neckline, the other is a bona fide skinny fit tee. Even before I cut the fabric, I realised that what I really wanted for under my jackets, where printed, or otherwise decorated shirts. So, I decided to do something which I hadn't done in quite a while: decorate.


Cap-sleeves has a 'necklace' of miss-matched mother-of-pearl buttons from my grandmother's box. Skinny T sports a drawing (in black textile marker) of an anatomical heart. I'm rather pleased with both of them and looking forward to find out how they will perform in real life.

December 19, 2009

A new and different shirt

From time to time, I tend to get a little annoyed with the strict and structured look of most of my creations. Most of the time I love it of course, but not all the time. Owning a serger and being able to make things in jersey has improved this matter, but especially when it comes to tops, it will still hit me every once in a while. This time, the topic was the blouse. Most of mine are fitted and made from a fairly stiff cotton. It is shirtweight but tends to seem a bit starched and just never gets drapey. It happens to be one of the fabrics I can always buy at the local market, so it gets used a lot.

I wanted something flowy, with a wider but still feminine fit and preferably still having the features of a normal button-down shirt. I made some muslins with a wider, undarted body shape and hated them all. Then I remembered this picture from an '08 magazine and decided to do something a bit like that. I drafted the pattern, including my widest sleeve to date.


The fabric I used has been in my stash for a year and a half. I bought it at the fabric market, which is held twice a year. Back then, I thought it was all cotton, but on closer inspection now, I realised the weft threads may be cotton, but the warp threads are something else, most likely polyesther. The things you learn in a year...


When sewing this, I loved my new sewing machine. The old one would have eaten such a delicate fabric. This one didn't even make it pull at the seams.
Because the fabric is a bit sheer, I used white organza instead of the usual lightweight fusible interfacing. I had never done this before, but it worked quite well. I just cut pieces with seam allowance and treated them as one piece with one of the pieces in fabric.
Originally, I made big cuffs for the sleeves, but as soon as the first one was on, I tried the shirt on and hated the look of it. In the end, I opted for binding the sleeve edges with strips of bias cut fabric. They are kind of three quarter length but I think that's OK with such roomy sleeves. It keeps them out of the saucepans ;)

I can see myself wearing this, as soon as the weather starts to warm up again. I still have about a meter of the fabric left, which will become a sleeveless top with ruffles (yay! for rolled hems on the serger)

Oh, and don't forget, there's still plenty of time to enter the giveaway...

November 28, 2009

Playing catch-up (and weekly outfit nr.9)


I'm afraid I got a bit behind on posting this week. In part, the weather is to blame for this. For most of the week, it's been raining so much that there was hardly any proper daylight. Not good for taking pictures...

I'll try to make up for it now. First of all, a new 'weekly outfit'.

I made the top last week, and wore it for the first time this week. It is made from woolmix knit and was my attempt to make kimono/batwing sleeves work on me. Roomier ones require a different kind of figure, with breasts... This particular shape probably wouldn't work in a woven fabric (too confining) but it's fine in a knit. For added interest, and to have an excuse for a center back seam (and thereby saving fabric) I made a fairly deep V at the back. The trousers are one of the first things I made using my new sewing machine, somewhere back in June. I still really like the fit-and-flare shape, the topstitching details and the pockets with flaps.

It occured to me that this top is hardly the only recent creation I haven't shown yet. So, I'll show the rest as well.


I made this dress last weekend. Unfortunately, the picture isn't very clear, but it has a smocking detail at the front under the bust. I kind of like it, but it's a style I have to get used to. I've been wearing it with a little bolero jacket in black jeans. Both for warmth, and to give it a bit of an edge.


For this blouse, I used the first pattern for a top I ever made. I only changed the collar. I'm not that happy with it. I love the original blouse (which is black and has a larger and floppier collar) and have worn it a lot. When I bought this gray cotton for one of E's shirts, I was convinced that it would be a good colour for me too, and so I bought extra fabric. Yet, I'm stuck with a blouse which somehow doesn't look or feel quite right to me... I think it's mostly a colour-thing and I wouldn't be surprised if washing it helps with the rest(that will take the starch out of the fabric). Lately, even my crazier plans usually work out, so I'm a bit surprised at the being disappointed by what seemed to be a very safe project...
Well, better next time.


These trousers, I finished just this morning. I realised a while ago that I didn't really have any good trousers anymore, excluding the jeans. The pair in black stretch twill I've had for two years are pretty faded by now, so no longer good for more formal occasions. I used the pattern I made for that much loved pair and made a new one using thin charcoal grey woolblend. Flared legs, scoop pockets at the front, single welt pockets at the back.
I bought 4 m of this fabric, so you're going to see more of it. I'm slightly addicted to making jackets (although I try to keep that in check, I don't wear jackets that much...) so there will probably be one of those. And I'm sorely tempted to try and make a pair of belt pleated trousers. Which could be either great, or a total disaster. I'll keep you informed.

Lastly, I've got a museum/city tip to share. Last Thursday, M and I went to the Antwerp Fashion Museum, MoMu. We saw the exhibition about Belgian leather brand Delveaux (handbags from the 1930's till 2000, plus history, patterns and an impression of the atelier), work by incredebly talented first year BA students of the Antwerp Fashion School (I strongly suspect these people graduated from some other art school before starting there, that would explain the level of their work) and at Modenatie (a separate store/galery bit) items from the Yohi Yamamoto winter collection. And, despite the appalling weather, we did some great window shopping along the Nationalestraat (where the museum is located). Now, this exhibit is too small to be worth a long trip, but if you happen to be near Antwerp, or have some way of getting there easily and cheaply, it is definately worth a place on your to-do-list.