Showing posts with label experiment. Show all posts

July 18, 2017

A trouser experiment

Thank you for the nice comments on my previous post! Now that someone has brought it up, it would make a lot of sense that the combination of knitted and woven fabric is a reason why not many other people have made things like that dress. But take it from me: if you can make a simple t-shirt, you can certainly make a dress like that!

Now, on to the next thing. I kind of announced I would put two items in one post, but now I think I will save the second one for tomorrow.
A few weeks ago, while I was still working hard on all the end-of-year stuff that comes with teaching, I decided I wanted a simple, fun sewing project. Something kind of relaxing. And for some reason, I remembered Thai fisherman pants (I know I always insist on using the word trousers for trousers, not "pants" but in this case the idiom seems pretty much fixed on pants). 
I spent some time looking on Pinterest for inspiration pictures and pattern suggestions and I found a lot.

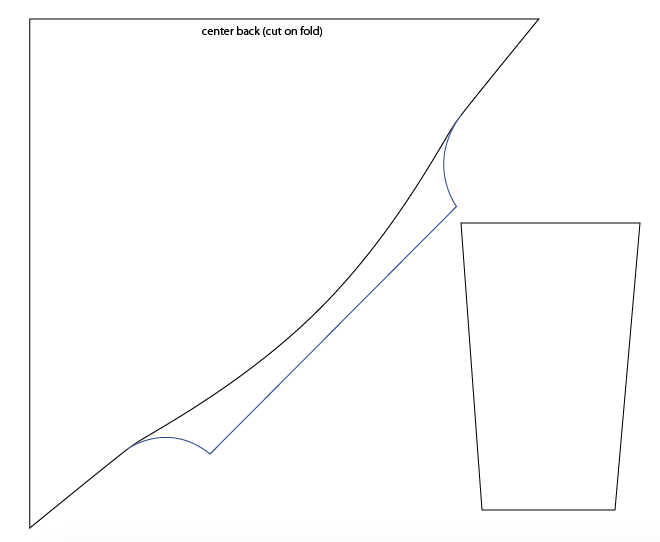
So, one Saturday morning, I used this very simple sketch as a guide and cut into some black linen from my stash. 
I went with a single layer top panel with flat-felled seams and a turn-over hem.

The end result wasn't bad but didn't quite look like these things do in most pictures.

At some point during sewing, I even wondered they might be too tight around the thighs, but they're not.

In fact, this strange shape actually allows a lot of room for movement.

This, just in case you are not familiar with this phenomenon of Thai fisherman pant, is that strange shape:


You've got the completely flat shape of a huge pair of trousers (without shaping on the crotch seam, that is why they are flat) which is wrapped around the wearers body and tied with ties attached to the center back of the top panel. After tying, you fold over the top half of the top panel, covering the ties.

There are a few different options to construct the legs and I think this is one of the simplest. I made these pretty much the way the pattern tells you to (although I may have forgotten to add seam allowance on some straight seam somewhere). Based on the result, I wouldn't recommend doing that if you wear more than, about, a Burdastyle size 38. If you do, add some width and height and go from there, or use one of the many other tutorials floating around on the internet.
The beauty of this style should be that it is truly "free-size" and this version isn't really. It still makes for a nice pair of summer trousers for me though.
Tomorrow I will show you my version of one of those other tutorials.

January 28, 2015

Experimenting

You know I draft most of the patterns for just about anything I make. And you know I'm fond of special pattern making tricks, like those in the Pattern Magic books. And of 'object' garments (like this Burdastyle cardigan, these retro designs from Studio Faro and several of my own creations, some of which I made tutorials for which are in the list on the right of this page).

Well, I often combine all those likes and loves and experiment. Especially if I have just found a lot of appropriate fabric, cheaply. In this case, I was already eyeing up the tweed-y knit I used for E's cardigan. I could make something like a knitted 1950's suit from that stuff. Or a dress.

And then, I suddenly decided to make this:

I've always loved the neckline/collar thing you get in Pattern Magic's "Wearing a square" and in the those 'object' retro tops... What if I tried to combine that with normal pattern making for jersey fabrics? I had considered a design like this before but at that time, I didn't want to risk it because I couldn't figure out how to make sure it wouldn't be too confining for arm movement. 
This time, I decided to just go for it and worry about practicality later.

These are the bodice pattern pieces (none of these drawings are to scale).

And this is the dress. It came out looking (even) more 1950's than I had expected. Not that I'm complaining though.


These are not the prettiest pictures. Most days are pretty glum and cloudy these past weeks and I had been wearing the dress for more than a day before it was light enough for photographs (that and the high heels are why the back looks so folded). However, they're good enough to do what I really needed from them: Just show the dress. 

And of course, arm room is an issue. This is as far as it will go without seriously pulling the whole dress up.
It doesn't make the dress completely unwearable but it leaves considerable room for improvement.

There are several options for change, depending on where I want to go with the design.

- It would be possible to cut an armscye in the one-piece bodice and use a more normal sleeve. In that case, it would make sense to also adapt the bodice under the sleeve and make it more of a normal bodice and less of an object there. I've drawn this particular sleeve with a point because I think that would work well with the shape of the collar. All this would make the whole look more 1950's and less Japanese.

- Another option would be to make the 'object' bodice larger on all sides and mount it over a fitted lining of a thinner fabric (lycra, for example). In that way it would blouse over the sleeves and skirt which should allow for a wider range of movement. This would emphasize the free-form look.

- Related to the previous option, I could also treat the entire 'object' bodice as a capelet instead of a bodice. Again, over a thin and smooth lining, probably connected at the shoulders. Depending on the proportions and the styling of the skirt, this could look either Pattern Magic-esk or almost 1930's.


- Going back to the basic shape the dress has now, the least invasive thing to do to it would be to insert underarm gussets. This would work and it would still look fairly 1950's. I just really don't like the mess of seams you'd get at the sides.

- Of course, with this shape of the bodice, the arm-room issue could also be solved by adding room at the top of the arm and shifting the sleeve up. That would mean making a shoulder seam and flaring it up from the shoulder point (the long red line in the picture would be the seam, the small wedge would have to be added to each side, but I thought adding two might make the drawing more confusing). It would work but these seams would meet in a single point at the back of the neck. Which doesn't work with the cut-on facing I've been using and I don't really like that look anyway.

- Building on the idea of adding room at the top of the arm, I could consider adding a gusset there. 

- And because that would mean attaching the sleeve to the area where the gusset is, wouldn't it be better to integrate those two?

- And because the sleeve is closely fitted, it might be better to shape both pieces so they can be made to properly encircle the arm.

I had some other ideas somewhere along the line, like one involving a side panel for the the bodice which would extend into the underarm gusset, but I think these were the main ones. I think I like the first and last idea best, depending on how vintage or modern I want the end result to look. 

Oh, and there is one other, important alteration which I am considering for those styles which should not look very 1950's: In the design sketch, the diamond shape of the 'object' bodice is much more pronounced than in the actual dress. I would like to be able to make my creation look like that.
It doesn't because I've mixed pattern shapes for loose, free-hanging shapes with pieces of a fitted design.

If I want the dress to look like the drawing, I should make an alteration like this, which will add extra material to follow the skirt to my sides. And of course, any alteration I make to the shoulder (apart from those where I also want to change the bodice under the arm) can than be applied to this shape.

I haven't made any of these alterations yet, but I'm sure I'll try my favorites. And I thought you might like this little look into how my mind works with these things. 

November 8, 2010

A practical experiment


After the self-indulgent sewing extravaganza which was the leather jacket, it was time to tackle one of the few obvious gaps in my self-made wardrobe: simple tops.

After years of sewing, I still find myself wearing the same old black turtle necks from H&M whenever the weather starts to cool. Especially if I want to wear an eye-catching skirt. The olive drape-neck top was definately a step in the right direction, but I needed more. And I've got brown/olive knit in three different weights. And that colour looks good with most of the colours of skirts and trousers I've got. And it fits my A/W colour plan...

I couldn't resist a pattern experiment, so I didn't make a basic which will go with anything. However, I did make a long-sleeved top which will go with trousers and some skirts and it taught me more about my strange free-form pattern. It also provides the right amount of warmth for the weather we're having now.
And M mentioned liking my sleeves when I wore it today (and she's a designer/pattern maker with many years of experience, so I really rate her opinion).

August 22, 2010

experimental top tutorial

Here it is, by popular request: a pattern tutorial for the top in my previous post.
It is a pattern for jersey/knit fabrics and it should be sewn either on a serger or using a stretch stitch on the sewing machine (dedicated stretch stitch or small zigzag). It will take about 1 meter of 1.4 meter wide fabric and no additional supplies.
You will need some kind of pattern to use as a sloper. A standard fitted t-shirt is ideal (Burdastyle's Lydia for example) but it can be any pattern for any knit top, as long as it is at least waist length and has a set-in sleeve. I would always recommend using a tried-and-tested pattern. In this case, you will use the back neckline, the angle of the shoulders and the waist length and width.
All instructions and given measurements are without seam allowance.

1. Trace the back pattern piece onto a new sheet of paper, placing the center back at the left edge of the paper (put it on the bottom as well, the rest of your pattern will be drawn upwards and to the right). Make sure to mark the waistline.

2. Place the front pattern piece with the outer corner of the shoulder touching the corner of the back shoulder. Position it so that the center front is at a 90 d
egree angle to the center back line. Trace and mark the waistline.

3. Draw the waistline for the top at 3 cm under the sloper's waistline (front and back). The length of these lines stays the same.

4. Mirror the front pattern piece.

5. Draw a front neckline/warp-over bit as shown.

6. Draw a diagonal line, connecting the new waistlines.

7. Parallel to this line, draw another one, at 3 cm distance. Create a gentle curve from one to the other, making sure to keep the line straight in the middle.

8. Loosely measure the circumference of your arm above the elbow. Draw a half circle with that measurement as the size of its edge and its center in the middle of the line you've just made. (to find the radius of your half circle, double the measurement and divide by 6.28)

9. Now, your main pattern piece is finished. It will be cut with the center back on the fold. To make the waistband and the narrow bands for the neckline and armholes, you will need to make straight strips of fabric, cut on the crossgrain for maximum stretch.

10. For the neckline, measure front and back neckline on the pattern and substract the measurement by 10%. The pattern piece will be that length and 4 cm wide and should be cut on the fold.
For the waistline, measure the back waistline and the front one from the side to center front. Substract 10%. This pattern piece will be that length and 24 cm wide and should also be cut on the fold (that will give the waistband a center back seam, if you prefer seams at the sides, don't cut it on the fold)
For the armholes, Substract 5% from the armhole measurement. The piece should be 4 cm wide.


Sewing the top

A. Close the shoulder darts

B. Stitch side seams.

C. Fold the neckband in half lengthwise and right side out. Treat as one layer and pin and stitch it along the neckline, stretching it to fit.

D. Sew the short ends of the waistband and armbands together.

E. Fold the armbands and stitch them to the armholes like you did for the neckline.

F. Pin the front pieces of the main pattern piece so they overlap each other and the tip of each one is at the other's side seam (the right side, for the wearer, should overlap the left). From now on, the two front pieces should be treated as one layer.

G. Fold the waistand in half and pin and stitch it along the bottom of the main piece, stretching it to fit.

I hope I've explained everything clearly. If you make the top, I'd love to see a picture and if you blog about it, please let me know.

August 20, 2010

flat form experiment - top

It feels it's summer again today, and I really hope it will be here to stay for a little while, because I still plan to go camping for a few days. However, that hasn't stopped me from developing my autumn sewing plans.
I thought about photographing/scanning the stash fabrics I plan on using and post them with my sketches. Thought about it, and then decided against it. Neither photographs nor scans of fabric ever turn out right for me. Every digital device always wants to represent an equal spread of the colour spectrum, so if you try to get an image of a plain colour fabric, the results can be quite... eh.. surprising. I may try to get an image of a bunch of them together, later on.

For now, I would just like to show off my new top. It's one of my experiments: the pattern is very 'flat', part geometrical shape, part from sloper. I made it 'evolve' from the pattern for this top, made earlier this year. It has a warp-over front with a banded neckline and a wide, fitted waistband. The main pattern piece is almost a triangle, cut on the fold with 'dents' in it for the armholes, back neckline and shoulder darts (which need pressing, as I see in the second picture). Originally, I had planned to attach full length sleeves. Howeverm when I tried it on, I realised that, with the armholes in this position, there is slightly more material at the front than at the back. With these banded armholes, it doesn't matter if they are a bit higher at the back then at the front but with sleeves, it could get uncomfortable. Despite that, I'm rather pleased with both the look and the shape. I may try to make yet another step in the development of this part-free form design: a cardigan with sleeves.