Showing posts with label muslin. Show all posts

March 5, 2016

Testing...

Alright, so I still haven't moved passed sewing toiles... I hoped to get some real sewing done today but it just didn't happen. However, I did get pictures of the muslin for that 1950's Bella dress. 


I have to say I was pleasantly surprised by it. The skirt has an interesting style: It is only moderately full and cut in six gores with flat pleats at the two front seams. Of course the whole thing looks much more flamboyant in the illustration but I think the real thing comes close, once you take into account the proportions of a real body.

I think the waistline is just a bit too high on me though... I feels a little bit snug at the bottom of my ribcage and is clearly already flaring out at my actual waist. 

And then, there is the bodice style... while I was sewing this, I was a bit concerned that the bust on this pattern might be way higher than mine... And indeed, that curved horizontal seam hits just below the apex of bust, not under the bust like design features like this usually do. 

But that is also how the bodice looks in the drawing... And if the seam was below the bust, that slit neckline would gape... So, maybe that bust seam is a design feature.

As it is, I consider adding the extra bodice length I need above the bust seam, which will bring it down a little but but keep the overall effect it has now. Other that that, the dress looks promising. I just don't know which fabric to use yet.

January 10, 2016

Testing...

Just a word of warning: These are not my usual kind-of pretty pictures. These are what you get if I manage to squeeze in the sewing of a toile in a rather busy weekend and then run downstairs and demand from E that he take a few pictures right there and then. Scruffy hair, no shoes and a photographer who is looking down at the model...

Of course, I started to second-guess myself about that 1920's dress. The fabric I had in mind might have been cheap, it was also kind of earmarked for a very different dress. One which, in my mind's eye, actually looks a lot better in it. 
So, I decided to make a muslin after all, using this pale green fabric. It came from my stash and was as cheap as the other fabric but I didn't really know what to make of this stuff. And it seemed to have the right hand for this design.

Ehm... What can I say. It's a genuine 1920's dress. The size and proportions look right for the period but not exactly flattering.

To be honest, I was almost ready to just add this one to "interesting experience" and leave it there. Even if I found the perfect fabric for this dress, would I wear such a sack-shaped thing?

Then I went upstairs again to take it off. And I looked in the mirror and played with it a bit... And I came to a very similar conclusion as before: It wouldn't look quite so sack-like and unwearable if I made a tuck on that waist seam. On the front in this case. That would also draw in the front bodice enough to make the armscyes sit properly (the front bodice is extra wide. In theory, this should provide the neckline drape but in practice, unless it is pulled in at some point, that extra width just spreads out and puts the armscye in an annoying low position).

So, I guess I will be looking for the right fabric after all. I know I do not have anything suitable in my stash (the vast majority of my fabrics has a lot less drape and is more suitable to post-1947 looks). And it looks like a nice colour would help with this dress. No black this time...

November 30, 2015

Toiles!

Right until the moment I started to take pictures for this blog post, I thought I had an easy answer.
Yesterday, before I went to the climbing hall, I sewed up very simple toiles of both of those patterns. A quick try-on showed me that on the half kimono-sleeve one, my alterations had worked. The raglan one had a nice clean fit under the arm but a weird bulge in front of each shoulder, a to-be-expected consequence of that trick I used on the sleeve so I wouldn't have a dart in the sleeve. 
The outcome seemed clear: Just make the half-kimono-sleeve one, the best one overall.

And then, I tried both on again today... A bit more carefully... (oh, and don't pay attention to the odd seam on the collar. I only made the under collar for the toile because it is quicker and the facing does not actually change the shape) 

This is the half-kimono-sleeve jacket:


The shape works but that big sleeve gives quite a bit of excess fabric under the arm. That is a normal result of this sleeve style so it can't really be removed. Not without seriously compromising freedom of movement.
Oh, and I should lengthen the jacket at center back and adjust that bottom edge to be a nice smooth line.

And this is the raglan one: 


No bulging fabric under the arm here. The weirdly placed excess material in front of the shoulders is on the seam lines, so it is easy to take in. With that issue out of the way, this version starts to look really good.
It also needs some more length at center back and the front bodice should be taken in a bit at the bottom edge. 

With the adjusted raglan version, the only really difference seems to be in that forward tilt of those sleeves.
Of course, I am never going to get that sculpted effect in this very thin fabric. My real fabric is thicker and I don't mind using some light interfacing but I won't go all-out with horsehair and heavy tailoring. 
But the shape is clear: Those sleeves curve forward and the hem looks shortest at the front. I can adjust the hem of my sleeve any way I like but that curve is a bit more difficult. I might take in the front seams (on either version) a bit. That would help a bit. The original may have the seam in an unusual place, more to the front (or have an extra seam) in order to get that shape. With my softer and slightly stretchy fabric, I don't think I'll bother though.
Which one to choose?

January 4, 2015

So many toiles...

The last time I talked about work in progress here, I told you I was going on with the vintage patterns. I told about making a muslin for this dress:

A real beauty from a winter 1950 issue of Bella magazine. 
I did just that:

And wasn't pleased with the result. This is a common problem when you fall in love with a design you've only seen in an illustration. Fashion photography may often lie, with drawings really are just a fiction of a garment. 

For obvious reasons, I'm not modeling these muslins but even on the dummy, you can see some of the issues. I'm not even talking about the fit here. There are some issues with that but nothing I can't deal with. 

My real problem worry is with the design elements I originally fell in love with. That pocket/pleat thing looks too wide when I wear this dress. The pleat from the shoulder (I always love that feature) which looks really prominent in the drawing, is actually quite small and not very noticeable. And that sassy pencil skirt is more of a modest A-line.
It's not an ugly dress but just not as great as I hoped it would be.

The fabric I was planning to use is a black wool crepe which has been in my stash for a while. It's a high quality material which I was able to buy fairly cheap. As such, it has suffered the fate of so many nice fabrics which are not bought with a specific project in mind: It has become a 'Holy Grail' fabric. It's so nice and I could never replace it without paying quite a lot more than I did for this stuff. As a result, I've become afraid to use it. 
Of course, that is ridiculous so I have decided to use it now. But I still really want to be sure I will use it to make something I will love.

So, I decided forget about the Bella dress and try something else. After some sketching, I went with an odd skirt shape I've had an eye on for a while.

This picture comes from Dutch ladies' magazine Beatrijs from 1951, from an article about fashion from the US. The skirt is pencil skirt at one side and circle skirt at the other. This lady looks very glamorous in it.
From the moment I saw this picture, I wondered if that would work in real life.

And I don't think it does. As I had expected, the width spreads across the skirt a bit and the weight of the wider side makes the bodice sag. It would be possible to compensate for the sagging but the whole thing just looks a bit weird.
I quite like this bodice though. I'm just not so sure I like it for the black crepe. I'm very sure I like it for another dress I want to make before the weather warms up again.

So, it was back to the drawing board again. This time, I decided to stop trying to be clever. Often a good call when you're feeling a bit lost design-wise.
How about making a simple beautiful dress? With some nice pattern details, of course. 

Kimono sleeves, a V-neck, half circle skirt. A good start but I wanted to try a different and new-to-me construction for that bodice and an interesting detail.

This bodice has side panels which extend into the underarm gussets. And I've added large patch pockets which stand away from the skirt at the top. It still requires some tweaks but I think I like it.

So, now I have to start thinking about the real dress: Full lining? Just a bodice lining? No lining? How about fitting the bodice closely and putting some boning in to keep the shape? And if I'm going to line the dress, what material should I use? And with the side panels, I will have no choice but to put the zipper at center back but shall I use an invisible zipper or some more vintage solution or go for something more edgy and use a metal zipper and put the teeth on display? And maybe I could use piping along the neckline and those pocket edges...

I should be able to finish the pattern on Tuesday so I hope I can start making this dress for real pretty soon.

November 13, 2013

That dress muslin!

Are you still interested in the 1930's inspired dress I want to make from my green wool crepe?
I know progress is slow. Nowhere near my usual pace, to be precise. And I don't really know why. This is not a busy time at work so there should be plenty of time for sewing. All that time just seems to slip away…

Anyway, I sewed up a muslin today. Because I was afraid my pattern might be too large for the amount of fabric I had, I measured out the muslin fabric carefully: no more than 2 meters, at 140 cm wide. It took some tetris skills, but I managed to get all of the pieces out that. The only real sacrifice was having to reduce the flare of the inserted skirt piece. I was a bit worried about that, but decided to have a look. 

Looking at the dress now, I don't mind the slight flare of the skirt. And I like the pointed shape of the inserts. I don't really care for the neckline though. I let the front sleeve meet the neckline at the shoulder seam and the cowl neck connects at that point too. I think that combination makes the upper bodice look to high and square. I will have to re-do the front bodice and top of the sleeve. I'll put the raglan seam lower in the bodice and make the cowl neck a bit deeper. And of course, the real fabric has a lot more drape than this stuff I'm using for the muslin.

There are some fit adjustments to make as well: it's a bit tight at the lower ribs. This must be caused by the way in which I grafted that point onto the skirt without darts and I think I know how to compensate for it. It only needs a little bit fine-tuning anyway. There's also too much of a curve on the sleeve just past the shoulder. I've pinned it and I can just shave a bit off the curve in the pattern. And I will have to re-position the elbow dart. It should be about 3 cm higher. I had the same issue in the kimono sleeve muslin for the drape skirt, so  it was no surprise. It makes me want to check the sloper though…
I may narrow the lower sleeves a bit, but I'm still considering that. 
Normally, I don't make dresses with long sleeves. I'm always afraid that would make them look really frumpy. In this case, I was following the inspiration from the 1930's: narrow long sleeves. And I think it works with this silhouette. 

Oh, and there two things not quite right in these pictures which don't worry me: the hem (result of the improvised skirt insert pattern piece) and the odd bulge in the back (I paid attention to pinning the side opening before taking pictures but I was mostly paying attention to the skirt and of course, I could only see the front of the dress).

And then there's something else to consider. Using two fabrics, or both sides of silk crepe satin, in one dress was very common in the 1930's and I just happen to have some satin (supposedly silk, but I didn't test) which matches the colour of my wool crepe. It's thin and shiny so I don't want to use it in large surfaces or in fitted parts of the dress. But it might be very nice for that draped neckline. Using a different fabric for that would allow me to make it wider and maybe put some pleats in.
I knew about that matching fabric before but I'm only considering it seriously now. What do you think?

November 17, 2012

The continuing story of the redingote: Muslin no. 3

It's one of those dreary autumn days: a tiny bit of frost in the night, fog all day, a sort-of drizzle of rain and, as a result of all that water vapor, no proper full-on daylight even at noon. These pictures may not look too bad, but I had to stand very still...


Anyway, this is my third try at the Marion redingote. To make this one, I did the alterations to the previous version, the one I drafted myself. I re-drafted the sleeves, letting them take up a lot more space on the front and back bodice. I also lowered the bottom of the armscye quite a bit and widened the top of the sleeve (I'll post an explanation about that tomorrow). I went for a completely different pocket design. I narrowed the waist a bit and flared out the skirt. I also altered the lines at the back, making the center panel narrower (to be more like the Marion design). 
For a normal coat, I would consider the waist over-fitted but in this case, I think it suits the style. In all the pictures I have of post-1947 redingotes, the waist is quite tight. I may let the bust out a little bit though.

The funny thing is, now it's starting to look like the picture in the magazine...


Obviously, I still have to put the collar on. I am still considering it. I like those little back darts in the original collar but I'd like mine to be a bit lower. It may be less warm but is suits my body shape a lot better. And also, it's already quite a lady-like and old-timey coat, maybe I should do a notched collar or something like it to give it a bit of an edge...
And I'd really like to stop making muslins and start on the coat itself...

November 12, 2012

Coat muslin 2.0

I had the day of today, so there was time to work on the coat pattern. 
I wore the shirt I posted about yesterday, tucked into the red skirt. Just mentioning it ;) 
I never like getting zero comments to a blog post but I guess that teaches me for doing hasty posts with bad pictures... (also, to get rid of a certain kind of spam, I recently disabled anonymous comments on the blog, I thought that would hardly effect real comments but I have had an email about it. I just changed the settings back, I hope the spammers have already left).
Unfortunately, in this post, I once more only have some very hasty pictures on offer.

I drafted this pattern based on the Marion design. I didn't add a collar yet, I plan on using the original Marion collar. Please ignore the fact that I accidentally cut the center front pieces 10 cm shorter than the other ones (I didn't draw the full skirt length on paper...) and the wonky pinning.


First of all: this coat actually fits me. And you can see a body shape in it as well! I'm even fairly satisfied with the way the sleeves fit at the top of the shoulder. And the skirt now falls pretty much like a lot of redingote skirts in vintage pictures. With just a couple of tweaks, this could be a rather nice coat.

But then, there's a lot I don't really like. Those sleeves are too tight at armscye. There is a way to draft them, set lower, with ease at the upper arm allowing for a good range of movement. I also don't like how little space the raglan bits occupy on the bodice. Being more used to full raglan sleeves than to this pointy half variaty, I must have been far too modest drawing them in... I'm thinking about re-drafting the sleeves to adress these issues. 
I also think I would like the skirt to be a bit fuller yet. For this version, I simply followed the angle of the lines just below the waist which gives this form-fitting flare. There's nothing wrong with it but I'd like a more spectacularly skirted coat. And of course, the skirt also needs to be longer. 
Along the same "it's actually not bad but I'd like it to be different"-line, I will tweak the bodice a bit. It's a tiny bit snug at the bust, which is easily remedied. It has a normal fit at the waist by today's standards but I think I will tighten it up just a little bit there to get a bit more of that 1950's look.
And then there are the pockets. I copied the design from the Marion coat but I'm still a lot less then thrilled with them. I'm going to abandon the the curved scoop pockets in favour of somewhat draped stick-out pockets like those on my skirt. Those new pockets will also be placed a bit lower.

All in all, I think I will need to make another muslin. So, what started out as a fun little vintage thing is actually turning into one of those projects...

November 6, 2012

Ehm... well, that coat muslin...

So, by the end of last week, I found some time to trace the pattern for the Marion coat. Although the pattern sheets look choatic, they are actually not that bad. Black on yellowed white is much easier to see through tracing paper than red or green on grey-ish recycled paper... And obviously, I wouldn't even think about taking a tracing wheel to a nearly 60 year old pattern. 
As I told you, the pattern was in size 38, which, in 1950's Marion, was the smallest ladies' size. It's bust 88 cm, waist 68 cm, hips 96 cm. The size of the dress I made this summer was 36, which they sometimes mention as a small ladies' size but is actually considered to be the size for 14-16 year old girls. That size has bust 86 cm, waist 68 cm and they don't mention a hip size because young girl's don't wear narrow skirts. 
I'm at about bust 84, waist 65, hips 94 myself and I remembered a suprising amount of ease at the waist and a high waistline from the dress experiment.

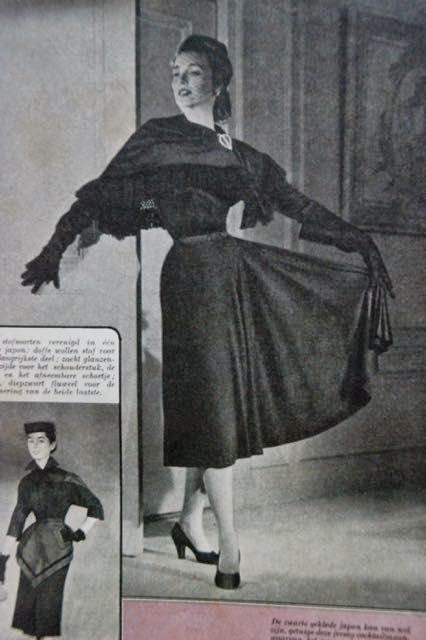
Even before I traced the pattern, the drawing of its pieces made me pause to worry. Those skirt pieces seem to flare out to fit the hips and then continue more vertically towards the hem... That does not a full skirt make...
I decided to go ahead anyway. One of the great things about these patterns is to find out the actual proportions of fashion which I mostly know through somewhat idealized fashion plates. 
I worried again looking at the pattern pieces. There didn't seem to be that much of a waist-to-hip ratio at all...
Despite those misgivings, I cut the coat in my muslin fabric. As the measurements stated about indicate, I could expect it to run a bit big but the alteration I made at this stage was to lower the waistline by 1 cm (in line with my experience with the dress and with a measurement of the center back).

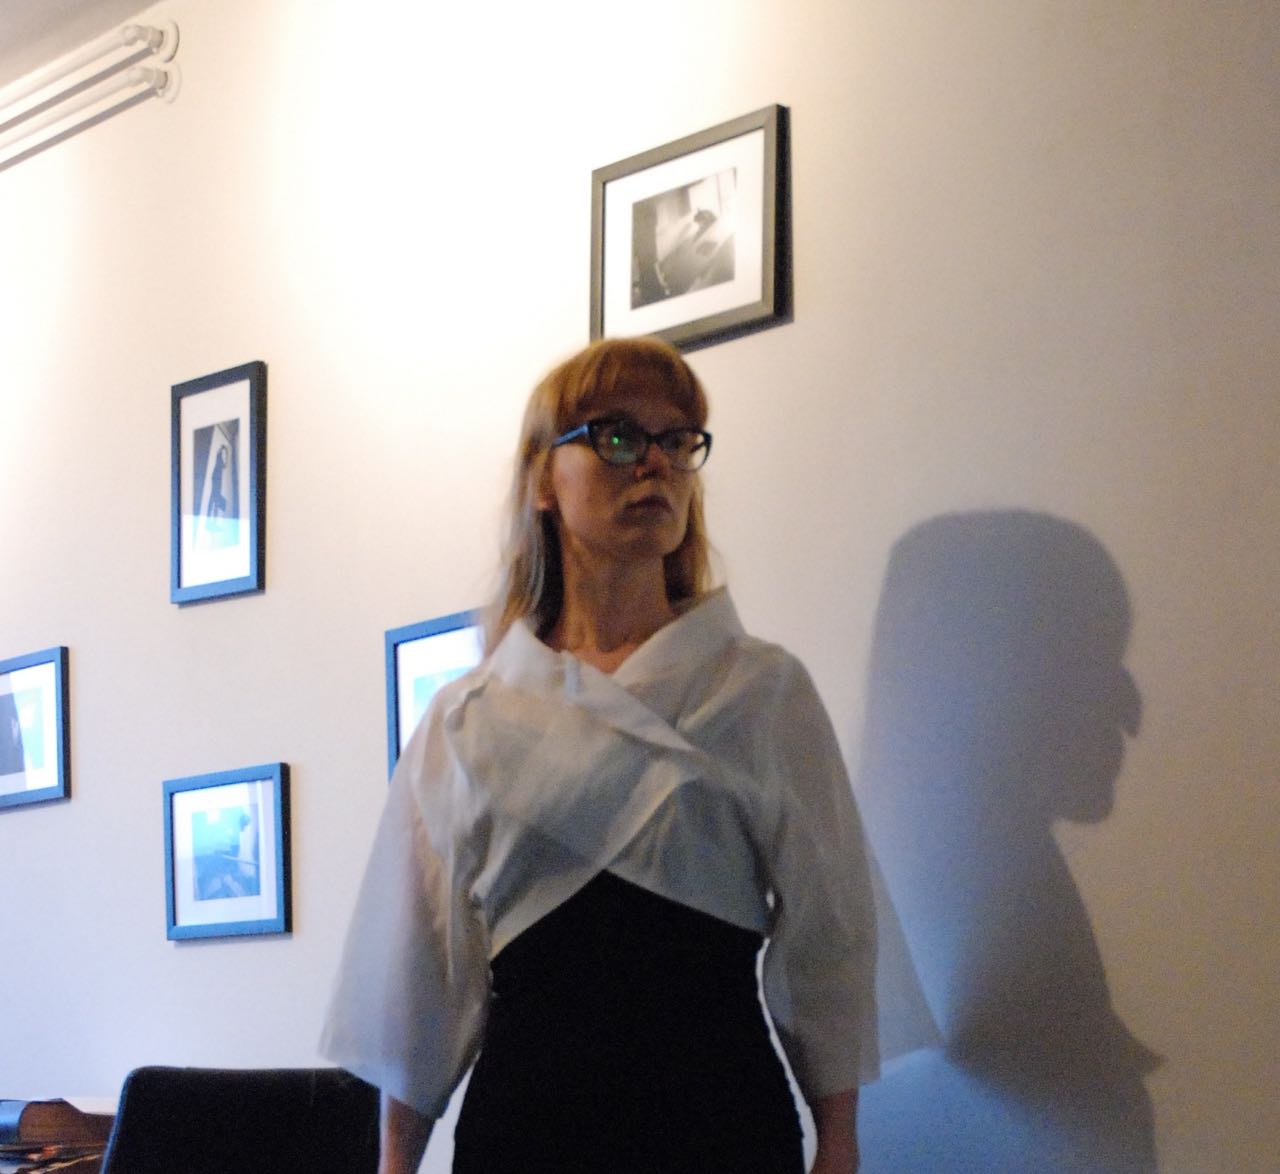
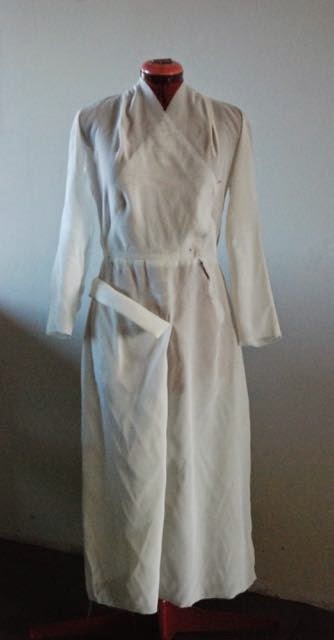
On Sunday, I completed my muslin. Unfortunately, it was a very dreary day so by the time I was finished, there wasn't enough daylight left for pictures. I only found time for that this morning, between a dentist appointment and going to work, on a another rainy day (which is why I don't look nice at all in these pictures).

Well. What can I say? This is why I learned to draft my own patterns... 

This hardly looks 

like this, does it?
My main reason for not grading down before making a muslin was shoulders. In my experience with both RTW and commercial sewing patterns, I tend to need a size bigger at the shoulder than at the chest. My first Marion dress didn't really involve shoulder width so it didn't provide a benchmark for that. So, I figured the size up, 38 might be just what I needed. If I were lucky, I'd only have to pin in those princess seams...

As it turns out, there's no such luck. This coat is ridiculously too big. Even when worn over a sweater, I can easily pinch in 10 cm at the waist (and sizes go up by 4 cm intervals!). Of course I know coats need ease, but this is one is supposed to be closely tailored at the bodice!
Weirdly, the chest seems less oversized than the waist and hips but that may be down to the fact that the whole thing is pulling back rather substantially. 
And those shoulders? They also seem to be too wide by about 2 sizes... 
Somehow, I don't think using Marion patterns for 10-12 year olds would solve my problems either...
Oh, and it's just so flat. Tailored, fitted coat? Redingote? Nice feature pockets sticking out a bit from the hip? None of that. It's not really wide enough for a swagger but there's neither fit nor flare.

On the up side, I like that collar. It's a little shawl collar made higher and more lofty by four little darts, two on either side of the center back. It both flattering and practica because it allows for a bit of a statement collar which is still quite closed-up and therefore warm. 
Oh, and my waist-length alteration seems to have done the trick.

All in all, I don't think I will be grading and altering this pattern. There's just too much which I don't like or is way off. I think I will try and draft my own pattern based on the drawing of this one. Although I will try and incorporate the original collar. My interpretation of the design if you will. 
Stay tuned for the next muslin!

March 18, 2012

Cape muslin

Like many of you suggested, I decided to go with the short cape with sleeves. But, since this little book is new to me and I still wasn't entirely sure about the look, I decided to make a muslin first.

First of all, the instructions in the book are decidedly sketchy. Of course, I don't have the slopers it used to come with, but still...
It doesn't mention how deep the cut between sleeve and body should be, or at what angle to the straight grain or what distance to the original under-arm point it should be made. Either of which would have been very helpful to get the right placement. It only tells you that the sleeve hem is 21 cm wide on each pattern piece... And it does mention shoulder/sleeve length but not the length of the body of the cape.

If my theory is correct and this method of pattern buying/making never really took off, they didn't just have affordable patterns from the likes of Marion to blame for it...

Also, the text about what looks, at first glance like sleeves is not entirely clear either. They mention a slit between body and sleeve but don't really go on about the sleeves themselves.
And on closer inspection of the pictures, I noticed this:

Edges at those 'sleeve-slits'. Do they mean they're not sewn together? Or only at the very tip? That sort of defeats the purpose of including something sleeve-like, doesn't it?

I did stitch the slits on my muslin as sleeves. On one side, I also added a sort of underarm gore: a strip of fabric 5 cm wide between the front and back of the cape. At the other side, I just sewed front and back together.

Even when posing like the lady in the drawing, I fortunately don't look like I don't have shoulders at all.
The fabric I used for the muslin is a bit stiff, so I expect the cape to drape more gently when made up in an actual fashion fabric.

Oh, and the fabric tends to stick to the fabric of my jumpsuit, which makes the 'normal view particularly un-appealing.

In these pictures from the side, you can more or less see what I'm talking about with that underarm gore. Basically, it allows that half-sleeve thing to function like a real sleeve.

with:
without:

I'm still not sure about this thing though. It is more like a little jacket than like a cape and I don't know about its dimensions. It might be better if I made it a little longer...

March 28, 2011

Slow going

Wow, lately it seems like everyone else is sewing and blogging up a storm... I feel like I'm lagging behind. Badly so.
The truth is, I've been busy. Too busy to get a lot of sewing done. And then, as soon as I get time to sew, there will be an assignment waiting for me. Work just been quite busy lately. And E had to work another entire weekend, so there are still no better pictures of the jacket.

As mentioned before, I had decided to fit in a few quick and easy things between my jacket and the assignment one. Of course, 'quick and easy' tend to be famous last words in my world...
I started of this skirt thinkin it would be both easy and a great opportunity to try out the tiny amount of draping experience I had just picked up at M's. Hm, well where to start?
I can't drape skirts at home. Mary still doesn't have legs and she has a posture issue and my normal dummy opens at the sides and center front and back which makes her quite unsuitable for pinning and draping. This meant I had to go with what I already know and start from a flat pattern.
Secondly, I hate this fabric. I love the colour and the hand is rather nice too (although maybe not ideal for this project) but it's just so synthetic. I knew it was polyesther, polyesther crepe to be precise, but not all polyesther fabrics are created equal. And as it was very cheap so I thought I could always use it for a muslin.
Well, that's what this skirt will have to be. A muslin. Which is why it doesn't have a zipper or facings and why I didn't press it properly.
This fabric isn't even worth that name. The stuff creates so much static electricity that I think it's a fire hazard. No way I'm going to wear that. And it frays like crazy.


I think I do like it though. The draped front will have to be smaller because it drags that side of the skirt down too much (not visible in the pictures) but I would just love to have a skirt with a 'fly-away panel' (as they call this feature in vintage pattern describtions, if I'm not mistaken). If you ask me, it's fun and flirty and feminine. Even though it's also difficult to finish properly because both sides of the drape are on display and there's a curved edge (I used a rolled hem from the serger on this muslin, but another fabric might need/allow other methods).

PS. Don't forget to enter the pattern magazine giveaway!

February 14, 2011

Back in the game: another jacket muslin

Well... What to say about this one? I would really like your opinion this time. I think the jacket body is about right by now. But, this is a muslin with the styling in place. And that's where I need your opinion: completely mental or kind of cool?

There is some strange pulling of the sleeve at the front. I know why and I will fix it, so please ignore that. I'm not so sure what to think about this look. Before, I liked the banded sleeve, but I felt it could be pushed a bit further. So I did.
This result does look a bit like those Balmain sleeves from winter 2009, which makes me wonder whether it looks too much like some fashionable one-day fly.

I also went with a peaked lapel because it's the sharper look, which I thought would go better with the crazy shoulder than it's tamer cousin. I did take out a little dart on the fold line before drafting the collar and that seems to have worked. And I added back vents.
The pocket flaps are just pinned-on bits of fabric now but I plan to make bound pockets with flaps, using the usual jacket trick of cutting the bit below the pocket on the center front (hard to explain that properly, I'll record the process for you later).