Warm weather and sewing with lycra... It would have been weird if I hadn't thought about swimwear last week. And sure I did. I've been thinking about making a new 1950's style bathing suit but I decided to make something more practical first: A sporty type of bikini top to go with my existing set. It's something I already blogged about a year ago.
I'm not much of a beach or pool person but if I go near one of those things, I like to be able to swim. I didn't miss a practical swimsuit in the past year but I know I would on my next holiday or if I decided to go to the beach after all...
This new top is a simple racerback style, drafted from a dartless bodysuit block. It's basically shaped like a sport bra although it doesn't compress the chest quite as much (I wanted that. It's not like I'll be doing heavy exercise in this thing and this way it doesn't completely flatten my breasts).
If I make a top like this again, I would make the racerback piece a bit narrower at center back. It works well like this, but it would look better if it were narrower.
Now, I have a practical bikini. I may go on to make the pretty one as well but for now, I'm returning to my 1930's dress plan.
Last week, we had a bit of a heat wave here in the Netherlands. I know, our heat wave may feel like a nice day in spring to some of you out there but in this country, 30 degrees Celsius or more really is very, very warm. I usually don't do well in very warm weather and my sewing usually suffers because my sewing room catches a lot of sunlight in the evening. In past years, I've made very light and airy little outfits to deal with this weather. This year, I decided I already had enough of those (heat waves normally don't last long here) but I still didn't feel like "proper" sewing, with large pieces of fabric.
Instead, I decided to make more lingerie. I like the set I made recently, but it could do with another pair of panties. And it would be a shame not to try and use up that lace and lycra...
I quickly realized that the aubergine coloured (and still very difficult to photograph) lace and lycra didn't just go with the matching elastic I bought for it (which was only enough for a second pair of panties) but also with the dark cream/light beige coloured picot elastic from my stash.
So, I made a pair of panties in my tried-and-tested lace back pattern to match the first bra.
And a modified version of Melissa's Lacy Thong using the light coloured elastic. I've made this pattern several times and I always thought the front could be a bit lower where the lycra meets the lace and I always had some excess fabric in the center back panel. So, this is my improved version but I think that has more to do with my specific shape than with the pattern.
Then, I looked at the amount of material I had left... It looked like a lot but it's always hard to tell when sewing lingerie. I was hoping it would be enough for another bra and two pairs of panties but I had my doubts. So, I decided to cut out and make that second bra first and then see how many panties I could still make.
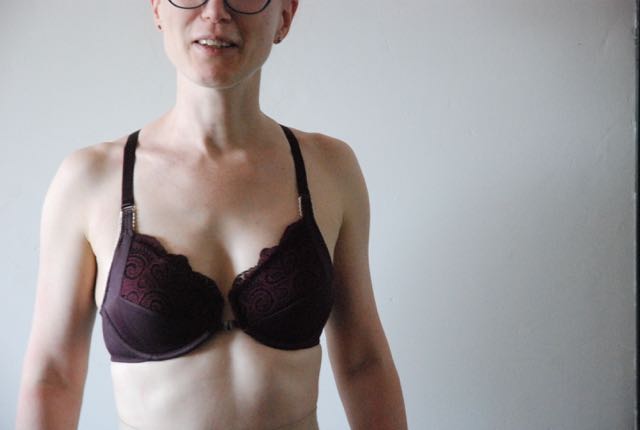
The second bra was always going to be a racerback one. It's a shape I've loved for comfort and practicality in RTW and I'm still happy with my first self-made version. The great thing about this style is that you never have to worry about bra straps sliding from your shoulders.
This also makes it difficult to get good pictures of these bras lying flat on the table. So, considering the fact that the foam cups make this bra not very revealing, I thought it would be better to model it.
Like most of my bras, this one has cups made from cut-and-sew foam, covered with lace and lycra. I used plunge underwires and a front closure cut from an old RTW racerback bra. It's basically the same pattern I made before but I've changed the cup edge from a curve to a straight line and I've treated it covering differently. And I used fold-over elastic on the first one and normal lingerie elastic here. At the sides of the cups, I only cut seam allowance on the lycra, not on the foam. A its first pass, the elastic was only sewn to the lycra, then it was folded back over the foam and stitched down. It was fiddly but it worked and I quite like the finish.
Just for comparison, this is what the strapless bra looks like when worn. You can see the slightly pointy shape it gets from that bit of boning in cup.
I had to wait for a few days until I could finish this bra because I had order the underwires from lingeriestoffen.nl (different stores and webshops sell different brands of underwires and those can vary a lot in shape. Those sold by this shop have a combination of length and width which works really well for me. It's also great that they list all the measurements of all the underwires on the site).
And then, I had to see how much I could still make from the remaining materials... It wasn't enough for two pairs of panties. It was about enough for one and a half, no more.
So, I just made another version of my favorite design.
This set is now well and truly finished, however sewing lingerie is always a bit addictive... There's more to make. New shapes and designs to try out, both in lingerie and swimwear. And a lot of other bloggers seem to be making stuff like this as well now...
I didn't plan to take a break from blogging but because of it, I can now proceed straight away with telling you about that museum tour.
In fact, it wasn't at the museum at all. It was at the museum depot. The Rotterdam Museum doesn't have room in basement or attic to store items which are not on display, like many museums do. It shares a depot at the edge city with other museums from Rotterdam. It's not a place visitors usually get to see, which actually makes it more fun to have an opportunity like this.
The museum's collection slumbers, carefully packed, on endless shelves in large rooms which are kept at a temperature of 17 degrees Celsius at all time.
We came to look at items made from chintz and the sample books from the Rotterdam Cotton Company.
The first item was this magnificent, but impossible to photograph, 18th century dress. We were looking at it with the dress lying flat on a table, great for studying all the details, not so great for pictures.
It is made from genuine chintz, imported from India, hand-painted in a glorious, large, intricate floral design on this deep red ground. There is a repeat in the pattern but only in about a meter and even then, it isn't exact. Because it is hand work, obviously.
The dress is in a great shape, the fabric even still has its shine.
This skirt is also made from hand-painted chintz but this design seems more European in style. And the design was specifically made to be made into a skirt like this.
On this lovely children's dress, the design is large but ordered almost like a jacquard (which is, of course, a woven fabric from Europe, usually France).
And this woman's jacket has a very small print. Still hand-painted in the same technique, but very different in look.
Chintz became very popular in European fashion from the late 17th century onwards so it was perhaps unsurprising that factories across the continent tried to produce something similar.
That is where the Rotterdam Cotton Company came in. Under various names, this company has existed from the early 18th century up to 1930. They did produce immitation chintz but unfortunately, those sample books are not in the collection of the Rotterdam Museum (some are at a textile museum in Twente). There were some pictures from it. Not just chintz-like floral but also abstract prints which wouldn't have looked out of place in the 1930's or even in the 1950's.
The sample books in this collection date from 1870 to 1930 and show a variety of designs. Some were for local use but many were made for export. Those are particularly interesting: Many designs mimic Indonesian batik fabrics and were made to be sold there to consumers who couldn't afford the real thing. Indonesia was a Dutch colony at the time, which made careful research and marketing possible.
The same fabrics were occasionally also sold elsewhere, particularly in Africa. Over time, new designs were developed to appeal specifically to that market (other printing companies did the same and one which really specialized on Africa still remains today, Vlisco).
The Rotterdam Cotton Company created its designs by block printing. Blocks were cut from wood and the fine line details were made by adding small pieces of copper. Separate blocks had to be made for each colour in the design and all blocks had to be perfectly lined up. Block printing may have been less labour intensive than hand painting or batik, it was certainly not a simple process.
Then, there was a bit of time left to look at some more garments.
The length of this jacket betrays its age: It has to be from the early 19th century. What looks like yet another floral print isn't a print at all though... It's embroidery, very very fine chainstitch embroidery.
This longer jacket (which was under the short one in the earlier pictures) is made from printed cotton. This one is interesting because its insides show how the bodice length has been changed in such a way that it could be changed back.
The final piece was this short cape, made from chintz with a very dark brown background. It is lined in wool of the same colour decorated with tufts of beige wool. The design looks like an imitation of ermine but in a different colour.
The full circle cape was pieced to use the least amount of the expensive outer fabric. This was hand-painted chintz as well so it must have been expensive. Even today, the fabric has so much shine that it almost looks coated in plastic...
I hope you've enjoyed this little look in the depot. I certainly did. I suppose this is why you should pay attention to vaguely announced events held by you local museums ;)
Do you like fabric? Do you like cotton fabrics? Do you like vintage prints?
If you answered "no" to the first question, I suppose you are here because you got lost... Surely everyone who sews, loves fabric!
If you also answered "yes" to the other questions and happen to be in the Netherlands on 9 July, you may find this event interesting.
Museum Rotterdam hosts a tour through its archive, focussing on the sample books of the Rotterdam Cotton Company. There are two tours, one at 10.30 and one at 14.00 and they are organized in collaboration with Modemuze (I think I mentioned that website before. They are an online platform about fashion and fashion history on which you can search the costume collections from seven Dutch museums. It is only in Dutch though)
At the moment, I'm looking at things and making plans. I have two simple t-shirt-like tops and a pair of shorts which haven't made it to the blog yet but those are not particularly exciting.
Oh and fortunately, that blue top for my grandmother turned out well, it looks very good on her and she really likes it.
I was all set to make that striped 1950's dress because it would be great for the not very warm summer weather we've had so far but this week, the weather is turning.
I was also enjoying lingerie making again and I don't think I'm quite done with that yet. Oh, and I could actually use a practical, sort of sporty swimsuit or bikini...
But right now, I am looking at other things. Vintage patterns. I am considering trying a 1930's look once more. Third time lucky maybe?
I've already brought this up in the We Sew Retro Facebook group and the ladies there gave me some very good advice. The thing is: Those fashion drawings look great but after two failed attempts, I keep asking myself "How would that dress look with hips?".
To make up my mind, I've made a Pinterest board with all those designs from Gracieuse magazine which I like and have a pattern for in a size sort of near mine.
I already see I should pick the year carefully. In 1930, dresses are still quite loose and the waistline sort of wanders somewhere a bit below the natural waist (still on the way up after a decade lower down). By mid-1931 a waistline is forming. Those dresses often have a bodice which blouses over the skirt at from the waist up. I think that could be an option. Later, you start to see more wide belts. And then, by 1934 those shoulders are really starting show...
I've never been a fan of the giant shoulder look which is why I think I may go for a design from 1932 or 1933. Those dresses often have volume at the top of the body but it's soft, for example in the form of capelets or flounce sleeves.
Gracieuse stopped including a pattern sheet in 1934 and the original owner of that part of my collection didn't renew her subscription. After that year, she seems to have relied on occasionally buying other magazines. So, I have some magazines from later in the decade which still include patterns too. Maybe I should add those to my list of options as well...
Of the things I like so far, many day dresses seem a bit too warm for this time of year.
I also can't stop loving jumpsuits but I kind of want a dress...
And today, I just realized this: So far, I thought a day dress would give me the best chance of making something which I could wear normally (which is what I want) but I might be wrong. Like in many summers, the maxi-dress is once more a fashionable warm weather option this year.
So, I wouldn't stand out that much in what is actually a 1930's summer evening gown design... These were even meant to be made in printed fabrics and I think I mostly have printed cottons with the right kind of hand.
I decided to make another top for my grandmother. I've already made her two but in those cases, she showed me the design she wanted and picked the fabric. The first one turned out great and she wears it a lot. For the second one, she bought fabric without me. A really soft viscose jersey which was a bad match for the jacket-like design she wanted. I did my best but I'm really not proud of the result. And I don't think it gets much wear.
This time, I wanted to surprise her. My grandmother is in her eighties and has all the fit issues you'd expect from a lady of such advanced age: hollow chest, sloping shoulders, rounded back. I made fit alterations on a basic t-shirt pattern when I made the first top but it's still a good idea to think about styles which might flatter. She also prefers tops which she doesn't have to pull over her head.
I thought some kind of wrap top would be nice. One with gathers or with a collar. I went so far as to draft the pattern for the one with the asymmetric collar.
However, fabric choice was an issue too... For some reason, a lot of the jersey fabric in my stash is grey-ish or black. Neither of those are likely to look good on her. I wanted to buy new fabric especially for this project, but I couldn't find anything suitable. Just a lot of synthetic stuff and really flimsy jersey...
The one fabric in my stash which might work was this bright blue stuff. Fairly heavy cotton jersey with a very soft, sweatshirt-like brushed back. The only problem? I had just one meter of it. Nowhere near enough for that wrap design.
So, I made a new design. A zip front cardigan with small pleats along the center front. I had just enough fabric for that. But the only separating zipper I could find in a matching colour was this chunky plastic one... For myself, I might have gone with a metal zipper with a zipper tape in a contrasting colour, maybe red. In this case, I thought it might be better to go for the matching one.
As it is now, the top only needs hemming and some little bits of finishing, like tacking down the facing at the shoulder seams. I can easily have it finished before I see may grandmother tomorrow evening. I just really can't predict whether she'll like it...
I've made a new lingerie set. In lace with a lovely rich aubergine colour which happened to be very hard to photograph accurately.
That's part of the reason for this picture on my sewing table.
It's a strapless bra from my own pattern. I've made it three times before, once strapless, twice as a balconette. Each time, I've made slight tweaks to the pattern. As a result, I think this is the nicest version yet.
I was going to make this one with straps but I think the amount of lace, lycra and elastic I have should be enough for two bras and three pairs of panties (hopefully four, that would be ideal). However, I only have shoulder strap elastic for one bra. This design can easily be made strapless but the racerback version, which I want to make as the second one, can't. So, this lace bra became a strapless one.
The outside of the bra is fully made from the lace.
On the inside, there is the foam material (matching the lace in colour) from which I've made the cups and non-stretch skin coloured net. That stuff stands out in these pictures but it doesn't really when I wear the bra. For me, this material has a pretty spot-on skin colour. Like I usually do, I've added bits of boning at the sides and in the lower cups. Both are normal features in strapless bras for larger cup sizes but I like to use that bone in the cup to give it slightly point-y 1950's style shape.
I sewed the elastic at the bottom behind the lace, to keep the scalloped edge.
The panties are a new-to-me design. The shape is based on the lace-back thong I've made several times. This one has lace at front and back, sewn unto a lycra crotch piece. I think it looks nice but the rise is fairly low. I may experiment with that next time.
This set looks like it's pretty much all lace, which is nice. For the next pieces, I'll have to mix up those proportions a bit. After I've bought more thread...