November 30, 2012

A week summarized

I certainly didn't plan to be absent from this place all week... But circumstances conspired against me.
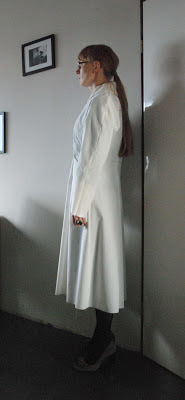
I finished the coat, of which I will only show you some close-up sneak peeks here. 

Front closure

Pocket

I plan on doing an actual outdoor photoshoot for it this weekend. At least, if E can be convinced to play along and take a couple of pictures for me.
After finishing work on the coat, I decided to tidy and clean my, by then thoroughly messy, sewing room. During that process, I found something disturbing: On an open shelf above the drawers which hold my fabrics, next to the dressmaker's dummy on which I display my lovely sharp shouldered jacket, I keep the things I bought second hand with the intention of refashioning them. Leather and suede in skirts and coats, a pile of silk shirts, some of E's old band t-shirts and a harris tweed men's jacket. I found out that a big patch on the back of the tweed jacket had been completely devastated by moths... 
Of course, I threw it out straight away. I also threw out the t-shirts which had been lying under it. The one on top (of the three) had a couple of moth-cocoons on it... 
I spend the next day moth-proofing my stash and my wardrobe. Cedar chips, moth balls, the works... And my beloved jacket is now in the freezer. According to a book on vintage clothing, three days in there will kill any moth eggs which might be hiding. My recently acquired vintage silk dress underwent the same treatment. And from now on, any 'new to me' vintage find will!

After all that unwanted excitement, I was quite happy to get away for a little bit and go with designer friend M to the fabric trade fair in Lille: Premier Tissu. We were looking for eco-fabrics for her brand but those were, unfortunately, not widely available. We did get a good insight into colour and fabric trends though. The 'it' thing for summer 2014? According to this fair, it's digitally printed fabric.

Now, I really have to focus on two little 'assignments' first: making a dressy long sleeved knit top for my grandmother and replacing the waistband on a pair of trousers for my mother. 
And then, I promised E a new coat (because he wears the one I made him last year ALL THE TIME) and a new shirt and I kind of decided to make another shirt for my brother who turned 25 this month...

November 20, 2012

The continuing story of the redingote: Sewing has occured!

This is just a quick post to proove that I've actually started sewing. 

I was good enough, this time, to actually cut all the materials I needed before starting to sew (I often don't cut lining or evening interfacing bits until I need them).
The fabric I have for this coat is an interesting colour but it's also a bit thin so I decided that underlining for warmth was in order. For that, I used this grey wool (I made my half-circle culottes from this stuff, but I still had more than 3 meters left over of a fabric which isn't ideal in many ways). I also thought it would be a good idea to interface the bodice with horsehair canvas (I cut it to extend to 10 cm below the waist). And then, I still had to cut the lining...

After all that cutting, I sandwiched the horsehair between the outer fabric and the underlining stuff and basted those sections, to keep it all in place. Fortunately, all the materials involved 'stick' to each other quite easily. 

Then, I could finally start sewing...
I allowed myself to start on the easy, gratifying long seams instead of wrestling with diagonal bound buttonholes straight away.  

This is the back, with the back of the sleeves already sewn in (this picture comes closest to the real colour blue).

This is the side front, with that stick-out pocket (of course I interfaced the pocket edge).

I even had a good excuse not to start with those buttonholes: I wasn't that happy with the buttons I had originally picked out. 

The interesting dark mother-of-pearl button on the right can from my grandmother's button jar. I think it's a lovely button and I had the right amount of these. But... In theory a colour like this could be an interesting match with the greyish blue of the fabric but it never looked quite right to me. The buttons were also a bit small. At close to 3 cm in diameter, they aren't exactly small but I wanted to stick with the look of the buttons in the Marion design, which calls for three 4 cm buttons.
So, this afternoon, I went to the fabric store (I already looked for buttons at the market and didn't find anything) and bought the blue ones on the left. Now, these are buttons for this coat!
I'll just wait and see if I have the courage to start on those diagonal bound buttonholes tonight...

November 19, 2012

About sleeve alterations

When writing about my second coat muslin, I mentioned I wanted to alter the sleeves. More specifically, to set them lower into the bodice and adding ease to the arm to allow for a good range of movement.
Kimbersew asked for an explanation about that. 
It's actually a trick which is included in the better pattern making books (best known of which is probably Winifred Adrich's Metric Pattern Cutting). As usual, I won't be copying the instructions from the book. Largely because I don't want to infringe their copyright but also because every pattern making book I know of, applies this method (or one very much like it) to a few specific sleeves, while I think I could explain it a lot better in the context of altering sleeves in general. 

I going to illustrate this with pictures showing a normal set-in sleeve but it works just as well with (half)raglan sleeves or sleeves with a square bottom of the armscye.

Imagine your basic, fitted sleeve. It has a high armsye and a sleevehead shaped like this, which will include some ease (Note the markings on the sleeve pattern piece, the double mark in the back set-in marking).

In some garments, especially in coats, you may want a lower armscye to allow the garment to worn over other clothes.

If you alter the armscye just a little, a rather simple rule applies: Lower the edges of sleevehead by half the amount with which you lowered the armsye. Then, widen the sleevehead under the set-in marks for as far as needed to match this measurement on the bodice.

This method works well if you only need 1 or 2 cm of extra room under the arm. Any more and the sleeve will, at even the slightest movement, show strain in the area marked in grey. Nevertheless, it is always the first step when re-drafting a sleeve for a lowered armscye.

There are two ways to deal with this. The first, shown here on the right, is used a lot in sport(y) clothes. This method involves re-drafting the sleevehead making it wider and shallower (when doing this you can eliminate the ease in the sleevehead). This will put the sleeve in a different angle to the bodice (in the previous examples, the sleeve's natural position is hanging straight down, after this alteration, it's half-lifted. In sports, you usually use your arms in some way, hence the popularity of this sleeve in sportswear) and as a result, dramatically alter the over-all look.

For my coat, I didn't want the sporty look, so I used this method: Cut along one of the dotted lines at each side of the sleeve (so, either at the set-in marks or between it and the edge of the sleeve. Which is better depends on the original shape of the sleeve). Pivot the wedges upwards with the point on the sleevehead staying in place. Open the underarm seam up by about 4 to 6 cm. Re-draft the underarm seam and tweak the outside edges of the sleevehead if necessary (they shouldn't be pointing up).

I hope this makes sense to you. As ever, feel free to comment or email me with questions. Obviously any sleeve alteration you make should be tested out first in a muslin.

November 17, 2012

The continuing story of the redingote: Muslin no. 3

It's one of those dreary autumn days: a tiny bit of frost in the night, fog all day, a sort-of drizzle of rain and, as a result of all that water vapor, no proper full-on daylight even at noon. These pictures may not look too bad, but I had to stand very still...


Anyway, this is my third try at the Marion redingote. To make this one, I did the alterations to the previous version, the one I drafted myself. I re-drafted the sleeves, letting them take up a lot more space on the front and back bodice. I also lowered the bottom of the armscye quite a bit and widened the top of the sleeve (I'll post an explanation about that tomorrow). I went for a completely different pocket design. I narrowed the waist a bit and flared out the skirt. I also altered the lines at the back, making the center panel narrower (to be more like the Marion design). 
For a normal coat, I would consider the waist over-fitted but in this case, I think it suits the style. In all the pictures I have of post-1947 redingotes, the waist is quite tight. I may let the bust out a little bit though.

The funny thing is, now it's starting to look like the picture in the magazine...


Obviously, I still have to put the collar on. I am still considering it. I like those little back darts in the original collar but I'd like mine to be a bit lower. It may be less warm but is suits my body shape a lot better. And also, it's already quite a lady-like and old-timey coat, maybe I should do a notched collar or something like it to give it a bit of an edge...
And I'd really like to stop making muslins and start on the coat itself...

November 15, 2012

A vintage find


This week, for the first time in quite a while, I had the opportunity to go to the market on the day my favorite vintage stall is there. So, of course, I went there to have a look. Their offerings can be quite hit-and-miss and I didn't find anything nice in the racks. But, I was there early and they were still sorting through a couple of garbage bags filled with clothes... 
Under my eyes, this was thrown onto the '50 cent a piece' table.

I could see it was silk, so I took a hold of it straight away. The label confirmed my idea: thai silk 100%. Pink with polka dots. I think it ended up with the bargain stuff because of the state the sleeves are in. The dress doesn't have stains or signs of wear but it rather looks like someone abondoned it in the middle of a minor re-fashion. The white cuffs were taken off but are still with it and the sleeves were gathered at the bottom. Maybe they were originally longer?

Of course I tried it on but, as expected, it didn't look good on me at all. But what I really had in mind for it, from the moment I saw it is this:

I've wanted a good plissee skirt for years...

I don't really know how to date this dress. The label is woven nylon, the buttons are plastic, the bodice is lined and the skirt has french seams so no revealing seam-finishing. I would guess it's 80's sort of doing 50's...
Without really expecting anything, I googled the name on the label. It's designed like an autograph, so I wasn't even sure I had deciphered it correctly. The name was Jim Thompson. I didn't take a picture of the label, but you can see it right here, on the website of the still-in-existance company. 
And wikipedia provided even more information: mr. Thompson was very much a real person. Originally an architect who had a colourful carreer during the Second World War which eventually took him to Thailand. He stayed there after leaving the army in 1946 and devoted himself to revitalizing a cottage industry of hand-woven silk. His efforts had a major impact, establishing the fame of thai silk and helping some of the countries poorest people. After his mysterious disappearance in 1967, the company went on under his name although did start  producing in a factory.

I never expected to find out this much about the brand... It's quite fascinating.

November 12, 2012

Coat muslin 2.0

I had the day of today, so there was time to work on the coat pattern. 
I wore the shirt I posted about yesterday, tucked into the red skirt. Just mentioning it ;) 
I never like getting zero comments to a blog post but I guess that teaches me for doing hasty posts with bad pictures... (also, to get rid of a certain kind of spam, I recently disabled anonymous comments on the blog, I thought that would hardly effect real comments but I have had an email about it. I just changed the settings back, I hope the spammers have already left).
Unfortunately, in this post, I once more only have some very hasty pictures on offer.

I drafted this pattern based on the Marion design. I didn't add a collar yet, I plan on using the original Marion collar. Please ignore the fact that I accidentally cut the center front pieces 10 cm shorter than the other ones (I didn't draw the full skirt length on paper...) and the wonky pinning.


First of all: this coat actually fits me. And you can see a body shape in it as well! I'm even fairly satisfied with the way the sleeves fit at the top of the shoulder. And the skirt now falls pretty much like a lot of redingote skirts in vintage pictures. With just a couple of tweaks, this could be a rather nice coat.

But then, there's a lot I don't really like. Those sleeves are too tight at armscye. There is a way to draft them, set lower, with ease at the upper arm allowing for a good range of movement. I also don't like how little space the raglan bits occupy on the bodice. Being more used to full raglan sleeves than to this pointy half variaty, I must have been far too modest drawing them in... I'm thinking about re-drafting the sleeves to adress these issues. 
I also think I would like the skirt to be a bit fuller yet. For this version, I simply followed the angle of the lines just below the waist which gives this form-fitting flare. There's nothing wrong with it but I'd like a more spectacularly skirted coat. And of course, the skirt also needs to be longer. 
Along the same "it's actually not bad but I'd like it to be different"-line, I will tweak the bodice a bit. It's a tiny bit snug at the bust, which is easily remedied. It has a normal fit at the waist by today's standards but I think I will tighten it up just a little bit there to get a bit more of that 1950's look.
And then there are the pockets. I copied the design from the Marion coat but I'm still a lot less then thrilled with them. I'm going to abandon the the curved scoop pockets in favour of somewhat draped stick-out pockets like those on my skirt. Those new pockets will also be placed a bit lower.

All in all, I think I will need to make another muslin. So, what started out as a fun little vintage thing is actually turning into one of those projects...

November 11, 2012

Quick fix

The pictures with this post are not that great, my apologies for that. I am busy drafting the coat pattern today but when I saw the daylight start to fade ever so slightly, I decided to run downstairs and take some quick pictures of this little extra project I fitted in this week. 
It was an 'instant gratification' sort of thing and something I actually need in my wardrobe. I made this top three years ago and I still wear it a lot. It just goes well with many of different bottoms: belt pleated trousers, narrow tapered trousers, pencil skirts...


The fabric I used this time is a cotton knit, it has the textured back of a sweater knit but it is, in fact, quite thin and not very stretchy. Those properties made it ideal for adding a collar. This thing now has the overall shape of my old top (just with a seam at center front, rather than at center back) and a collar which is rather similar to that of my pinstripe dress (which was unfortunately impossible to photograph in black-on-black). I cut it a little bit wider to compensate for the lack of stretch, lengthened the sleeves and added cuffs. 

In this fabric, the top works well worn over a skirt as well as tucked in, just as I hoped.

November 9, 2012

Vintage inspiration

There's nothing to show on the coat-front yet. I just haven't had the time to start yet. I have something else though: a wonderful selection of coats from my vintage magazines. I find these very inspiring although, now that I'm going to draft the coat myself after all, they give me cause to reconsider every single detail...

Even my rather quick and un-thorough research was enough to reveal that not redingote but the swagger was the dominant coat style of the 1950's. For most of the time, both styles existed along side each other but it looks like swaggers were worn and certainly sewn a lot more. And if you include the swagger's shorter sibling, often called 'topper' it really reigns supreme. 
However, I have tried to focus on the redingote.

In 1948, just one year after the introduction of the New Look, the redingote was very much 'en vogue' as this spread from Libelle shows. In the editorial comment, it is told that the skirts of the redingotes, like those of the dresses, are this year to be less full than the last (the real New Look redingotes) although coats should still be long. There are swaggers too, but the redingote clearly steals the show. I think this is the shape we usually have in mind when thinking of a "New Look" or "50's" coat. As you can see, a 1948 redingote could be either single or double breasted, might still sport shoulder pads (the double breasted one on the right page. In those days, that was considered a small shoulder pad and many were glad to get in back after the sloping shoulders of the New Look), had kimono- or set-in sleeves, a very tight waist and could have any kind of collar. How great and crazy is that one on the far right?

By 1951 things had changed. A lot. Swaggers and short wide coats were all the rage and the redingote, apperently, a thing of the past. In this quick search through my, rather limited (Beatrijs 1951), archive I couldn't unearth a single example of a 1951 redingote. Neither in the fashion reports...

... nor among the sewing patterns. And no, that trenchcoat-like one is not a redingote. It's described simple as a 'sporty coat' and from it's look I'd say it's completely straight and slightly pulled in with the belt. In fact, I've never seen the term 'redingote' used for a coat with a real belt. 

For the winter of 1955 the same magazine, Beatrijs shows a very different picture. It's no longer all about wide coats but the old redingote hasn't quite returned either. This seems to be the era of the fantasy versions of the redingote. For the one above, the term redingote could maybe be used. It is gently fitted at the waist, has raglan sleeves and the skirt gets its width from loose pleast attached at the bodice some 5 cm below the waist.

On the next page, the second coat from the left has a more obviously classic shape but a decided kind of decoration with those huge pockets on the skirt. This page also introduces two new silhouettes: a business-like straight one of the far right and a loose-yet-shaped option on the far left.

In 1956, according to the magazine "Goed nieuws voor de vrouw" both swagger and redingote continue to be fashionable. If we concentrate on the redingote (look away from those marvelous suits on the right page!), several things attract the attention: The skirts are rather sleek, they have a lot less volume than that pocketed one from the year before. The collar is now the prominent feature. And then there's the closure, a probably rather impractical, long, single line of small buttons. This is, in fact, very much in line with the fashion for dresses at the time.

Finally, we get to the end of the decade, 1959, brought to you by Madeleine magazine. The heyday of the narrow waist is coming to an end. The fashion plates show wide coats, not so much the flared-from-the-shoulder swaggers of yesteryear but new shapes with clean lines. That's it from Paris, but from Italy, Madeleine can still report on a fantasy redingote. Once more, an option with a skirt gathered or loosely pleated from a below-waistlength bodice. 

That's it for now. I think the use of the word 'redingote' may have ended with the 1950's or somewhere in the first half of the 1960's, at least in its use in the Dutch language. The coat it had come to describe didn't really disappear. It went in and out of favour, changed according to the requirements of fashion but in fact, it's still with us.

November 6, 2012

Ehm... well, that coat muslin...

So, by the end of last week, I found some time to trace the pattern for the Marion coat. Although the pattern sheets look choatic, they are actually not that bad. Black on yellowed white is much easier to see through tracing paper than red or green on grey-ish recycled paper... And obviously, I wouldn't even think about taking a tracing wheel to a nearly 60 year old pattern. 
As I told you, the pattern was in size 38, which, in 1950's Marion, was the smallest ladies' size. It's bust 88 cm, waist 68 cm, hips 96 cm. The size of the dress I made this summer was 36, which they sometimes mention as a small ladies' size but is actually considered to be the size for 14-16 year old girls. That size has bust 86 cm, waist 68 cm and they don't mention a hip size because young girl's don't wear narrow skirts. 
I'm at about bust 84, waist 65, hips 94 myself and I remembered a suprising amount of ease at the waist and a high waistline from the dress experiment.

Even before I traced the pattern, the drawing of its pieces made me pause to worry. Those skirt pieces seem to flare out to fit the hips and then continue more vertically towards the hem... That does not a full skirt make...
I decided to go ahead anyway. One of the great things about these patterns is to find out the actual proportions of fashion which I mostly know through somewhat idealized fashion plates. 
I worried again looking at the pattern pieces. There didn't seem to be that much of a waist-to-hip ratio at all...
Despite those misgivings, I cut the coat in my muslin fabric. As the measurements stated about indicate, I could expect it to run a bit big but the alteration I made at this stage was to lower the waistline by 1 cm (in line with my experience with the dress and with a measurement of the center back).

On Sunday, I completed my muslin. Unfortunately, it was a very dreary day so by the time I was finished, there wasn't enough daylight left for pictures. I only found time for that this morning, between a dentist appointment and going to work, on a another rainy day (which is why I don't look nice at all in these pictures).

Well. What can I say? This is why I learned to draft my own patterns... 

This hardly looks 

like this, does it?
My main reason for not grading down before making a muslin was shoulders. In my experience with both RTW and commercial sewing patterns, I tend to need a size bigger at the shoulder than at the chest. My first Marion dress didn't really involve shoulder width so it didn't provide a benchmark for that. So, I figured the size up, 38 might be just what I needed. If I were lucky, I'd only have to pin in those princess seams...

As it turns out, there's no such luck. This coat is ridiculously too big. Even when worn over a sweater, I can easily pinch in 10 cm at the waist (and sizes go up by 4 cm intervals!). Of course I know coats need ease, but this is one is supposed to be closely tailored at the bodice!
Weirdly, the chest seems less oversized than the waist and hips but that may be down to the fact that the whole thing is pulling back rather substantially. 
And those shoulders? They also seem to be too wide by about 2 sizes... 
Somehow, I don't think using Marion patterns for 10-12 year olds would solve my problems either...
Oh, and it's just so flat. Tailored, fitted coat? Redingote? Nice feature pockets sticking out a bit from the hip? None of that. It's not really wide enough for a swagger but there's neither fit nor flare.

On the up side, I like that collar. It's a little shawl collar made higher and more lofty by four little darts, two on either side of the center back. It both flattering and practica because it allows for a bit of a statement collar which is still quite closed-up and therefore warm. 
Oh, and my waist-length alteration seems to have done the trick.

All in all, I don't think I will be grading and altering this pattern. There's just too much which I don't like or is way off. I think I will try and draft my own pattern based on the drawing of this one. Although I will try and incorporate the original collar. My interpretation of the design if you will. 
Stay tuned for the next muslin!

November 2, 2012

These unflattering long skirts...

Fattening and aging, I think the fashion editor of Libelle magazine called the new skirt length for 1947... The New Look.
This is my first attempt at such a length and I don't think it is unflattering in any way. Of course, in a safe colour like black, grey, brown or blue, it might be a different matter. That would probably a bit frumpy and therefore aging... 
But I have to admit it's a whole lot of look:

I love the textured leaves/features woven into this fabric. And that vibrant colour of course. It has got a nice hand as well. It's cotton and fairly heavy but it isn't stiff like most heavier cottons are. 


Looking carefully, you will notice that this isn't such a complicated skirt at all. I had planned some flared and pleated affair but that would have 'restricted' me to a length of about 72 cm. This is 80. 

This is a simple half circle skirt with pockets which stick out from the hipline. In fact, I spend much longer on those than I usually do on a pocket arrangement. I had to figure out an angle which would make this work. Stick-out pockets are a common feature in skirts, dresses, coats and jackets from 1947 to well into the 1950's. 

On the pattern, it looks like this:

Back skirt, front skirt, pocket facing and underside of pocket. When sewing the side seam, you clip the seam allowance where the pocket angles away from the  side of the skirt.

This skirt is also a testament to just how much 50's fashion sense I have absorbed by now... 
Honestly, having been a teenager in the 1990's I have spend many years hiding wide hips. Then, when I started pattern making, I grew to appreciate how the waist-to-hip ratio at least gives me a feminine figure (cup A won't get you that) and now, influenced by all those vintage magazines, I have no problem at all at faking a bit more hip ;)

I know a feature like this won't be for everyone. But I guess the morale of this story is to pick your fashion battles. If what's 'in' today doesn't suit your body type, find a beauty ideal which does. You don't have to want to follow a look of some vintage literally to take some pointers...
Even without going into any of the standard debates, any 'ideal shape' is just one image and any woman will look more beautiful if she's happy with herself and what she's wearing... 

Ok, I didn't mean to lecture. I feel very good in this skirt although its length may make it a bit impractical. I don't think it will be great for riding a bike for example. 
I'm going to trace that coat pattern now. I hope it will make for a nice coat to wear with this skirt.