November 27, 2014

Sewing Frohne

With the deadline looming, I've decided not to give up on my Vintage Sewing Pattern Pledge. I could come up with a whole bunch of reasons why I've only made eh... one and a half of the promised five garments so far. And some of them would even be good reasons. But why waste time on that? The year isn't over yet and I think I will have time to work on this in the coming weeks. I may have to count the 1930's wadder to make five but I think that's OK. After all, it was made from a vintage pattern from my collection...

Anyway, I chose to start out with a design from the Frohne patterns-to-size system. I've blogged about this before and shown you pictures from the book for summer 1961 and winter 1972.
I looked through all the Frohne patterns in my collection (the longlist got its own Pinterest board). Originally, I had always planned to make this great suit from 1972.

Which I still love... but a suit is quite a commitment when following an unknown system.
I also had some 1950's options available but that didn't really go with my goal of using the Pattern Pledge to try out some new-to-me fashion eras. Then, I thought I could be clever and make something which would help me fill a gap in my wardrobe. Make a top. But who wants to make a top when there are so many cute dresses?
This left me with a choice between two designs:

The dress in the middle, from 1961. Very cute but definitely a fabric hog with that pleated skirt.

And one on the left here, from 1965. Simple but sweet with that collar. 
That's the one I decided to go with.

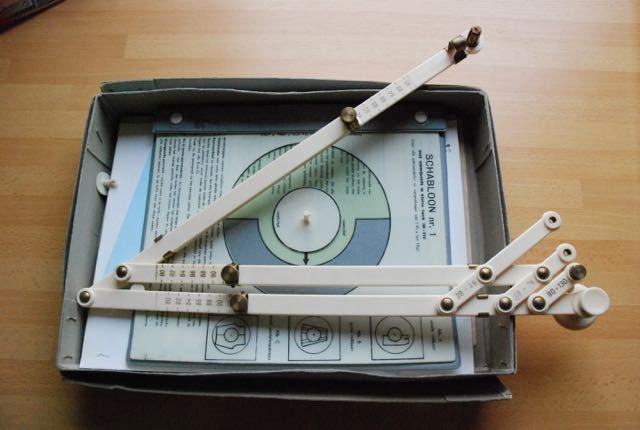
As a system, Frohne is related to Lutterloh. You get miniature patterns with dots on them and, so they claim, you can use a special tool to enlarge those to whatever size you need. Lutterloh's tool is a special ruler (I will make a Lutterloh pattern next, so that's when I will try and show that in more detail), Frohne's is a bit more complicated:

This is the Frohne toolbox.
It contains the tool, templates which supposedly make its use easier, an instruction book and a book with basic patterns (a new on-trend pattern book came out twice a year).

To make a full-size pattern, I scanned and printed the mini one (I guess you were supposed to cut it out but no way that I'm doing that). After that, I followed instructions.

You set the tool by adjusting each of three interconnected sliding rulers to the number of your bust measurement. Then, you take the template and position it over the miniature pattern (it may be possible to put it in one position which will work for all pieces but I moved it a couple of times) and secure it with a plastic pin.
On the top of the pin, you place the tool itself.
Now, all you have to do is 'walk' the pin, near the joint of the tool, to every dot on the pattern. 

This will put the pencil in position to make a dot for the full-size pattern for your size. This is not difficult at all although you have to be careful. A slight wobble of your hand can easily move the pin a millimeter or so, which could translate into a bit of a problem. 

This is not all though. Everyone who has ever graded a pattern, will know that the vertical difference between sizes is only a fraction of the horizontal one. And this system treats all measurements equally. The good people at Frohne have thought about this though. The instruction book contains tables with back length measurements. You can just compare the one given for your bust size with your own and add or substract according to need (the book even tells you how to do that). Frohne seems to consider a bust circumference of 96 cm as 'normal', so that got their 'normal' back length of 39 cm (less than today's patterns where it is usually 40 or 41 cm). My size, bust 90, ended up with a back length of 36.5 cm. Since I have a modern normal height and back length (1.68 meters in length with a back length of 40 cm), I had to add 3.5 cm to all pieces above the waistline. 

The book contains more tables which can be very useful to adjust a pattern to size but luckily, I didn't have to use those because my proportions are, apparently, very normal by 1965 standards. Those tables show the relationship between bust circumference and other measurements according to Frohne. You can check your hip size, upper arm circumference and neck size there. If your measurement are closer to another size than the one you were using overall, the book instructs you on the adjustments you can make.

I thought that was really good. Recognition for the fact that all bodies are different and a fairly easy way to deal with that. Frohne is by no means a pattern drafting system but the way the patterns and instructions are presented makes it, I think, easier for an unexperienced seamstress to start making necessary adjustments.
Nevertheless, I don't think I'll completely trust the theory. There are just to many variables to any human body. I'm going to make a muslin first.

November 25, 2014

Lovely new coat

Finally! Pictures of my new coat. 
In retrospect, it's silly I hesitated for so long to re-make my favorite coat. Really, it should have been a no-brainer. From the moment that this new version was far enough in its assembly that I could put it on, I've loved it. 

We took these pictures at about a quarter to five in the afternoon so the light was already starting to disappear which gives all the outdoor pictures a blue-ish hue. I've decided not to meddle with it because, in my experience, although you may get the blue out, you won't get a 'normal' coloration if you do. 
Just for the record, the colour of the fabric is much closer to how it looks in the picture on stairs. 

As I've told you before, the first version of this coat was made way back in 2009. It was inspired by Balenciaga's 'barrel' coats from the 1950's. Since then, I've learned a lot more about 1950's fashion and I know now that although there were plenty of loose, wide coats, most of those were long. And short wide coats were usually either straight or flared. I'm still convinced I have seen an example of a tapered coat by Balenciaga somewhere, but I wouldn't know where to look. 

Anyway, I didn't look into the inspiration again when I started on this coat. I've worn and loved the first one for years so I knew how I wanted it. I kept that large signature collar (which wasn't in my inspiration, I think) and the back pleat and the square set-in sleeves. 
I also knew what needed work. A bit more room at the hips so it wouldn't pull there when worn over layers of clothing. I moved the collar notches up by 1.5 cm so they would be further away from the overlap (just for the sake of the look).

The fabric is a not-stretchy wool knit in burnt orange and off-white which I found last year. I backed it with a very lightweight fusible throughout and used horsehair canvas in the collar, lapels, front edge and hem. In a design like this, I would never use a firm interfacing like horsehair canvas on large parts of the front. The bulk of the coat has to stay soft so it can flow around the wearer. 

Finding buttons and a lining was a bit of a challenge. These sort of salmon coloured buttons surprised me by being the best match for the fabric at my favorite haberdashery store (they started out a few years ago as a haberdashery store but have now moved into a bigger space and sell lots of fabric as well) but none of their linings even got close.
   
I finally found this material, a fairly dark burnt orange satin, after looking at all fabrics, which might be used as lining, at all the fabric stalls at the market.
I kind of worried it wouldn't match the buttons but I didn't really have much choice. In the end, the lining and the buttons do match. The lining is a bit darker but they are clearly in the same colour-family.

I've shown you the construction of the collar before and I made the lapels in the same way. I hesitated about stiffening the coat's edges. I wanted to keep the soft shape but prevent it from looking shabby or sagged out or curled any time soon (the main reason why I used horsehair canvas in the collar and lapels as well. The old coat was a bit too soft there). So, I finished the sewing first, so I would be able to judge its interfacing needs. Then I decided to put 4 cm strips of horsehair canvas in hem and the front edges. Of course, I had to tack those it by hand.

Oh, and one more construction thing: On blogs, I often see people sew linings to coat hems by hand. I wonder why. I would only do that if I suspected the two fabrics from behaving so differently that I couldn't possibly predict it. If that is not the case (an usually it isn't), I bag the lining on all sides, including the bottom (where the lining should be about 2 cm shorter than the outside), turn the coat out through a gap in the lining side seam, press the hem up (usually 3 cm to the seam where outside and lining are attached, turn it inside out again and then sew the coat hem by hand. After that, you turn it right side out once more and close the gap in the lining. This gives you a perfectly secure lined hem with only one bit of hand sewing. (I should add that I've always been taught not to bag the hems of wide flared coats. Their skirt-like pieces tend to fall better when the lining is kept separately like in most skirts and dresses)

I'm really glad I made this coat. Once more, I will have to remind myself that I have other coats which deserve to be worn as well because this one promises to be every thing its forbear was: a garment like warm embrace. 

November 23, 2014

Aging gracefully, 1950's style

Ok, I had really planned to have some nice pictures of my new coat to share with you today. However, life and circumstance intervened once more. Other things to do, low energy and the weather which turned at the very moment I could have gone out for those pictures, to be precise.
However, with some luck E's schedule will allow us another try on Monday or Tuesday when he should be home fairly early.

Instead, I thought I would share these images which I added to my Pinterest boards today.

I don't have a separate board for 'vintage style at a certain age'. I picked both of these images from magazines from the 1950's simply because I liked the styles. 


Of course, this first one is incredibly glamorous. It must have been back in 1951 and it still is today. Who wouldn't want to age like that... 
Obviously, girdles and the like, which were common at the time, would have helped one to keep and show off a figure like that. We wouldn't consider such things very comfortable but at the time, they were credited with providing welcome 'support'. 
I also love her super-sophisticated hair-do with the grey bits clearly visible and just adding to the overall air of distinction.


This second one, from 1956, is a bit more 'lady of a certain age next door'. Which makes sense because this image illustrates one of the patterns offered by the magazine while the first one belonged with an article about fashion. This lady doesn't have such a killer figure and her dress has the sensible long sleeves which can be used to hide a variety of beauty issues. But despite being a bit more sensible and covered-up, her dress is very much in line with the fashion trends at the time (that type of skirt drape was a hit that season) and she looks both comfortable and rather dignified in it. 

I'm not a specialist on this topic, mostly because, let's face it, I don't have to. Not yet. However, three years in the bridal business (where you also get to meet many mothers of brides) and countless conversations with my mother and aunts have told me about the minefield of dressing when you get older. Depending on style, circumstances and body type, most women can only follow 'regular' (=for young women) fashion up to anything between 40 and 55. 
After that, it's hard to find really good looks. Mainstream fashion is for younger women but the only alternative often seems to be aimed at a much older audience. There is the option of embracing a certain 'signature look'. That can work really well but carries the risks of becoming a bit of a cliche. 
Of course it's dangerous to jump to conclusions based on just a few magazines, but it doesn't seem like there was such a great gap 60 years ago. Mainstream fashion and the reigning beauty ideal looked less 'young' so following those from a distance might have been easier for longer.

There are major differences in media treatment as well: These 1950's magazines were primarily housewives with young(ish) children living at home but (based on the reader's letters they published) read by all kinds of women, from teenagers to grandmothers. And they tried to address the issues each group might be facing with dressing advice being for the student-nurse on a tight budget one week and for the upcoming mother of the bride the other. In all my vintage fashion, sewing and knitting magazines, there is a mixture of designs for all ages.
Nowadays, you may still find that mixture is sewing or knitting magazines but never ever ever in fashion ones. 

Again, I don't claim to really know what I'm talking about here. I just know the ladies in these vintage pictures look great and just about every present-day mother-of-the-bride I've ever met was really struggling.

November 20, 2014

Some pattern instructions... for that dress

Thank you so much for all the nice comments on my dress!
Because some of you mentioned wanting to copy it (I'm honoured. If you do and blog about it, please let me know), I thought I would try and provide some extra instructions. 

As you probably guessed, drafting this dress is not exactly rocket science. Or even proper hard-core pattern making. Anyone with some understanding of sewing and patterns should be able to make it. With the help of a tried-and-tested pattern for a fitted t-shirt with sleeves, that is.

I'm going to explain the steps using just a back pattern piece but the front is the same. If your pattern has bust darts, you can convert those into the seam between the front bodice and the lowest band of the yoke. 
The pattern pieces as sketched (nothing is to scale, these are illustrations not actual patterns) don't have seam allowance. When doing alterations like this, it makes you job a lot easier to work like that. Just add them back on to the pattern pieces you end up with.

Before you begin, consider the fit of your pattern. Most real t-shirt patterns are rather rectangular but for this dress you want a fairly fitted waist, so you may have to take the side seams in a bit further at that point (to get a fit like mine, you also shouldn't have a lot of negative ease at the chest but that is a matter of preference). Of course, you can correct this while sewing, if you don't serge on the whole skirt without trying the dress on first.

An easy thing first: That dropped waist seam. Mine sits at 10 cm below the waistline (and I'm 1.68 which I think is still Burdastyle's standard height). It's basically a straight line but the ends near the side seams are curved a bit to form a 90 degree angle to those seam lines. Of course, you should make sure the side seams match up. This is how you avoid strange pointy bits at the side.

Than you have to start planning that yoke. Part of its charm, and all of its difficulty, is that the yoke extends just a bit past the shoulder. 

To draft that, split the sleeve pattern piece in half, starting at the notch which marks where it will match up with the shoulder seam and straight down perpendicular to the straight grain line.

Take your half sleeves and trace each onto the appropriate bodice piece. This is hard to draw well, but the top of the sleeve should meet the shoulder point on the bodice, the sleeve head can overlap a bit at the shoulder and there should be some open space left over where sleeve and bodice curve in. Compared to the shoulder, the sleeve will slope down a bit.

Now you can draw in the yoke pieces. This starts at the neckline. If you want a turtle neck, like my dress has, you need a fairly high neckline but it should still be wide enough to fit over your head. I think neckline on the bodice pattern was about 50 cm in total (the turtle neck piece itself is a band of fabric of 40 cm high and 42 wide, including seam allowance. In a firm knit like the pointe, that makes for a rather high neck which I can just pull over my head. I like it, but I have a long neck). Obviously, the front neckline should be clearly lower than the one at the back. 
Draw concentric circles around the neckline. In my pattern, the top one is 4 cm wide, the other three are 5 cm. That worked better with the position I wanted for the bottom edge of the yoke (to get rid of the bust dart in my knit sloper). 

The actual yoke pieces are shaped as I mentioned it my previous post: They are straight bands of fabric, as long as the measurement of their top edges on the pattern. 

There's just one more thing to do to the bodice piece now: adjust the sleeve. A bit of a raglan sleeve effect looks better under a yoke like this, so you adjust the armscye accordingly. Cut off the little piece.

Cut off the half sleeves along the bottom of the yoke and stick them back together. The middle of the top will look a bit odd but you are working with a stretchy fabric. Just connect the sides in a straight line. And add on the raglan-bits. The pieces from the bodice won't fit easily on the sleeve but you use them more as a guide: They determine how much width you have to add to the top of the sleeve and then you just draw gentle curves to the underarm point. Make sure to check if the lengths of the 'armscyes' on bodices and sleeve match each other though.

And the skirt? That is just a rectangle. Mine uses a little less (because the material close to the selvedge was a bit weird at one side) than twice the width of the fabric, so its about 2.60 cm wide in total. The finished length of my skirt is about 50 cm and I made a deep hem. 

I hope this will help anyone who wants to try and make this cozy dress for herself. As usual, if anything isn't clear, just ask and I'd love to see what you make from this.

November 17, 2014

Quiet-night-in dress

With the days getting shorter, darker and colder, it's only natural to want to make clothes which are nice and warm and cozy.

And last week, I did just that. Unfortunately, the days are now short and dark enough to really restrict picture-taking-time to the weekends (if I want E to help me, that is), so it took me until yesterday afternoon to get photographic evidence.

As much as I love a tailored look, there's just nothing more comfortable than a dress in a knitted material. So, when I recently found this fairly thick ribbed knit at the market (on sale for 1 euro a meter), I thought it would be perfect for a dress for those dark autumn and winter evenings. It's a mystery fibre but it neither has the static cling nor the sweatiness of polyester, so that's fine. The colour is a rather dull one between pale grey and beige (is this the colour they call 'greige'?). At first, I thought that might work well. I've had much luck with gray/olive tones in the past. They might look boring on their own but do wonders for complexion. This one was too pale for that though.
So, I had to do something about that. 

On the left is my original idea, on the right what it evolved into. The dress with the short bodice is, in shape, inspired by the fashionable silhouette of about 1960, longer bodices with gathered skirts had quite a following around 1954 (although I've never seen an example in a knit, so that's not very relevant for this design). The yoke-in-rings takes its inspiration from the Nordic sweaters which are suddenly everywhere on the highstreet (which is kind of funny because I made one last year on the knitting machine). I originally thought I would would make it look even more like that by embroidering over the yoke in knitting yarn but, as usual, I decided against extra embellishment in the end.

The dark rings are made from charcoal grey pointe knit from my stash. 
The construction of the yoke was a bit of an experiment: I knew I was using stretchy materials. I also knew the rib knit made my main fabric clearly directional. And it doesn't stretch vertically. 
So, considering all that, I decided to cut the rings for the yoke as strait bands of fabric, like you would for a T-shirt's neck band (but in single layers, except the high neck piece).

Each band was cut at the length it would need to be at its top edge and the bottom edge was stretched to fit the piece below it when it was sewn. 
And it worked. 

The skirt has a bit of a construction-story as well: To gather it, I basted through the rib so I could pull it in, essentially using the fabric's own gathering.


To make the dress look like the drawing, I need a belt and a petticoat. It's a fun look but I think I will nearly always wear it without. 

P.S. My apologies for the overly present tea cup in the pictures.

November 15, 2014

A little interfacing trick

By now, I'm almost convinced that I will love the new coat as much as the old one. 
The most fiddly work is done now: bound buttonholes, single welt pockets. And I've sewn the main pieces together so I could kind of put it on to try and see what it might become. And so far, I like what I see. 

This morning, I started working on the collar. There were some issues with that on the old coat. I had only used a lightweight fusible back then and it is a pretty wide collar. As a result of both those factors (and the fact that I wore the coat a lot when riding my bicycle. An activity for which you always have to stretch your arms forward) the points of collar had started to curl. 
So, some more serious treatment was called for.

Unlike a lot of bloggers, I don't mind using fusible interfacings. It's just a matter of using the right one for the job. In this coat, I'm using a very light, slightly stretchy woven one to stabilize the fabric. For shaping a collar however, nothing beats good, old-fashioned horsehair canvas (I have fusible cotton which is as stiff, but that can't be shaped in the same way. Or at all, really).

I considered pad-stitching but decided instead to use a slightly lazier technique: Sewing the horsehair to the outside fabric by machine. 

If this seems like sacrilege to you, you should how I got the idea... 
Designer friend M has a small collection of vintage jackets which she uses as reference for details and tailoring techniques. It is in a mid-century beauty from that number that I saw this. It was made from a smooth black wool suiting and had a combination of zigzag and straight stitching on the under-collar and under the lapels.

My fabric, with its rather plush surface and the tweed effect, provides much more of a background for the stitches to sink away in. The stitching is not invisible but it doesn't stand out (and don't forget that in classic pad-stitching you also apply the horsehair canvas to the outside fabric. Those stitches can show as well).

And now, half-assembled like this, the collar looks great. I can't wait to put it on the coat.


November 12, 2014

Considering a coat

Way back in January, I already mentioned it: My favorite coat is at the end of its existence. I have other coats, a prettier one even but it's still hard to let go of this one. It's just so practical and comfortable. 
I didn't throw it out back then and on the few chilly days we've had so far, I reached for it again. 

And yet, it's time I made a successor for it. I've decided to use the same pattern, with some small alterations. It was always just a bit too snug at the bottom edge to fit well over all kinds of clothing I raised the notches of the collar by 1.5 cm.

I realized I had a good fabric for this coat in my stash after all: This not-at-all-stretchy thick wool knit which I bought on sale last year. 
It's burnt orange and off-white with a tweed-like effect and the weight is rather similar to that of the fabric of my old coat. 

Although this fabric was cheap, I was a bit nervous to cut into it. I really like it and it would also make a very nice unlined coat (like you see so often in stores now). On the other hand, I've really liked this pattern the first time around, so using it for this fabric might be the best guarantee that it will become a garment I'll love. 
Either way, I felt better about it once I seriously started cutting. I'll start sewing tomorrow. 

November 10, 2014

An unusual story

Following all the 19th century fashion goodness from last week, I would like to share something I found in one of my vintage magazines. These ladies' magazines didn't just provide fashion news, housekeeping advice and knitting patterns, they also aimed to entertain and educate. In this case, they, the editors of Beatrijs magazine in 1951, have chosen to share some curiosity from the wide world...

The article is titled "An Unusual Inheritance" and its subject is the traditional costume of the women from the Herero tribe in Southwest Africa. The text is fairly limited in the information it provides and not without a light touch of casual racism.  
What mainly stood out to me were those great portrait pictures.

According to the text, the Herero were originally nomads who traveled around with their herds of cattle until control of white people over the land forced them to settle. When they did, in the 19th century, missionaries came to convert them to Protestantism. And they handed out clothes to their new converts. Clothes which had been made by women in Europe in support of the mission. Those clothes, although not high fashion, were in line with the prevailing styles at the time: The long, full, frilly skirts and buttoned-up bodices of the Victorian era. 

The style caught on with Herero women and continued to be copied over the years. It was blended with African elements and always worn with the distinctive high turban headdress (only for adult women).

Of course, I tried to find some more information about this tribe and, as usual, Wikipedia provided. As was to be expected, the interaction between the Herero and the colonizing white people didn't go as smoothly as you might think from the Beatrijs article. In fact, the tribe had a prolonged struggle with the German settlers which ended in an initially successful, but eventually brutally crushed, rebellion in 1904. 

As for clothing, there is this modern picture of ladies in colourful long dresses which seem similar in shape to those in this article. Full skirts, long sleeves with puffs at the shoulder. And headdresses which are shaped like the horns of a cow. And are nothing like the high turbans in Beatrijs. An explanation might be the fact that the Herero are not a homogenous people. Of several groups, there are two (including the largest one) which wear clothing influenced by contact with colonial European culture while other groups wear traditional leather garments. It might be that the ladies in Beatrijs belong to another group than those on the picture on Wikipedia. The other of the two. And there is little doubt that the Beatrijs story is based on those groups, not on the story of all Herero people.

The writer of the Beatrijs article seems delighted that "These black beauties still dress like our grandmothers did sixty, seventy years ago". Oddly, she doesn't seem to realize that Victorian (and slightly earlier) style lived on, in a similar way, in the traditional costumes of certain places in her own country (that link takes you to a google image search which will show what I mean).  

P.S. This is not actually related to the story of the Herero women in any way but writing this post reminded me of the work of British/Nigerian artist Yinka Shonibare. This explores, among other things, the complex relationship between Europe and Africa. Often in textile and garment (or rather, dressed dummy) form. 

November 8, 2014

Ehm... Jeans and a shirt!

So, finally, time available to myself and to E coincided with decent weather so we could take some pictures. I've finished the trousers a week and a half ago and the early in last week. 

I suppose a bit of a confession is in order: I seem to have made skinny jeans. I didn't set out to do so but there's no way to deny it. 

In fact, I was looking for a good fabric for some nice 1950's style cigarette trousers when I found this rather nice stretch denim at my favorite market stall (De Griek Modestoffen, for those of you who are local. It's available in several colours and they still have plenty of it for 4 euros a meter). So, I bought the fabric. And then, I started thinking and sketching about what to make exactly. The fabric being denim, I thought I should add some actual jeans styling but most of the vintage jeans details I like only make sense for more loose-fitting styles. So, I deviated and came up with something of my own.

The rise is between modern and vintage: The top edge of these trousers is about 2 cm above the natural waist (there is no separate waistband) but the crotch curve is modern (close fitting). All the darts needed for such a high-rise style are hidden in the pocket seam and the pieced back yoke. And of course, there is a solid facing inside, doing the job of a waistband. This sketch is pretty rough, and I should point out that the real thing is in no way lopsided but I think it helps explain things anyway.

For years and years, I've claimed skinny jeans were not for me but these are pretty nice. I was even inspired to try out the dreaded jeans-in-boots look and I even liked that... Of course, I guess I could claim my invention has little in common with the standard low-rise skinnies. I might even be right about that. But still... I've already bought more fabric like this in a darker colour too.


With the trousers finished, I started thinking about how to show them off. One of my reasons to want this rise was because I like to have some pairs of trousers which can be worn with the tops tucked in retro style. 
However, all of those existing tops were short-sleeved. And we my be lucky enough to enjoy a very mild autumn, long sleeves are getting useful by now. So, I thought it might be time to try and make something along the line of a classic white shirt. Of course I'm using off-white because I will be the one wearing it. I used cotton with a bit of stretch from my stash and made a fairly simple pattern. I eliminated the bust darts (there's a pattern trick for that with some of the material going to the armscye and some elsewhere), simply didn't make any of the waist darts and made a back yoke. I drafted the sleeves according to instructions for a man's shirt sleeve and added a collar with an extra high stand and single cuffs (which I decided to close with cufflinks anyway). 

It was an experiment in some ways and the result is very wearable but I'm not 100% happy with it. I think the fabric may be slightly too bulky and/or stiff for this style and the sleeve was probably intended for a body with a slightly dropped shoulder so it's just a tiny bit short. And I don't like the drag lines at the cuff. I guess that's what I get for wanting to use men's style pleats on a cuff designed to fit my tiny wrists (my wrists are unusually skinny, it's a fact which has received regular comments in the past). 
Oh, and it looks less than great when worn loose over something but I made it for tucking in, so I'm not going to worry about that.


So, there we have it. This may be as close as I get to 'normal fashion' these days and I actually feel great in it. Some outfit for enjoying autumn...