April 28, 2014

Just checking in

Ok, last week kind of broke my posting streak... I didn't mean for it to happen but it did anyway.
And although I'm back today, it's not even with a proper post.
I finished the dress I told you about (in fact, I'm wearing it right now) but I just missed my photo opportunity yesterday. Oh well, I will show it to you later.
Maybe it's good because initially, I wasn't that pleased with the way the pleats behaved. And now, I think I've learned to live with them. As you'll see soon.

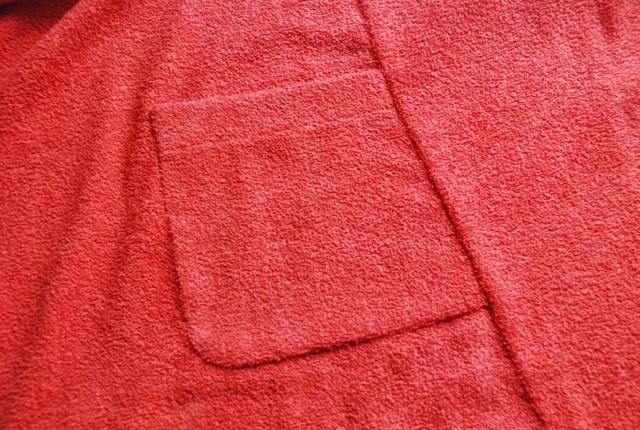
Today, I thought I'd show you the fabric I bought at the market this morning.
I've never made it a habit to show all my fabric purchases on my blog but this one is interesting because it's a bit out of character for me:

Mystery fibre (but without static cling!) crepe in a muted orange (1,5 meter) and cotton with a nice hand and a kind of 'swirling dots' print which could look 1930's or 1970's depending on its use(3 meters). Normally, prints like this are done on polyester. I'm not really a print kind of girl but finding this stuff in a nice material convinced me to try. As for the crepe, my attention was first caught by a smaller piece in ocher yellow. Which happens to be one of my all-time favorite colours which I shouldn't wear. It makes me look ill. This time I was wise and went for the odd colour I can wear.

You may have noticed I was talking about pieces of fabric... That's right these were cut pieces. 
Because they're back. Once a year, for a few weeks, on two of the four weekly market days, these sellers come and sell big piles of fabric pieces which have been used as sample fabrics for sewing workshops. The good, the bad and the ugly all thrown together. You have to buy the lengths as they are but they're only 1 euro a meter. I've bought some great stuff there in the past (like the boiled wool for my green cape).
Today's offerings were a bit lackluster compared to the previous times but I know they will bring new stock each day they're there. 
So if you happen to be in the area, it's worth checking out. I'm sure they'll be there again next Monday (and probably some other day later this week, I just don't know which one).

P.S. Over the past months, I've realized I have more Dutch readers than I had guessed before. And I know someone visited the market in The Hague on my advice last year.
At the moment, the The Hague market is a bit of a mess. It's in the process of being completely renovated. All the fabric and haberdashery stalls are still there but they're spread all over the half of the market where there are no building works yet. As a result, many can't bring or display all their usual stock. 
So, I've been thinking. In a few months, when the renovation is over and all the sewing-related vendors have settled into their new stalls, would you be interested in me doing a bit of show-and-tell about them? Show what those places look like and what you can best buy where?
Just let me know ;)

April 21, 2014

I got distracted...

Again.
It seems that whenever I say I'm going to make something, I loose interest and decide to go and make something completely different. And it's no different this time.
Last month, despite knowing I kind of needed another pair of trousers and some  simple tops, I was all set to start on a stripey vintage style dress. Life got in the way and nothing was done. Then, I made a shirt for E and discussed making him a new pair of trousers as well. And mentioned in passing that I should actually start working on a light coat or casual jacket for him too because the old ones are starting to look a bit tired.
I won't even list the many other more or less nice things I have been thinking about making in that same time. There a just too many of those.

This weekend though, I finally had enough time to actually get started on a new project. And, maybe to no-ones surprise (certainly not to my own) I decided to go for something I enjoy designing, drafting and sewing: a sort-of 1950's style dress. 

This is the rough sketch for it. Little cut-on cap sleeves, button front, side zipper and a slim skirt with a feature I always find intriguing when I see it in vintage fashion illustrations: Pleats which are 'buttoned on' the front of the skirt. Mine will have pockets in the tops of those pleats. I'm still figuring out the best way to construct those on the inside but it's just too good of an opportunity to miss.

I'm using this a somewhat coarsely woven but fairly thin cotton. It's a bit denim-like although it's a plain weave. The interesting thing about it is that it's woven with pinstripes but has this bold pattern of flowers and foliage printed over it.
And I thought I'd play to the denim-effect by using these silver-coloured buttons.

I've just started sewing. Hopefully, I'll be able to finish it in the coming week.  

April 17, 2014

The wide online world

A little while ago, I received an email from Seamstress Erin, who asked if I would like to take part in her series of interviews with sewing bloggers about their connection between sewing and style.
Of course, I would like that! I felt flattered and I think the focus of her series is really interesting.
Today, she published the 'interview' with me. It's here.

April 15, 2014

The shirt

And this is the shirt I made for E.

As you can see, he immediately felt comfortable in it.
I used my usual sloper: the 'tailored shirt block' from Winifred Aldrich's Metric Pattern Cutting for Menswear.

And here you can see the shirt properly. It's very simple: no pockets, short sleeves and a camp collar. I think I've told this before, but E has a fairly short neck and really doesn't like tight, high collars. So, when I started sewing for him, I tried to find a solution. Camp collars are where that ended up.
The fabric is the same white and black cotton plaid I used for his robe last year. For this shirt, I made the front facings and the under collar in thin black cotton and stitched everything in black. 
Of course, I made an effort to match the plaid, at least at the horizontal lines in the body. I made it work pretty well.

And here's a little detail I didn't show in my previous post: how to cut the back yoke.
I can't take any credit for this neat little trick. It's from David Page Coffin's Shirtmaking.
The idea is simple: When you're wearing a shirt, people are going to pay more attention to its fit and design from the front than from the back. If you choose a fabric with stripes or checks and you cut the back yoke on the fold (as usual in most patterns), you'll end up with angled, broken lines at the front edge of the yoke. Which is where people will see them. Quite often, you'll also get some odd line action at the back because most shirt yokes are slightly curved at the bottom.
So, instead, you cut the yoke in two pieces and aline each front edge with the lines in the fabric. Of course, this will result in a center back seam and a slight 'A' shape at the back but I think that's a small price to pay for the nice look at the front. Certainly with E's hairstyle.
If the fabric you are using changes shape easily when use off grain, it's important to make a double yoke with the inside cut on the fold. In this fabric, that wasn't needed.
And I don't know if you can tell from this picture, but I went one step further yet and also cut the front edges of the collar along the stripes of the plaid.

And of course, I used the two tricks I showed you in the previous post, to get a nice finish at those hems.

April 13, 2014

Shirt details

I'm making a new shirt for E. One with short sleeves. It's been a while but I've made so many that all my shirt-making habits are well established. And short sleeved shirts are quick to make because they lack some of the most labour-intensive bits of a shirt: sleeve slits and cuffs.

In this post, I thought I'd share some of the details of this shirt. Details which are easy to make but apparently not very common. At least, I've never seen them on other blogs.

First: Nice, simple, professional looking, decorative hems for short shirt sleeves. I've seen hem like these in RTW and they're easy to make if you plan ahead.

It starts with the pattern: Trace your pattern on a piece of paper, decide on the sleeve length you want and draw a straight line for the hem. Determine how deep you want your hem to be and draw a line below and parallel to the hem at that distance (mine is 3,5 cm). Cut the paper you don't need off along that line, then fold along the line for the hem and cut out the sleeve. This way, the shape of the sides of the sleeves will be mirror in the bit for the hem.
Now, you can cut out the sleeves as usual.

The sewing of the sleeve hem happens at the usual stage in the construction of the shirt: near the end, when the whole thing has been assembled and all it still needs are hems, buttons and buttonholes.

With the shirt inside out, press the hem width to the inside of the sleeve.

Turn the sleeve up further, at the same width and press again, encasing the raw edge in the new fold.

Stitch at about 0,5 cm this fold.

Fold it back again and press flat.

Turn the shirt right side out. Your sleeve has been hemmed without any ugly edges on show. It has a sort of mock-cuff or mock-turn-up (the stitching is hard to see on my sleeve because I stitched exactly on the black stripe) which is in fact nothing more than a tuck, parallel to the hemline, which just happens to work as a hem too.

The second thing I wanted to show you is a simple cheat's method for hemming curved shirt tails. I've never liked fiddling with those narrow hems which pull at the  shaped bits on the bottom of a shirt. And I'm not above using techniques I've learned in dress making for menswear.
I use bias tape. The regular store-bought variety, cotton for E, cotton or satin for myself. Preferably fairly narrow, 1 or 1,5 cm.

Stitch in the fold, on the right side of the shirt. If you're using a facing at the front, let the tape end in the facing. If you want to hem the whole front, let the tape extend about 1,5 cm at the front edges so you can fold those back to form a finished edge.

Press the tape to the inside of the shirt, in such a way that the seam falls in the inside.

Stitch the tape down along its edge. 

And there you have it. An effortless curved hem.

I hope everything is clear and you can use these finishing details.
I'll show you the shirt properly later this week.


April 10, 2014

Those cuffs

This post may seem a bit redundant to some of you (the pattern makers and those who are used to changing and manipulating patterns) but I hope it will be useful to others.
Several people, both here and on Burdastyle and on We Sew Retro, expressed an interest in those sleeves. And a desire to copy that particular detail of full sleeves with cuffs.
Which I understand. I made them like that for a reason and after wearing the robe more than once, I'm very happy with how they turned out. These sleeves are even safe when cooking.

So, I thought I'd give you a bit of technical information about those sleeves and their cuffs.

I don't think I have to go into a lot of detail about the sleeves themselves. Most normal robe patterns have sort of medium width sleeves, to which you could also attach a cuff. To get a shape like mine, you have to slash and spread the sleeve (slash in three places: at the top of the sleeve and left and right to it, straight down the sleeve, along the straight of grain line and spread them out at the bottom, keeping the original length of the seam at the sleeve head. And then flare out the sides for half the amount of space between the pieces as well. Of course, a sleeve head will change shape because of this treatment, and that's fine).
Whatever you are doing with your sleeve, if you're going to add a cuff, you have to make the sleeve shorter. Don't make the mistake of shortening it by the cuff length. That would make it pull and be uncomfortable. 
I would recommend removing half the length of your cuff. In my case, that was 6. I wanted a 12 cm cuff, so I made the sleeves 6 cm shorter.

It's those cuffs I wanted to talk about. I used jersey for them, which I think is quite practical. A stretchy material for the cuff means it can be fitted yet comfortable and most of us have jersey scraps in our stash. And you can usually get jersey in a much wider range of colours than rib knit (which would be the alternative). When using rib knit, you could get away with using a straight piece of material because it's very stretchy and has a lot of recovery.
I've made straight cuffs in jersey in the past but I was never quite happy with them. And the longer they get, the worse the fit becomes.
The solution is very simple. You just make this shape:

The height of this pattern piece is two times the desired cuff length. The width in the middle is your wrist measurement, the width on the top and bottom of the piece is the measurement of your arm at the top of the cuff. Just take these measurements with the tape measure wrapped smoothly around your arm. The stretch of the jersey will allow you to put your hand through the cuff. I wouldn't go for negative ease in this case. The cuffs have to stay in place, you don't need them to be skintight.
Start by measuring out the black lines, than adjust the corners as you can see in by the red lines. The diagonal sides should be the same length as the center, with a 90 degree angle to the top and bottom line. It doesn't have to be absolutely precise but doing this will mean you won't have a strange little point on you cuff.

Add seam allowance, cut two of these cuff pieces out of the jersey with the straight grain running vertically.
Fold the pieces in half vertically, right sides together, and sew the side seams. Press the seams open.
Fold the them horizontally, with the right sides out, forming the finished cuffs.

If you are using fairly narrow sleeves, you can attach the cuffs by stretching them to fit, without gathering. If your sleeves are wide, you have to gather them first.
Gather them using your preferred method but don't gather them to the exact size of the tops of the cuffs. Keep them about 10 % bigger so you won't get a tight line on your arm in the finished garment. Stabilize your gathers before pinning the cuffs. You will have to stretch those so you don't want to have to deal with managing the gathers at the same time.

With your sleeves ready, pin your cuffs into the sleeves with the raw edges together and the right sides facing (of course, the cuffs are folded right sides out and you are treating them as one layer, so there's no in or out about those). 
Distribute the excess material of the sleeve carefully when pinning. 

Stretch the jersey to fit the sleeve when sewing. 
Finish the seam allowance using your preferred method. 

I hope this is useful to you. Have fun creating your own lovely comfy full sleeves with stretchy cuffs!


April 7, 2014

Another robe

 And this is where those pockets went: My new robe.
A couple of weeks ago, I found this coral red cotton toweling for sale at the market for only 1 euro a meter. It's a bit flimsy but at that price, I'm not complaining. And I'm fine with it, the thinness of the fabric will mean that this robe will be comfortable, but not really warm. Just what I need for spring. 

 Again (like with my and E's thin cotton robes), I went with a retro-y ankle length design. I didn't use any vintage pattern making systems this time. There are some issues with my earlier cotton robe which I know wouldn't be there if I would have drafted it using my normal sloper. 

Which is what I did this time. It's a very simple design: An A-line body with deep-set wide raglan sleeves and a shawl collar. 

In a slightly unusual touch, I've made the sleeves very wide and gathered them into fairly long cuffs. The cuffs and facing are made from jersey which has been in my stash for quite a while but which happened to match the colour of the toweling perfectly.

The only thing I'm not so certain about is the belt. I thought it would look better to make that in the jersey and I didn't have a long piece of the toweling left anyway. I had fused the the facing pieces with a thin fusible for knits which doesn't stretch lengthwise. It worked well there but I didn't want to use it in the belt because I expected weird pulling effects in that case. So, the belt is just jersey. This means it's rather stretchy and has a tendency to roll in on itself. It's not ideal but I think I can live with it.

Other than that, I'm pretty happy with this robe. It's very comfortable for lounging about and those sleeves don't get in the way when I'm eating or doing anything like that. 

And after all, that's what I want in a robe: A cocoon to withdraw in when I'm tired or have been soaked with rain on my way home. Perfect for lying on the couch but  serviceable if I still have to do anything as well. And for course, if it still looks kind of cute, that's a bonus.

April 4, 2014

Ciao Bella!

Are you tired of vintage magazines yet? I really hope you are not because I've got many more to show and talk about.
Today, I've returned to my first love: 1950's fashion. And this is a publication I think I've talked about on the blog before. But I haven't shown you any examples yet. Oh, no I have shown another issue before.

Like Marion, Bella was a Dutch sewing magazine. They helpfully numbered their years, so I can tell you that it was first published in 1902, probably under the title the New Fashion Magazine. I don't know when publication stopped but it was still going strong in the 1950's but (unlike Marion) didn't last until a time I can remember.
Bella differs from Marion in more ways. Some, I will show you. Other than those, a full size magazine, not the half size of Marion and, most importantly, it included patterns for all the featured designs... Just in one size, you still had to order other sizes but if you have an issue of Bella with pattern sheets, you should be able to trace any design in the magazine.

I'm sticking to the printing order with what I show you and this issue, the second one for March 1954, starts with children's clothes.

Then, there is an introduction, and then a knitting pattern (which is a difference, most sewing magazines from the same time don't include other crafts). This one is for the 'good-looking grandmother'.

Then, we start with designs for ladies' sewing: Coats for spring. Long and short, wide and fitted.

More children's stuff. Knitting and sewing.

And then ladies' dresses. Really lovely ones.

This is another children's pattern but one with a difference. This is a recurring feature in 1950's Bella: the 'many ways' pattern. This pattern is given as a scale picture with an explanation to make it up in various different versions and looks. This is most often done with women's patterns but in this case with a little girl's dress with raglan sleeves and a gathered skirt.

And then there's a crochet pattern for a camisole with a frilly collar.

Glorious suits.


And a wide and wonderful collection of daywear.

And then, there are hats. You could order a choice of four hat frames from the magazine and decorate them according to instructions. I wish I could still get those.

This dress is also shown in two ways. Although the dress looks like a lovely, stylish basic, I'm not very impressed with the difference in these looks. But I love that we photographs, rather then drawings.


This is also a regular feature: big man, little man. Patterns for men and boys! I don't have to tell you how unusual that is. In this case the man only gets a shirt and pajamas but there is an actual suit for boys.

And I thought you might like to see the pattern sheet. All one colour and fairly dense. I have yet to try one out but I hope these will be like Marion and not like Gracieuse. 

And then, you get a bit of a sewing lesson.

And an article about fashion. Which, in this case, is about new hats for spring.

And more lovely dresses with instructions for the lace and applique work on the opposite page.

And a lovely photograph on the back cover. It took me a while to figure it out but the front and back cover tend not to show designs with patterns. Rather, they are referred to in the introduction or fashion article.
I don't know what this is but it's still a very nice suit.

I really think I should try a Bella pattern for my vintage pattern challenge. Even though I have a lot of choice for 1950's sources (maybe I should just cheat and use more of those...)

April 1, 2014

A pocket tutorial

Last autumn, when I blogged about the robe I made for E, I promised you a tutorial about this pocket, if you were interested.
Well, some of you were and I've just made such pockets again (again on a robe, this time one for myself), so here it is.

This is a patch pocket without topstitching. You can only use this technique if one pocket edge is in a seam and you attach the pocket to the body of the garment by stitching from the inside.

The start is not very special: Put your chosen interfacing on the pocket facings and finish the outer edges (mine were served). You don't have to finish the edge which will be in the seam.

Press the facings to the inside. For a normal patch pocket, you would sew the facing to the pocket with the right sides together, to get a neat corner. Don't do that now.

Press the seam allowances to the inside. It's easier to make this pocket if you use a seam allowance of only 1 cm on these edges.

Now, you can position the pocket on the garment front. Of course, it is practical to have the position marked from the start.

Pin down the seam allowance at the top edge and the corner.

Turn the pocket over and pin its side seam allowance down further.

Sew from the top edge along the cease you pressed in. Don't stitch past your pin in the corner and make sure to stitch the bit curve before it in the direction it will need to go in. 

Turn the pocket right side up again.

Now, you can pin the bottom edge.

Stitch from the open side to the corner along the crease. To do this, you have to kind of bunch up the pocket and move it along while you sew. It may take some stopping sewing, putting the needle down and adjusting the fabric around it. You should be able to stitch all the way up to the end of the line of stitching you made before. If you can't, don't panic. You could cheat by closing the remaining gap with some hand stitches.

And that's your pocket. No visible stitching on the outside of the garment.

It's all here, on the inside. 

Then, you sew the side seam, which closes the other side of the pocket. My robe has an A-line shape, which is why this side is at an angle.

In a plain, slightly fluffy and sort of stable-yet-pliable fabric like this one, this pocket isn't particularly difficult to make. The real test with these is, predictably, making them in plaid or stripes. And I wouldn't recommend slippery fabrics, like satin (although I wouldn't recommend those for regular patch pockets either).

I prefer this type of pocket over regular patch pockets any day (for things like coats and robes. Not for the back pockets on jeans, of course). They don't have any real structural advantage but I just don't like topstitching if I can avoid it.
It's the sort of detail a non-sewer would't even recognize but which makes a nice subtle proof of skill to those-in-the-know.