Just a little announcement.
After posting yesterday, I looked through the email notifications of blog comments. I have been getting a lot of anonymous spam comments again lately but in the past blogger's spam filter has always been really good at keeping those from actually appearing on the blog. However, yesterday I took a look at a post which was heavily hit this week and found over ten of those comments displayed there... I spent some time this morning going through old posts and deleting spam but I'm pretty sure there's a lot I haven't found yet (mostly because I usually deleted email notifications of spam comments, assuming the filter had sorted them out. So I don't remember all the posts which received this treatment).
Because this development will make it really hard to manage the spam, I've decided to disable anonymous commenting on my blog. I know there are a few people who leave real, and usually very nice, comments anonymously (as in: they don't have an account to comment from, they usually make themselves known in the text) and I'll be sorry to miss those but I just don't want to risk letting my blog drown in spam.

February 27, 2013
February 26, 2013
Navigating the minefield
I mentioned before just how problemetic bra sizing and bra shapes can be, didn't I? And guess what? That first bra I made, the one I was kind of happy about? When I was wearing it last week, my suspision that the cups were too small returned again. Although my breasts filled the cups fairly well (a tiny bit of bulging over the front edge), the wires seemed to sit on the sides of my breasts, rather than around them. I showed the bra to M (after all, she got me started at making lingerie and she knows this stuff) who not only confirmed my misgivings but also pointed out that the center front bit, the bridge of the bra, was too wide as well, causing the wires to sit on my breasts at the center too.
According to her, that would put my size as 'BB', the volume of a B cup but with a different width (just for the record, the 75B of my usual brand of RTW bras fit just fine...)
Talking about this, we concluded that, as in outerwear, underwear manufacturers all design their product with a specific target audience in mind. Although there is sort of a rule about bra sizing, shapes and sizes and elastics can vary wildly from one brand to the other. Which is why help with fitting can be so important (there is some statistic going around according too which half of all women wear the wrong bra size...)
The 'rule' from bra-sizing is based only on the difference between one's underbust measurement and bust measurement. This doesn't take into account breast shape, torso shape or the way the breasts are placed on the torso. For all those things, those of us who buy bras have to rely on finding the right brand and those of us who sew them have to make muslins and tweak our patterns.
And the rule isn't set in stone either. The cup size chart from Pattern School is here and that one fits in with my personal experience. However, according to both my lingerie drafting books, a difference of 12-14 cm is for an A cup (and 14-16 cm=B, 16-18=C, 18-20=D, according to the Ann Haggar book).
The right shape bra is as important as the right size.
If the wire sits on the side of your breast, it will, over time, push that flesh to the side, under your armpit (of course, this is only if you always wear the wrong size and shape bra). If a bra fits well, the wire should fit around the breast. This can be a problem, especially for those who have wider torsos and smaller breasts. In RTW, the only option in that case is usually to stuff the cups... when sewing, go for the needed wire size and alter the cup pattern pieces, making the end result a bit more flat.
In theory, I knew all of this but dealing with it myself proved to be a different matter.
Not to be subdued, I decided to pass by the habedashery store on my way home and pick up a pair of cup B underwires (the ones I used before had come from my stash of wires-from-old-bras. I have had the habit of salvaging the wires from old bras ever since I followed M's lingerie making workshop years ago. And all my old bras were from back when I had cup A).
And guess what?
 These are all the different bra wires I have. In theory, I would expect the normal wire for sale to be the an almost perfect semi-circle, intended for a full cup bra (many of the normal styles in RTW are technically 'half cup' bras) with a set wire length for each cup size. Sigrid just posted about that shape here.
In this picture, you can easily make out the wire I bought because it's the only fully painted one: the white one, third from the top.
You may notice that it does, indeed have that semi-circular shape. You may also notice that it's the third smallest wire in the row... And this case, I was careful not to let perspective influence the image.
This Prym brand cup B underwire is smaller than most of the wires from my old cup A bras. Even though a lot of the larger ones came from foam cup bras, I didn't quite expect this. I did learn my lesson. I'll only ever buy wires by exact length from now on. Cup size is just too tricky (oh, and you do know of course that cup sizes only exist in relation to band sizes? The wire size for an 80B is the same as that of a 75C, a 70D, an 85A and a 90AA... I would expect notion brands to use either 75 or 80 as the standard on which to base their sizing).
The long, deeply curved wire on the bottom is one I am using now for new bra. To get it, I bought a the cheapest 75C bra at Zeeman (a Dutch chain of bargain clothing stores). It cost me half a euro less than the Prym wire and of course, I checked the measurement before buying. I worried a little about the deep curve. My pattern looked more wide than deep to me but I decided to give it a go.
I have some more observations about wire shapes for bra styles, but those will have to wait, this post is getting long enough as it is.
I will show you some of my bra drafting stuff though.
 In Een Tweede Huid the basic draft for the cup has vertical seam. I did my alterations to that first and tested it. Both pieces ended up a little wider than before and I tweaked the balance between the front and side (because the front top edge cut into my breast a tiny bit, while the side top edge was a gaping a little). After that, I drafted cups with a horizontal and a diagonal seam based on that well-fitted vertical one.
 This is the pattern I made for my new bra. Diagonally seamed cups, small separate center front piece, sides which are shaped at the point where the shoulder straps will be attached. The pattern pieces are including seam allowance.
I've been sewing on it already and I have good hopes for this one.
P.S. some people mentioned wanting to copy my idea for lace back panties. Of course everyone is welcome to do so. I will post some notes later this week about what kind of pattern to use and how to cut and alter it.
According to her, that would put my size as 'BB', the volume of a B cup but with a different width (just for the record, the 75B of my usual brand of RTW bras fit just fine...)
Talking about this, we concluded that, as in outerwear, underwear manufacturers all design their product with a specific target audience in mind. Although there is sort of a rule about bra sizing, shapes and sizes and elastics can vary wildly from one brand to the other. Which is why help with fitting can be so important (there is some statistic going around according too which half of all women wear the wrong bra size...)
The 'rule' from bra-sizing is based only on the difference between one's underbust measurement and bust measurement. This doesn't take into account breast shape, torso shape or the way the breasts are placed on the torso. For all those things, those of us who buy bras have to rely on finding the right brand and those of us who sew them have to make muslins and tweak our patterns.
And the rule isn't set in stone either. The cup size chart from Pattern School is here and that one fits in with my personal experience. However, according to both my lingerie drafting books, a difference of 12-14 cm is for an A cup (and 14-16 cm=B, 16-18=C, 18-20=D, according to the Ann Haggar book).
The right shape bra is as important as the right size.
If the wire sits on the side of your breast, it will, over time, push that flesh to the side, under your armpit (of course, this is only if you always wear the wrong size and shape bra). If a bra fits well, the wire should fit around the breast. This can be a problem, especially for those who have wider torsos and smaller breasts. In RTW, the only option in that case is usually to stuff the cups... when sewing, go for the needed wire size and alter the cup pattern pieces, making the end result a bit more flat.
In theory, I knew all of this but dealing with it myself proved to be a different matter.
Not to be subdued, I decided to pass by the habedashery store on my way home and pick up a pair of cup B underwires (the ones I used before had come from my stash of wires-from-old-bras. I have had the habit of salvaging the wires from old bras ever since I followed M's lingerie making workshop years ago. And all my old bras were from back when I had cup A).
And guess what?

In this picture, you can easily make out the wire I bought because it's the only fully painted one: the white one, third from the top.
You may notice that it does, indeed have that semi-circular shape. You may also notice that it's the third smallest wire in the row... And this case, I was careful not to let perspective influence the image.
This Prym brand cup B underwire is smaller than most of the wires from my old cup A bras. Even though a lot of the larger ones came from foam cup bras, I didn't quite expect this. I did learn my lesson. I'll only ever buy wires by exact length from now on. Cup size is just too tricky (oh, and you do know of course that cup sizes only exist in relation to band sizes? The wire size for an 80B is the same as that of a 75C, a 70D, an 85A and a 90AA... I would expect notion brands to use either 75 or 80 as the standard on which to base their sizing).
The long, deeply curved wire on the bottom is one I am using now for new bra. To get it, I bought a the cheapest 75C bra at Zeeman (a Dutch chain of bargain clothing stores). It cost me half a euro less than the Prym wire and of course, I checked the measurement before buying. I worried a little about the deep curve. My pattern looked more wide than deep to me but I decided to give it a go.
I have some more observations about wire shapes for bra styles, but those will have to wait, this post is getting long enough as it is.
I will show you some of my bra drafting stuff though.


I've been sewing on it already and I have good hopes for this one.
P.S. some people mentioned wanting to copy my idea for lace back panties. Of course everyone is welcome to do so. I will post some notes later this week about what kind of pattern to use and how to cut and alter it.
February 24, 2013
I don't have a problem...
This past week, I haven't had a lot of time for sewing (or blogging, for that matter), but all of it has been dedicated to lingerie. Did anyone mention before that sewing lingerie is addictive?
First of all, I drafted, tested and made the cheeky shorts from Pattern School. With panties, I hate to see the lines through my clothes, either at the hip or on my bottom. Thongs are one way to avoid this, but it's nice to have more options. In RTW, I also like shorts and bikini styles with stretch lace along the legline, instead of edging elastic. This keeps the panties in place but distributes the pressure more evenly, which results in a line-free exterior.
I thought I might be able to use this basic pattern to create something like that.
 To my taste, most of the instructions at Pattern School are for really skimpy styles. So, I took care not to make the rise quite as low as in the tutorial. I also used my own panty sloper, rather than drafting another one.
I tried the pattern out in turquoise lycra, with black picot edging (the best look from the elastics in my stash).
When I put the panties on before sewing on the elastic, I thought they could work well but wondered if I had made the leg openings to low. After applying elastic to one of them, I had my answer. The elastic was cutting into my leg, definately indicating a too-low and, as a result, too tight leg opening. I unpicked the elastic, cut a bit off the the legline (not forgetting to alter the pattern as well) re-did it. The result was the pair of panties at the top.
I wore them all day on Friday and they are really comfortable. However, the picot elastic (and/or the fact that I don't have 'buns of steel', like the model on the Pattern School website) means that I wouldn't wear these under all my clothes.
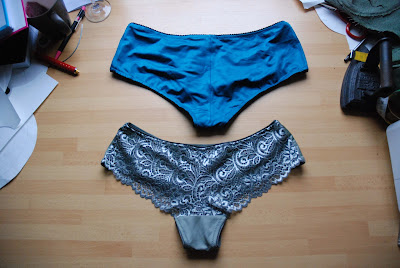 Then, I was confident to start on the design I really had in mind: another pair of panties using the sage green lycra and lace. I changed to shape again: cutting the leg openings higher at the sides and altering the angle of the back gusset (following the instructions. the difference in crotch width in the picture is not a result of any change in the pattern, it's largely down to perspective in the photograph). Because I wanted to use the lace for the back, I added most of the back gusset to front and cut it out the lycra.
I'm really happy with the way these turned out: comfortable, a bit surprising with that nice lace at the back and best of all: no panty lines in sight!
After this, I went on a bit of a bra-quest, but that's a story which will have to wait till next time...
P.S. in other panty news, I also wore the thong I made from Melissa's pattern for a whole day for the first time. And I feel I have to mention a bit of an issue with that: I used lycra for the front and back section, which has two-way (or is that four-way?) stretch. When wearing this thong under clothes, for a longer period of time, it felt like either the gusset was too long, or the sides were too wide, and probably both. Both issues could be solved by going down a size but I thought it was worth mentioning because before, I had concluded that size M was right for a Burda hip size 38.
If you make this pattern from a fabric without lengthwise stretch, I don't think there will be such an issue.
First of all, I drafted, tested and made the cheeky shorts from Pattern School. With panties, I hate to see the lines through my clothes, either at the hip or on my bottom. Thongs are one way to avoid this, but it's nice to have more options. In RTW, I also like shorts and bikini styles with stretch lace along the legline, instead of edging elastic. This keeps the panties in place but distributes the pressure more evenly, which results in a line-free exterior.
I thought I might be able to use this basic pattern to create something like that.

I tried the pattern out in turquoise lycra, with black picot edging (the best look from the elastics in my stash).
When I put the panties on before sewing on the elastic, I thought they could work well but wondered if I had made the leg openings to low. After applying elastic to one of them, I had my answer. The elastic was cutting into my leg, definately indicating a too-low and, as a result, too tight leg opening. I unpicked the elastic, cut a bit off the the legline (not forgetting to alter the pattern as well) re-did it. The result was the pair of panties at the top.
I wore them all day on Friday and they are really comfortable. However, the picot elastic (and/or the fact that I don't have 'buns of steel', like the model on the Pattern School website) means that I wouldn't wear these under all my clothes.

I'm really happy with the way these turned out: comfortable, a bit surprising with that nice lace at the back and best of all: no panty lines in sight!
After this, I went on a bit of a bra-quest, but that's a story which will have to wait till next time...
P.S. in other panty news, I also wore the thong I made from Melissa's pattern for a whole day for the first time. And I feel I have to mention a bit of an issue with that: I used lycra for the front and back section, which has two-way (or is that four-way?) stretch. When wearing this thong under clothes, for a longer period of time, it felt like either the gusset was too long, or the sides were too wide, and probably both. Both issues could be solved by going down a size but I thought it was worth mentioning because before, I had concluded that size M was right for a Burda hip size 38.
If you make this pattern from a fabric without lengthwise stretch, I don't think there will be such an issue.
February 18, 2013
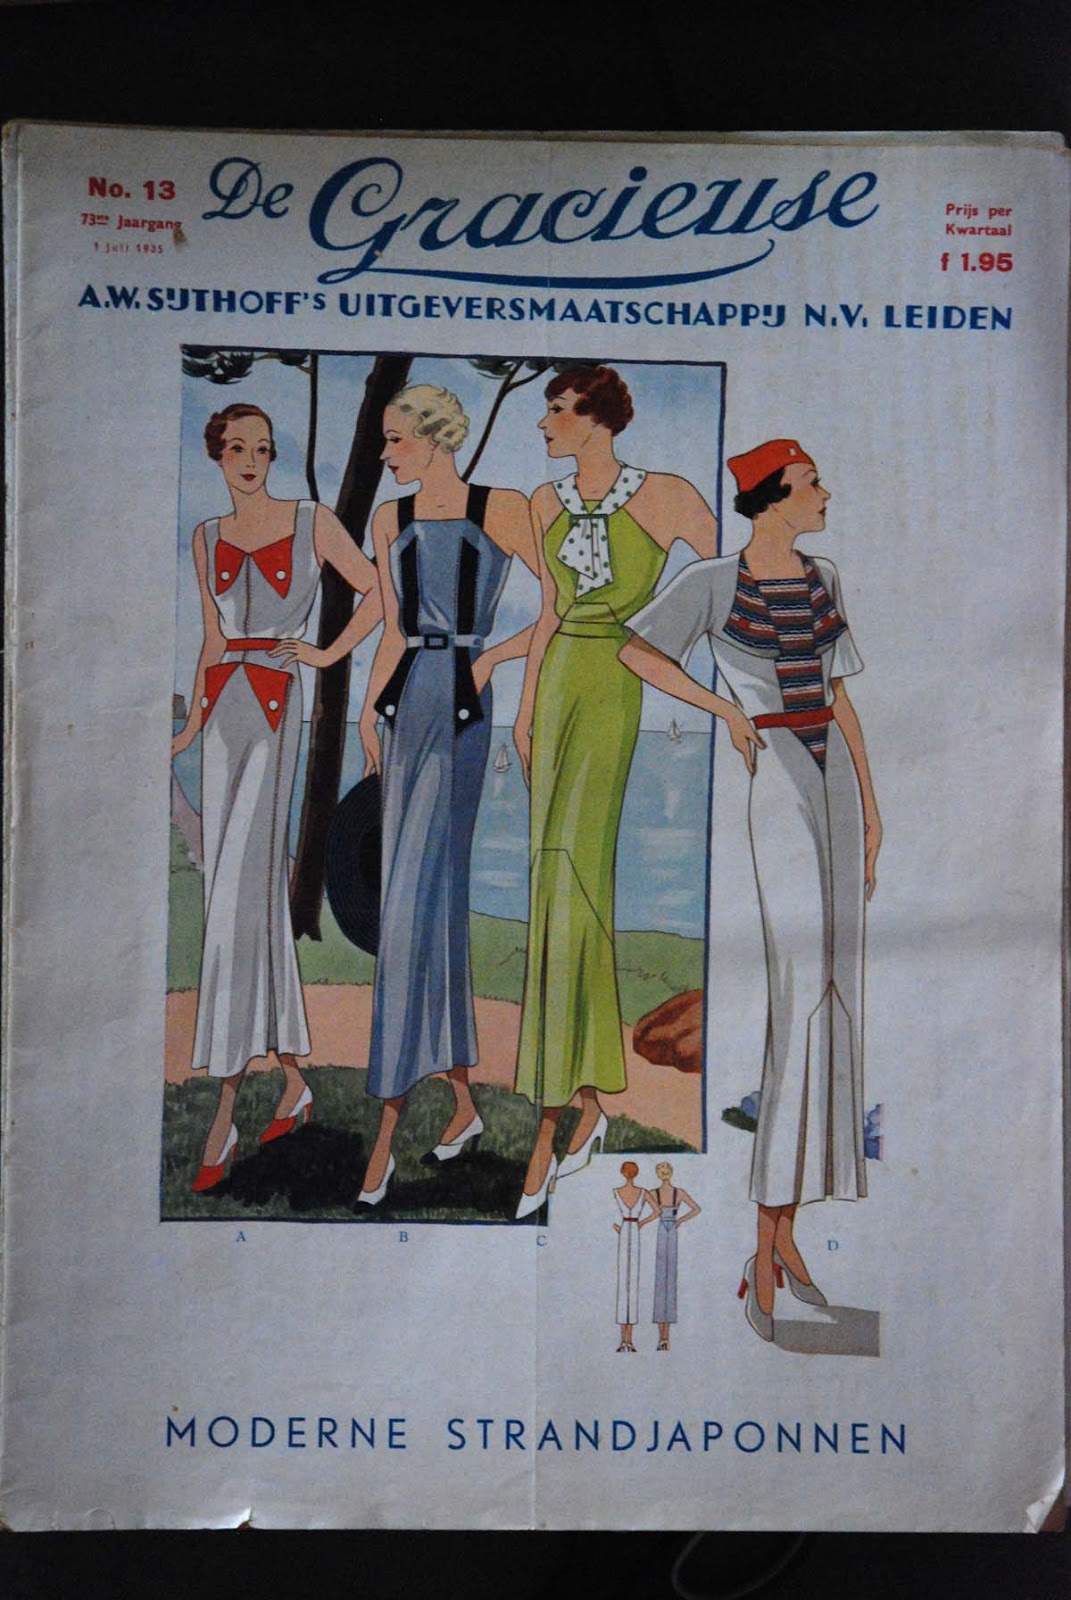
The vintage magazine motherload!
This afternoon I finally had the time to sort the latest addition to my vintage (pattern)magazine collection: two boxes full of magazines I bought last week.
 Advertized as being 'mostly Gracieuse magazines' from '1920 and later', I had to buy them because the seller also told how there were 'more than 100' and most of those 'with pattern sheet'....
I come across old Gracieuses fairly regularly. The magazine was published from about 1870 and merged with the Dutch publication of Record in the late 1930's so some have survived here and there (for some reason, 1880's ones seem to turn up most often). Mostly those are either bound years or single issues. The first are pretty but very expensive the latter are cheap but often in a bad state. And both usually lack the original pattern supplements.

 When unpacking the boxes I found what has to be someone's life-in-sewing. Gracieuse magazines from 1920 to 1935 (24 issues were published each year but only a couple of years are complete, there's only one magazine from 1926 and 1924 and 1935 are missing entirely). As to be expected, not all the magazines are in good shape, a lot of covers have come off and are in some case missing altogether. However, the vast majority of these have their pattern supplements (except the 1935 ones. They changed the system that year: instead of including a pattern supplement and making customers pay for the other patterns, they offered all the patterns on order, for free). These alone would be well worth what I payed for the lot.
 But it didn't end there: there was also a pile of 30's and 40's 'La Femme Elegante' magazines. A German/French cooperation which came in a Dutch translation as well. With pattern sheets.
 And 'Het Nieuwe Modeblad' (=the new fashion magazine), later called 'Bella'. Two 1920 issues without patterns, a 1930's one and several from the 1940's with.
 And a pile of 'Regina' magazines, Dutch 1950's publications from which one could order the patterns.
 And German 'Beyer's mode' magazines. About ten of them, the earliest from 1938, the latest from 1957.
 And assorted other magazines, most of these German and from the 1950's, and most of them with patterns.
 Oh, and then there were these: little tracing paper envelopes containing other bits of tracing paper... Unprinted patterns! Dutch ones called 'Pereboom patterns'. I had no idea there had ever been a Dutch company publishing sewing patterns in this way!
 And there were also some unprinted patterns in a different colour, bearing the label 'supplement to La Femme Elegante'. Even though I think all of those magazines I found in the pile came with pattern sheets.
Unfortunately, I haven't been able to find information about sizing on either kind of unprinted pattern yet.
All in all, the patterns from these boxes span most of the 20th century. The oldest are from 1920, the most recent from 1962.
Because there are so many of them, and because there are hardly any children's specials, and all the garments selected (I didn't study each magazine yet but a couple had designs marked in pencil and some pattern sheets show the marks of a tracing wheel) are for ladies, I am inclined to think the lady owning these may have been a professional dressmaker. That would also explain her apperent preference for publications which came with patterns included: most patterns-to-order were only avaible for a month or so, pretty inconvenient if your customers are going to pick the design they want from your magazine stash.
Either that or she was a well-to-do seamstress without children who kept a very keen interest in fashion well into her 60's...
P.S. I know all these magazines were owned by the same person. The seller told me they came from a house he cleared out 40 years ago and had belonged to an old lady who was really good at sewing.

I come across old Gracieuses fairly regularly. The magazine was published from about 1870 and merged with the Dutch publication of Record in the late 1930's so some have survived here and there (for some reason, 1880's ones seem to turn up most often). Mostly those are either bound years or single issues. The first are pretty but very expensive the latter are cheap but often in a bad state. And both usually lack the original pattern supplements.


Unfortunately, I haven't been able to find information about sizing on either kind of unprinted pattern yet.
All in all, the patterns from these boxes span most of the 20th century. The oldest are from 1920, the most recent from 1962.
Because there are so many of them, and because there are hardly any children's specials, and all the garments selected (I didn't study each magazine yet but a couple had designs marked in pencil and some pattern sheets show the marks of a tracing wheel) are for ladies, I am inclined to think the lady owning these may have been a professional dressmaker. That would also explain her apperent preference for publications which came with patterns included: most patterns-to-order were only avaible for a month or so, pretty inconvenient if your customers are going to pick the design they want from your magazine stash.
Either that or she was a well-to-do seamstress without children who kept a very keen interest in fashion well into her 60's...
P.S. I know all these magazines were owned by the same person. The seller told me they came from a house he cleared out 40 years ago and had belonged to an old lady who was really good at sewing.
February 12, 2013
And a matching bra!
Time seems to fly these past weeks! I didn't manage to do anything for Sew Grateful Week and, in fact I haven't done a lot of sewing at all.
I did, however, take a big hurdle on the 'sewing lingerie' front.
Maybe it's just me, but I always feel like sewing panties isn't the real thing. Sure, panties are underwear, lingerie, dessous etc. They are just not that complicated. Bras are a different matter entirely. Even buying the right bra is something loads of women don't manage...
Sizing- and shape-wise, it's a minefield. A minefield which I have (in RTW) so far been able to walk across at no great expense. Which is the benefit of a small cupsize. Recently, I bought some new bras because that small cupsize had become a bit bigger, putting me into an even easier-to-buy size (for some reason, my breasts grew from a 75A to a 75B this winter).
However... Maybe it's all the lingerie sewing going on in the blogosphere or maybe just the realization that I make all my other clothes... I had to try and make my own bra.
A few years ago, I followed M's lingerie sewing workshop, working on drafting and sewing bra and panties. It didn't amount to much because, back then, I was still using my first sewing machine: the knit-eating Toyota.
The experience put me off sewing lingerie for a while although it did give me the background knowledge to try my hand at making swimwear (see my elaborate bathing suit and last summer's much easier bikinis). And somehow it made me justify buying lingerie supplies if I found nice ones, sold cheaply.
Last weekend, I decided to try again. I should add that I habitually complicate matters further by trying to draft my own pattern.
Of course, I could have cut a corner there and bought a commercial pattern. The thing is, I'm so used to drafting my own stuff by now... And commercial patterns don't come with a fit-garantee either. And I really like how drafting something gives you an idea of how such a garment 'works', both in construction and on the body.
I had three different drafting tutorials to choose from: Magreet ten Dam's Een Tweede Huid (which translates as A Second Skin. The book has only ever been published in Dutch and has been out of print for years. It is highly sought-after which is why I only have photocopies of a few pages from M's copy), Ann Haggar's Pattern Cutting for Lingerie, Beachwear and Leisurewear and Pattern School's instructions on the subject.
I mostly looked at the books and found those to be very different in their approach. Ann Haggar has you make a zero-ease sloper and draft all bodywear based on that. This seems like a great way to deal with different body shapes and, according to the drawings in the book, would result in the 'downward hike' in the back strap which is the favorite way of may bloggers to adapt their bra patterns. The handling of cup size, however, seemed a big sketchy.
Margreet ten Dam, on the other hand, has you draft the bra as a seperate thing and seems to focus completely on supporting to breast. Her method is based on drafting a 'standard size' sloper and grading that up or down to your size. This may sound complicated but it is explained really well.
In part because I didn't have anyone around to take the kind of super-acurate measurements needed for a zero-ease sloper, I decided to go with the latter method.
I made one major change though: according to both books, a difference of 12 cm between underbust measurement and bust measurement puts me at cup A. But I have never known the sizing in any sewing pattern or drafting instruction to run significantly larger than sizes in stores AND I remembered that my first efforts with bra patterns from this book (the bra at the workshop and my first try at a bikini top last summer) were both clearly too small. So, I drafted a 75B. I made a muslin in non-stretch fabric and it fit. Succes!

 Then, it was time to start on a real bra. Of course, I wanted to match the panties I had just made, so it would be in grey/green lycra and lace. Last week, I finally found non-stretch netting (at the market, costing only 1 euro a meter!) in a sort of skintone, so I used that to line the cups and to stabilize the front of the bra. In this I followed, what I found in most of my RTW bras:
 Not only is the (in most RTW bras rather narrow) bridge completely rigid, there's a seam a couple of cm past the underwire, that's where the non-stretch interfacing ends (in the picture, you can see there are two layers of net left of the bound seam). In many bras this is not just a seam, there's a tiny piece of boning there. As far as I know, this is especially useful in strapless bras and for larger sizes as it lends more stability to the whole thing.
I stayed pretty close to the original, full cup draft. I just lowered the center front a tiny bit and planned the placement of the lace. I'll wrestle with a tiny little seperate center front bit later...
 The cups are lace over lycra, lined with the netting. I stabilized the front edges (and the top of the bridge, and those extra side seams) by understitching with a narrow ribbon.
 I see a lot of bras on other blogs which use normal picot elastic for the bottom band, but all my RTW bras use a more substantial elastic there. I had lots of nice, heavy black elastic (actually a 1.5 cm wide shoulder strap elastic), so I used that for the bottom of the bra. Because the colour didn't match, I stitched it on so it wouldn't show on the outside. If the bra is flat on the table, this stronger elastic causes ugly ruching at the front but this is pulled out when it is worn.
At the top of the bra, I used the same satin edge elastic as for the panties. Unfortunately, I had forgotten to buy shoulder strap elastic in this colour when I bought the other bits. The beige straps are only there until I find some in the proper colour.
 It's finished now and it fits (although really not on the dummy, she has the weirdest breasts)! I was nervous about that near the end, fearing the cup shape was wrong after all and/or it was still too small. I guess it just looked small because I'm more used to foam cup bras and it really goes to show you can't really try on a bra until all the bits are attached.
I like the sort of baroque look of the floral lace on the cups and I like the proportion of bra and panties when worn.
By the way, this picture on the dummy is the only one done with flash and, as a result it shows the colour most acurately.
Now, just one question remains:
 Should I sew this little ribbon flower on the front, leave it plain or attach a little mother-of-pearl button, like on the panties?
P.S. I'm really getting into this bra-making thing. If you're interested I could do a post on the many issues of bra-sizing some day soon.
I did, however, take a big hurdle on the 'sewing lingerie' front.
Maybe it's just me, but I always feel like sewing panties isn't the real thing. Sure, panties are underwear, lingerie, dessous etc. They are just not that complicated. Bras are a different matter entirely. Even buying the right bra is something loads of women don't manage...
Sizing- and shape-wise, it's a minefield. A minefield which I have (in RTW) so far been able to walk across at no great expense. Which is the benefit of a small cupsize. Recently, I bought some new bras because that small cupsize had become a bit bigger, putting me into an even easier-to-buy size (for some reason, my breasts grew from a 75A to a 75B this winter).
However... Maybe it's all the lingerie sewing going on in the blogosphere or maybe just the realization that I make all my other clothes... I had to try and make my own bra.
A few years ago, I followed M's lingerie sewing workshop, working on drafting and sewing bra and panties. It didn't amount to much because, back then, I was still using my first sewing machine: the knit-eating Toyota.
The experience put me off sewing lingerie for a while although it did give me the background knowledge to try my hand at making swimwear (see my elaborate bathing suit and last summer's much easier bikinis). And somehow it made me justify buying lingerie supplies if I found nice ones, sold cheaply.
Last weekend, I decided to try again. I should add that I habitually complicate matters further by trying to draft my own pattern.
Of course, I could have cut a corner there and bought a commercial pattern. The thing is, I'm so used to drafting my own stuff by now... And commercial patterns don't come with a fit-garantee either. And I really like how drafting something gives you an idea of how such a garment 'works', both in construction and on the body.
I had three different drafting tutorials to choose from: Magreet ten Dam's Een Tweede Huid (which translates as A Second Skin. The book has only ever been published in Dutch and has been out of print for years. It is highly sought-after which is why I only have photocopies of a few pages from M's copy), Ann Haggar's Pattern Cutting for Lingerie, Beachwear and Leisurewear and Pattern School's instructions on the subject.
I mostly looked at the books and found those to be very different in their approach. Ann Haggar has you make a zero-ease sloper and draft all bodywear based on that. This seems like a great way to deal with different body shapes and, according to the drawings in the book, would result in the 'downward hike' in the back strap which is the favorite way of may bloggers to adapt their bra patterns. The handling of cup size, however, seemed a big sketchy.
Margreet ten Dam, on the other hand, has you draft the bra as a seperate thing and seems to focus completely on supporting to breast. Her method is based on drafting a 'standard size' sloper and grading that up or down to your size. This may sound complicated but it is explained really well.
In part because I didn't have anyone around to take the kind of super-acurate measurements needed for a zero-ease sloper, I decided to go with the latter method.
I made one major change though: according to both books, a difference of 12 cm between underbust measurement and bust measurement puts me at cup A. But I have never known the sizing in any sewing pattern or drafting instruction to run significantly larger than sizes in stores AND I remembered that my first efforts with bra patterns from this book (the bra at the workshop and my first try at a bikini top last summer) were both clearly too small. So, I drafted a 75B. I made a muslin in non-stretch fabric and it fit. Succes!


I stayed pretty close to the original, full cup draft. I just lowered the center front a tiny bit and planned the placement of the lace. I'll wrestle with a tiny little seperate center front bit later...


At the top of the bra, I used the same satin edge elastic as for the panties. Unfortunately, I had forgotten to buy shoulder strap elastic in this colour when I bought the other bits. The beige straps are only there until I find some in the proper colour.

I like the sort of baroque look of the floral lace on the cups and I like the proportion of bra and panties when worn.
By the way, this picture on the dummy is the only one done with flash and, as a result it shows the colour most acurately.
Now, just one question remains:

P.S. I'm really getting into this bra-making thing. If you're interested I could do a post on the many issues of bra-sizing some day soon.
February 8, 2013
Thank you Melissa!
I mentioned the lingerie week on Fehrtrade earlier this week didn't I?
Although I've been planning to draft my own patterns for panties and bras for a while now, I downloaded Melissa's pattern straight away.
I thought it was a lovely design, of a type of panty I would wear. I also hoped I might be able to give some well grouded praise and/or advice about the pattern and instructions, not just because Melissa is a great blogger, seamstress and person but also because I think the selfless act of sharing a self-drafted pattern should be supported. And, added to all that, it seemed like a great short-cut to finally get into making lingerie for real (I tried before but was held back by such things as an un-cooperative sewing machine, a lack of bra-supplies and struggles with the patterns).
This week, I really wanted to make that stretch velvet dress, but when the completed pattern turned out to be quite considerably too large for the amount of fabric I had, I decided to give it a rest.
Instead, I made these panties.
I'm a Burda size 36 at the waist and a 38 at the hip, so I cut the size M (quite a serious effort at not using 'vanity sizing' by the way, usually 32 and 34 are XS, 36 is S, 38 can be either S or M etc. Not that it really matters because the sizing is quite clearly explained in relation to the sizing of Burda and other pattern companies).
I used the lycra and elastic I bought at Kantje Boord and lace I've had for quite a while. In size M, those side pieces were narrow enought I allow me to use both scalloped edges for the lace, so very little material was wasted.

 The instructions are excellent. I have made lingerie before and, more succesfully, swimwear, so I know what to do. I did read all the instructions though and I'm convinced they would be quite clear ever to a complete lingerie sewing novice. Also, great job on calculating the lengths of elastic to cut. I found these to be very well-balanced with the pattern.
If you are sewing these as a newbie, please bear in mind that a huge part of sewing good looking lingerie is practising you hand to get that nice even stitching, on stretchy stuff, close to the edge.
There's just one little thing I'd like to add which is this: When applying elastic to leg openings, it's difficult to start at one end because you need to stretch the elastic. If you don't stretch the first centimeter or two, there's no problem but because this is a fairly short piece of elasticated edge you will want to distribute the stretch evenly. I solve this by starting in the middle (which will be between your legs in the finished product, so no-one will ever see any double stitching there) and sewing from there to each end.
You don't have a problem like that with the waistband because there, you're applying the elastic in the round.
I think the finished item looks great. The panties fit me really well. I like the rise (low-ish but not to much so) and there's no elastic digging into the flesh at my hip. For a next version (and there will be one) I would narrow the center back piece a little bit because there is a bit of a fold there. This may very well just be down to my shape though.
One little point of criticism: I think if you have a Burda size 36, you should cut between the sizes S and M. The panties are really comfortable for me, but they might not stay on a pair of hips 4 cm smaller.
This fits with my first impression that the gaps between the sizes are rather big for such a small stretchy garment. Grading is really tricky, so I don't have a solution to this. Normally, there's a difference of 4 cm in overall width between each, numbered, size. For stretchy things, fewer different sizes are made. I completely understand the decision to take two sizes together which results in an 8 cm difference between each letter.
In RTW, in my experience, the usual difference between, say S and M, is usually 4 to 6 cm.
Although I've been planning to draft my own patterns for panties and bras for a while now, I downloaded Melissa's pattern straight away.
I thought it was a lovely design, of a type of panty I would wear. I also hoped I might be able to give some well grouded praise and/or advice about the pattern and instructions, not just because Melissa is a great blogger, seamstress and person but also because I think the selfless act of sharing a self-drafted pattern should be supported. And, added to all that, it seemed like a great short-cut to finally get into making lingerie for real (I tried before but was held back by such things as an un-cooperative sewing machine, a lack of bra-supplies and struggles with the patterns).
This week, I really wanted to make that stretch velvet dress, but when the completed pattern turned out to be quite considerably too large for the amount of fabric I had, I decided to give it a rest.
Instead, I made these panties.
I'm a Burda size 36 at the waist and a 38 at the hip, so I cut the size M (quite a serious effort at not using 'vanity sizing' by the way, usually 32 and 34 are XS, 36 is S, 38 can be either S or M etc. Not that it really matters because the sizing is quite clearly explained in relation to the sizing of Burda and other pattern companies).
I used the lycra and elastic I bought at Kantje Boord and lace I've had for quite a while. In size M, those side pieces were narrow enought I allow me to use both scalloped edges for the lace, so very little material was wasted.


If you are sewing these as a newbie, please bear in mind that a huge part of sewing good looking lingerie is practising you hand to get that nice even stitching, on stretchy stuff, close to the edge.
There's just one little thing I'd like to add which is this: When applying elastic to leg openings, it's difficult to start at one end because you need to stretch the elastic. If you don't stretch the first centimeter or two, there's no problem but because this is a fairly short piece of elasticated edge you will want to distribute the stretch evenly. I solve this by starting in the middle (which will be between your legs in the finished product, so no-one will ever see any double stitching there) and sewing from there to each end.
You don't have a problem like that with the waistband because there, you're applying the elastic in the round.
I think the finished item looks great. The panties fit me really well. I like the rise (low-ish but not to much so) and there's no elastic digging into the flesh at my hip. For a next version (and there will be one) I would narrow the center back piece a little bit because there is a bit of a fold there. This may very well just be down to my shape though.
One little point of criticism: I think if you have a Burda size 36, you should cut between the sizes S and M. The panties are really comfortable for me, but they might not stay on a pair of hips 4 cm smaller.
This fits with my first impression that the gaps between the sizes are rather big for such a small stretchy garment. Grading is really tricky, so I don't have a solution to this. Normally, there's a difference of 4 cm in overall width between each, numbered, size. For stretchy things, fewer different sizes are made. I completely understand the decision to take two sizes together which results in an 8 cm difference between each letter.
In RTW, in my experience, the usual difference between, say S and M, is usually 4 to 6 cm.
February 5, 2013
Just seven days...
Seriously, what is up with the first full week of February that gets people so active?


I do't read a lot of blogs but even among that limited company, this week has been made into two different theme weeks already!
The first is an annual one, which many of you may already know about:
Debi's Sew Grateful Week, dedicated to expressing gratitude for the many good things about crafting, sewing and the online community involved in those activities.
I am planning to participate on Wednesday, by sharing a simple pattern.
I only found out about the second 'week' yesterday (not that I could have known about it before):

Melissa has decided to make this week Lingerie Week on her blog, fehr trade. Dedicating the week to ehm... well, sewing lingerie of course. Although in this particular theme week readers aren't particularly asked for a contribution, she has kicked it off with something which will be very popular: a lacey thong panty pattern. Which I've downloaded immediately.
I think it would be very nice to make those panties using some of the supplies I bought when I was at Kantje Boord with Melissa back in October. And blog about it. Preferably this very week, so it still falls into her Lingerie Week.
However, I still haven't been able to get my sewing mojo back into high gear after Modefabriek. It's still a matter of so many ideas and not enough time and energy...
I had sort of planned to make this the week in which I would finally make a dress from my stretch velvet, and trousers to match my black jacket...
Well, I'll keep you posted!
Subscribe to:
Posts (Atom)