
Anyway, I chose to start out with a design from the Frohne patterns-to-size system. I've blogged about this before and shown you pictures from the book for summer 1961 and winter 1972.
I looked through all the Frohne patterns in my collection (the longlist got its own Pinterest board). Originally, I had always planned to make this great suit from 1972.

I also had some 1950's options available but that didn't really go with my goal of using the Pattern Pledge to try out some new-to-me fashion eras. Then, I thought I could be clever and make something which would help me fill a gap in my wardrobe. Make a top. But who wants to make a top when there are so many cute dresses?
This left me with a choice between two designs:


That's the one I decided to go with.
As a system, Frohne is related to Lutterloh. You get miniature patterns with dots on them and, so they claim, you can use a special tool to enlarge those to whatever size you need. Lutterloh's tool is a special ruler (I will make a Lutterloh pattern next, so that's when I will try and show that in more detail), Frohne's is a bit more complicated:
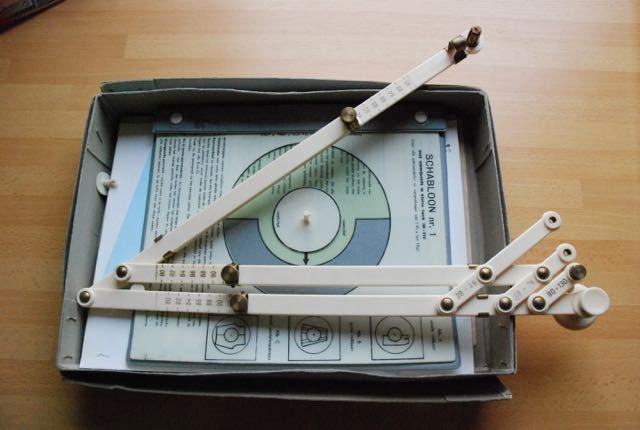
It contains the tool, templates which supposedly make its use easier, an instruction book and a book with basic patterns (a new on-trend pattern book came out twice a year).
To make a full-size pattern, I scanned and printed the mini one (I guess you were supposed to cut it out but no way that I'm doing that). After that, I followed instructions.


Now, all you have to do is 'walk' the pin, near the joint of the tool, to every dot on the pattern.

This is not all though. Everyone who has ever graded a pattern, will know that the vertical difference between sizes is only a fraction of the horizontal one. And this system treats all measurements equally. The good people at Frohne have thought about this though. The instruction book contains tables with back length measurements. You can just compare the one given for your bust size with your own and add or substract according to need (the book even tells you how to do that). Frohne seems to consider a bust circumference of 96 cm as 'normal', so that got their 'normal' back length of 39 cm (less than today's patterns where it is usually 40 or 41 cm). My size, bust 90, ended up with a back length of 36.5 cm. Since I have a modern normal height and back length (1.68 meters in length with a back length of 40 cm), I had to add 3.5 cm to all pieces above the waistline.
The book contains more tables which can be very useful to adjust a pattern to size but luckily, I didn't have to use those because my proportions are, apparently, very normal by 1965 standards. Those tables show the relationship between bust circumference and other measurements according to Frohne. You can check your hip size, upper arm circumference and neck size there. If your measurement are closer to another size than the one you were using overall, the book instructs you on the adjustments you can make.
I thought that was really good. Recognition for the fact that all bodies are different and a fairly easy way to deal with that. Frohne is by no means a pattern drafting system but the way the patterns and instructions are presented makes it, I think, easier for an unexperienced seamstress to start making necessary adjustments.
Nevertheless, I don't think I'll completely trust the theory. There are just to many variables to any human body. I'm going to make a muslin first.
Hmm, that seems like a method fraught with peril. As you said, one slip and it's going to be off. The dress is quite cute so I do hope the experiment is successful.
ReplyDeletei"m fascinated to see how this turns out! I've heard of this kind of systems before, and am very interested in how they actually translate to finished garments. I wonder why they went out of vogue? Cheaper and more readily available paper patterns?
ReplyDeleteVery interesting process (and potentially complicated too). I'm looking forward to reading about your progress.
ReplyDeleteI didn't know this method. Thank you for showing it to us!
ReplyDeleteNice and informative blog! Your blog provides information about many new and innovative technologies. Thanks for sharing the blog and providing an information about something new.
ReplyDeleteBalenciaga Tailor & Alterations