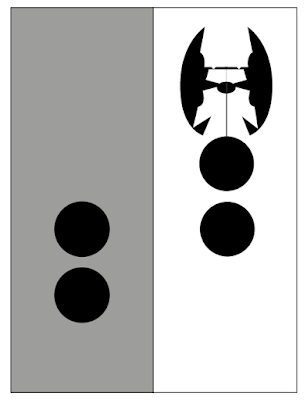
In the previous post, I promised to show you what the "pattern" for my dress looks like. And here it is (as usual, the drawing is not to scale):
As you can see, the pattern is perfectly symmetrical.
I started with two pieces of fabric which were 140 cm wide and 3 meters long.
I used my favorite shirtwaist bodice in which all the dart width at the back has been converted into those pleats under the back yoke. On the front bodice, I combined the waist and bust darts into a single French dart. The front bodice piece is drafted to extend 2 cm beyond center front, to create an overlap for the button closure. In the subtraction pattern, left and right front bodice are placed edge tot edge (with added seam allowance, of course) and then cut.
To make that work, I added extra width to the circle just below the waistline (not in the picture). 6 cm to be precise, the 2 cm for the overlap and 1 cm seam allowance, both times 2.
I managed to cut out the facing pieces from the cut-out fabric around the bodice but used an extra bit of fabric (in fact, the 40 cm bit I cut off at the bottom) for the collar and sleeves.
As you can see, I cut out the bodice pieces with sharp angles to the "side seam". In the small scale dresses, I preferred the look of that. Waist definition.
It did mean I had to treat those points with care. I fused small circles of lightweight fusible interfacing to them, then sewed the seams and cut to the seamline. At least, that is what I did on the right side. On the left, I put in an invisible zipper.
When I first tried the dress on, I was disappointed to find the bottom loop around my shins. I considered partially sewing it to the waistline but I didn't do that in the end. Instead, when I put the dress on, I make sure my body passes through that loop first and then through the "top" one. The top loop can't sag down because it is connected to the front waistline. So, it keeps up the other one between waist and hip. This adds to the skirt volume at the sides, which I really like.
To me, this dress is much more wearable than my first attempt (the brown-and-stripes one in this post), which was more of a "normal" subtraction cut dress. In fact, this one goes a bit against the spirit of the subtraction cutting technique. I used small scale experiments to take out the risk of experimentation and I made the bodice using normal pattern making techniques. I is what works for me though.
I think I will enjoy wearing this dress although the amount for fabric means it is not really an every day kind of thing. I would also like to continue experimenting with this technique and I think I will go on to do so in my way, with scale experiments and added normal pattern making.


I must say, I thoroughly enjoyed reading your blog post about your subtraction pattern and the interesting answers you discovered. It's fascinating to see how simple mathematical operations can lead to such intriguing patterns.
ReplyDeleteFind Net worth Of People
Thank you for this thought-provoking piece, and although I came seeking an answer to a different question, I am not at all disappointed with the knowledge and insights you've shared here.
ReplyDeleteVisit Our Blogs
I loved your subtraction pattern and the answers provided, making math fun for kids! It's like uncovering a "preschoolsmiles promo code" to put a smile on their faces while they learn. Thanks for sharing this engaging and educational blog!
ReplyDelete"The author's ability to break down complex concepts into digestible insights is commendable. It makes this blog a go-to for learning."
ReplyDeletehttps://www.discountdrift.com/promotions/
"The well-researched and insightful content in this blog sets a high standard for online publications. It's a beacon of excellence in the digital landscape."
ReplyDeletehttps://www.couponsstudio.com/all-stores
Love this post! If you’re looking for more fashion inspiration, check out Jazzlr for the latest trends and unique pieces!
ReplyDeleteThis blog is totally astounding! As of late, I looked at the SuperShopperHub site and went over the Preschoolsmiles promotion code offering 30% off. From the get go, I could barely handle it, so I chose to attempt the codes myself to check whether they were genuine. Amazingly, every one of the codes worked impeccably! I was stunned that SuperShopperHub genuinely offers a 30% off PRESCHOOLSMILES PROMO CODE
ReplyDeleteCalculation
ReplyDeleteDealPromoX which turned out to be surprisingly good, was discovered while I was looking for the most recent discount codes. Unlike many other coupon websites, the offers are frequently updated, and the majority of them work. It's a nice place to look before you buy anything online.
ReplyDelete