February 17, 2015

1940's

Most of my vintage style sewing, and most of my vintage pattern and magazine collection, focusses on the period after 1947. Last year, I tried to use the Vintage Pattern Pledge to explore some other eras but I still steered clear from late 1930's and early 1940's. Those big shoulders just really put me off. And yet... I do quite like some of those interestingly draped styles (this is probably why I love 1948 to about 1952: round shoulders and long skirts but still quite a bit of that interesting stuff). And 1940's looks can look quite good on other people, so why not on me... I will definitely try it for this year's pledge and I guess I'm now starting to 'get my eye in' by looking at some early 1940's magazines from my collection.

Of course, there is another issue with the first half of the 1940's: I've occasionally read posts on other blogs in which 1940 was mentioned as a "favorite year in fashion" (apparently, McCall's had a really good year back then)  and that always seems strange to me. The reason is simple: To me, 1940 is not a  year in fashion, just in history. Of course, I realize that's a local view: I live in the Netherlands. For people here, the Second World War started with the nazi invasion of the country on 10 May 1940. 
In other places, the war came at different points in time.

Interestingly, among the other publications in the two boxes which contained my Gracieuse magazines, there were some German magazines. My theory about the whole collection is that it belonged to a professional seamstress. That alone can explain the sheer volume of magazines from just before 1920 to the early 1960's and the obvious preference for magazines with pattern sheets. The majority of the German magazines are of this brand: Beyer's. The earliest one is from 1937, there are a number from 1940 to 1942 and some from the mid-1950's. She must have liked this publication, probably because a lot of the designs in each issue are included on the pattern sheet.   
I should also add that there is only one reference to nazi rule in the entire collection: A small black-and-white advertisement at the back of one of the 1940 magazines, which promotes thriftiness in support of the war effort, carries a logo of a swastika in an iron cross. 

The images I will show you here today are from February 1940 (so, from a time at which there was nothing special about that year yet). 

Although Beyer's magazine gets thinner throughout the war, it always includes photographs, which I really like.


This issue includes quite a lot of designs which are promoted for their limited use of fabric (oddly, more so than later issues)


And there is a bit of everything: Mostly day dresses but also coat, suits and separates,


evening wear,


and even wedding gowns.

From the 70 designs in this magazine, 45 are included on the pattern sheet. I'm not sure I have all of those because there is only one, double sided pattern sheet while the 1937 magazine has two (although 60 patterns are included with that one). As usual with vintage sewing magazines, each pattern is only given in one size and Beyer defines its sizes by bust measurement (which is nice because it's clear what they're talking about. And there's even a sizing table which tells how what waist and hip measurements go with which bust sizes). The pattern sheet is scarily densely printed though...

February 13, 2015

Twist top pattern tutorial

The promised tutorial! You can make a top like mine using a tried-and-tested t-shirt pattern as a starting point. It doesn't matter if it has bust darts, you can transfer that width into the excess material for the twist. For this design, you want a top which a good waist shape but isn't skin-tight. Oh, and obviously, this design is only suitable for jersey fabrics.


This is what the bodice pieces for a normal t-shirt will look like. As usual, it's much easier to do any pattern alterations without seam allowance.


Before you do anything about the twist, the basic shape of this top has to be made. To do this, you raise the shoulder point by 1 cm and extend the line from neck to shoulder by about 12.5 cm (to decide how much, put the normal t-shirt on and measure down your arm from the shoulder point. In my tops, the sleeve which attaches the seam is at the bicep). From that new off-shoulder 'shoulder' point, draw a line down to the body, at a 90 degree angle, and merge it into the side seam. 


Shape the new neckline. The basic pattern in this drawing has a close fitting neckline, the top we're making has has a wide V. Widen the neckline so that only 7 cm of the original shoulder line is left. At the back, the neckline needs to be lowered by about half the amount it was widened. At the front, make a V which ends at the bust line. 
If you don't intend to finish the neckline with a band, you definitely have to make gape darts at this stage too. I'd say 1.5.


Then there's the sleeve to think about. This will be a very simple shape. I'll give you the measurement I used for mine but I know I have fairly skinny arms, so only use these as a starting point. You want to make a sleeve which is a bit loose at the top and tapers to a closer fit at the wrist. The sleeve will be a bit wider at its top than the original sleeve-with-sleevehead was at that that point.
Draw the line for the top. Mine is 30 cm (the circumference of the middle of my upper arm is 27). Draw a line from the middle of this one, straight down. The length of this one should be the desired sleeve length (which you can measure on a straight arm). With the bottom of that line as a center point, draw the bottom of the sleeve, for which you can use your wrist measurement. Draw straight lines for the sides. I like to make a very shallow sleeve head by making the top of the sleeve 1.5 cm higher and drawing a smooth curve from it to the sides. 


And now it is time to start the twist! For the shape of this top it is important that the twist itself sits at bust level and there is no extra width added below the waistline. 
So, draw in the lines with that in mind. The actual seam will line up with the sleeve so it will end at 15 cm below the shoulder point. 
All the blue lines in the picture are where you will slash the pattern to form the twist. The red circle has a diameter of about 5 cm and is there only to help you add the extra width which the twist will need (which is easier to work with when drafting the pattern but really tricky to get into this drawing...)
I usually slash the pieces above and below the seam into 5 pieces, connected through that circle. In practice, this is a point where it's easy to go wrong. To avoid confusion after cutting, I like to number the corresponding pieces from the seamline out: So the pieces right above and below the seam are 1, the next ones are 2 etc. This may sound very obvious but as soon as these pieces are cut, it will become very easy to get them confused. This is also a good way to make extra-sure you've made the same number of pieces in both parts. Keep in mind that that lower body piece also counts!


And after all those warnings, it's time to slash and spread (you will see that I've suddenly gone from 5 pieces to 4. Please ignore that. I had made a mistake while drawing these and I didn't have an intermediate stage saved. And I didn't want to start all over again. For the principle of the twist, it doesn't matter).
Start with the largest piece, the lower body and match each next piece at the outer edge. Add about 5 cm between the tips. Mirror this with the upper parts, with the '1' pieces meeting at the tips and the '5' pieces having diameter of the circle, about 5 cm, between them (the drawing is wrong about this as well, my apologies). If you had any darts (bust darts or gape darts) fold them closed at this stage. 


Trace the pieces and smooth the edges to draw the new outline of your pattern. Don't forget to make notches for the twist. 


The neckband is a very simple thing: measure the neckline at front and back and subtract 10%. Draw a straight band of that measurement and 6 cm high and take out a piece at one end at 45 degrees (or more or less, if your neckline is far from a 45 degree angle to center front). 

Now, add seam and hem allowances to all pieces (if you prefer working with pattern with seam allowance). The neckband will be cut with the short straight side on the fold, the sleeve has its center line along the straight grain, the center back of the top is cut on the fold. The front should actually have the lower center front on the straight grain but if you're working with something like a stripe, it's often much more fun to put the neckline or one of the edges at the twist along the stripes.

I just added this image to clarify things.
When sewing, you start with the twist: If necessary, finish the raw edge of the fabric between the twist notches. 
Sew the twist seam on one of the front pieces from side to notches. Pull the other front piece through the remaining hole until its twist notches are on either side of it. Make sure none of the pieces are twisted back to front. 
Sew the twist seam on the second piece and the center front seam. 
Sew the shoulders and attach the sleeves with their tops at the shoulder seam. 
Sew the side seams and sleeve seams in one go.
Now the main construction on your top is finished. For the neckband, start by sewing the pointed bit together as it was pinned when you cut the pattern piece.  Clip the seam allowance to the point, turn right side out and press flat. Now you've got your V-shaped neckband. 
Pin it to the neckline, carefully distributing the excess ease (that 10%...). The twist notches should end up at about 1.5 cm from the tip of the neckband seam allowance. Starting at the tip, sew on the neck band. 

I usually do the entire construction of this top, apart from the center front seam of the neckband (I sew that using a very short straight stitch), on the overlocker/serger. But, if it's your first time making a design like this, I would definitely recommend sewing the seams around the twist first in a way which gives you a lot of control and will allow for easy unpicking. 
If you don't have a serger, you can use all the same stretch stitches on a the sewing machine which you would use for any other project using stretchy knits.

I hope this is clear to you. As usual, feel free to ask questions and I'd love to hear from you if you make something using this tutorial.

February 11, 2015

Another twisted top

And this, finally, is the last finished item I mentioned earlier. I took the pictures at the same time as those for my skirt but I wanted to be able to tell you how to make something like this. 
I designed and drafted the pattern for this top but it's that actually was a long time ago. Its first version was way back in 2011 and that one is still in my wardrobe. There as also a short-sleeved dress version which I can't find right now and a summer top in 2013 which was the first one with the neckline treatment I've just used again. 

Please don't mind the weird facial expression or the blurriness of the picture, but I enlarged this bit to properly show you the top (E didn't take any pictures closer up).
This new one was made from some jersey with knitted-in vertical stripes in alternating widths. With my orange skirt, I wore it tucked in but it also looks good over a normal pair of jeans (I wanted to take a picture of that yesterday but time and daylight didn't allow it).

When I first started to make twisted tops, I used the Pattern Magic instructions (even before I owned the book myself). By now, I'm so used to the technique that I don't even look at those anymore I think I have make a bit of an own way. And the rest of this top obviously bears little resemblance to the version made from the Japanese sloper. 

In fact, I'm not even sure this should technically be called a twist-top. The principle is quite simple: Two pieces of fabric looped through each other. 


I've tried to illustrate it with these two scarves. If you made a top like this by draping, you would probably start like this.
In the popular Burda version of a twist top, only the sides I've sort of folded together here are sewn closed and there's a separate lower body piece. In the Pattern Magic version and in most of mine, the bottom of the top is in one piece with the twisted part.

One of my personal twists to this design is the shoulder line: the dropped shoulder adds room in the upper bodice which always works well if you have a fairly small bust size.

In fact, this post is already getting a bit long so I think I'll stop for today. So, stay tuned for tomorrow's pattern tutorial!

February 8, 2015

Skirt and bolero

And here are the skirt and bolero I mentioned earlier!

The bolero was just a quick fix, a tried-and-tested (and self-drafted) pattern made up in that same tweed-y grey mystery knit which I've used for my experimental dress and E's cardigan. I've made it twice before: The first one was a real wardrobe staple so when, after years of service, the cuffs started to fray, I made another one. That one was made from a viscose knit which was had been on the same sale as this grey stuff. It was very nice to wear but, unfortunately, also extremely fragile. Any snag would tear a whole into it. That bolero didn't survive for more than a couple of days. So, now I have this one.
It's a very simple pattern: Just one pattern piece plus cuffs and that long binding along the edge. It takes just minutes to make on the overlocker/serger.

The skirt took a bit longer. Sleek pencil skirts are great, but only if they fit well. And the more sewing experience you get, the more critical you will become. In this case, I decided to re-work my skirt sloper because I thought it was responsible for some of my issues for a former favorite skirt. Turns out that it was. For some reason, I had never made a test version of that sloper with a zipper... So I had never been able to see an issue at the back: Apparently, I have a bit of a saggy behind... Or at least, the maximum fullness there is at the height of the lower hip while in the standard shape assumed by drafting system, it starts higher up. This is why I always have to lengthen the darts half-way through construction when I'm using this shape... 
And in my trouser sloper, I made an adjustment for this lack of volume at the top of the bottom years ago
To put it simply: I kind of knew, so what took me so long to fix it?

Anyway, I did so now and I made a skirt. 
The skirt is made from some I-can't-believe-it's-not-wool orange fabric from my stash. The seller was sure it was cotton and it shrunk like old-fashioned twill weave cotton when washed. It has a twill weave and a slightly plush texture and a very intense orange colour. It's also rather thick.
Because of that, I didn't want to make a kick pleat at the back, which is usually my preferred way of adding a bit of leg-room to a narrow skirt. I'm not a huge fan of vents and slits (basically, I think only vents with a considerable overlap look good and then I would still have quite a pile of fabric at center back). 
Instead, I took a clue from my vintage patterns: Just about every vintage pattern for a pencil skirt in my collection doesn't actually have straight sides. Let alone tapered ones. The vast majority of narrow skirts from the late 1940's and 1950's actually has a slight A-line. Usually, a back pleat is still added to allow for ease of movement, but still.

In this case, I went with just the slight A-line. For walking, I thought it was OK, but you never really know until you go outside in it. It forces me to take slightly shorter steps, but it's not a real problem. 
I'm still happy I didn't make it wider though. Now, it looks really sleek. A couple more centimeters at the hemline and the A-line effect would have been more obvious. 

To make the skirt a bit more interesting, I added pockets at the front. I considered single welts but ended up making patch pockets without topstitching (tutorial for those is here). 
Oh, and obviously it is lined.

I suppose I've become a bit addicted to bright skirts over the past few years... At least I'm happy to add this one to my wardrobe. 

February 4, 2015

Those slips...

To be honest, I had my doubts about modeling these here... Slips are underwear after all.
On the other hand, this is the first time I've made slips, I've mentioned them a couple of time already and there was some discussion about slips on the We Sew Retro Facebook group recently.

Well eh... here we go! As you may know, I have, over the past years, made several dresses in thicker cottons and with longer-than-short sleeves. Dresses which can be worn in autumn and in spring and on warmer winter days. If I wear tights or stockings under them, that is. And that, obviously, is the problem. Just about every fabric can stick to hosiery. 
Last year, I made a very plain half-slip for that purpose: A bias cut polyester with an elastic waistband. It sort of did the trick. It just suffered a bit too much from static cling (to the stockings, not to the dresses) and it taught me that I don't like wearing half slips. It's another line at the waist. With the dress's waist seam, the belt and the top edge of a garter belt or pantyhose already in place there, that's just one too many.

So, last week, I finally bit the bullet and made myself some slips. I thought about the versions I've seen on other blogs: luscious vintage style bias cut silk numbers, playful little things with lacey edges etc.
And I thought about what I wanted from these slips: A slippery layer between skirt and stockings which won't show under my dress and won't bother me in any way. It's an extra layer which will be worn over various kinds of bras.

With those requirements in mind, it was obvious that fussy styles were not going to work. I decided to use my body fashion block. A sloper intended for things like swimsuits. I added some ease to it (this sloper has serious negative ease, so reduced that a bit) and a skirt. Because I wasn't quite sure about the shape, I first made a slip using as basic a shape as possible. I used a grey lycra with a shiny stripe which I bought cheaply last year with this purpose in mind.


This one. It proves that the pattern works but I really should have made the neckline a bit deeper. This won't work under most of my dresses. 


So, I made a spaghetti strap version. I wish I could have used the narrow bits of the scallops at the tops of bodice but I didn't have enough of it to get the piecing right for that. Because I sometimes have issues with shoulder straps slipping off, I crossed them at the back.


And then, I made a third slip. This one is to wear with full skirted dresses. The top is the same as the previous one. Below the waist, I let it flare out a bit more until 12 cm lower. The skirt is a half circle of lining material, it's 'waistline' is the measurement at that spot plus some ease. The top is stretched to fit the skirt while serging it on.

All the slips are hemmed using the rolled hem setting on the serger. It took some fiddling to find a setting which would work with the stretchy lycra but once I did, it made for a clean and easy finish.
The lace on the grey slips was sewn on from the top (and I cut away the lycra under it later), on the black one it's inserted and the sides and back are finished with fold-over elastic. The spaghetti straps are bra strap elastic from my stash.

I think these will work, but I have yet to try it out. 
And I hope this post may add some food for thought or some motivation for other people who are considering sewing slips.
In which case I should add a few notes: These were really quick and simple to make because I have a serger and am used to sewing stretchy material with it. I've also made lingerie before so lycra and lace have no particular secrets for me. If this doesn't count for you, my 'easy fix' won't be yours. 
When planning your slip, consider what you want from it and your sewing equipment, skills and experience.


February 2, 2015

Jardin de la Mode

Slips, a skirt, a bolero and a twist-top... I've got quite a few items to show you but I haven't got any pictures yet. This past weekend, that pesky cold was still bothering me so I didn't feel like modeling and I only put the finishing touches on the skirt and top today (a button and hemming).
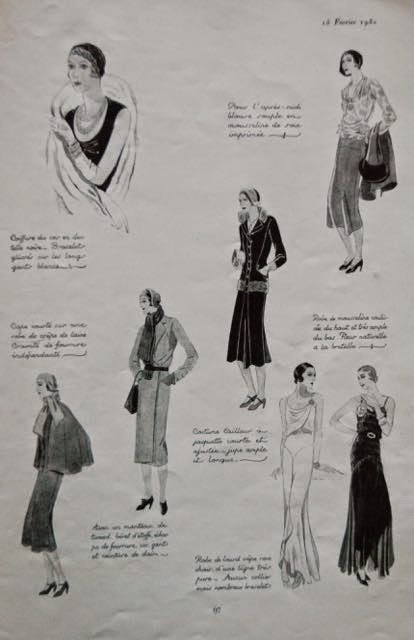
So, I thought I might share some more eye-candy with you: This time images from the French fashion magazine Jardin de la Mode from February 1930.


 There's fashion news,


hats,


new styles for spring, arranged by fabric type,

and gorgeous dresses by Patou,

Lanvin 

and Abernard (never heard of that one...)


and even a section on what the fashionable ladies in Paris are wearing.