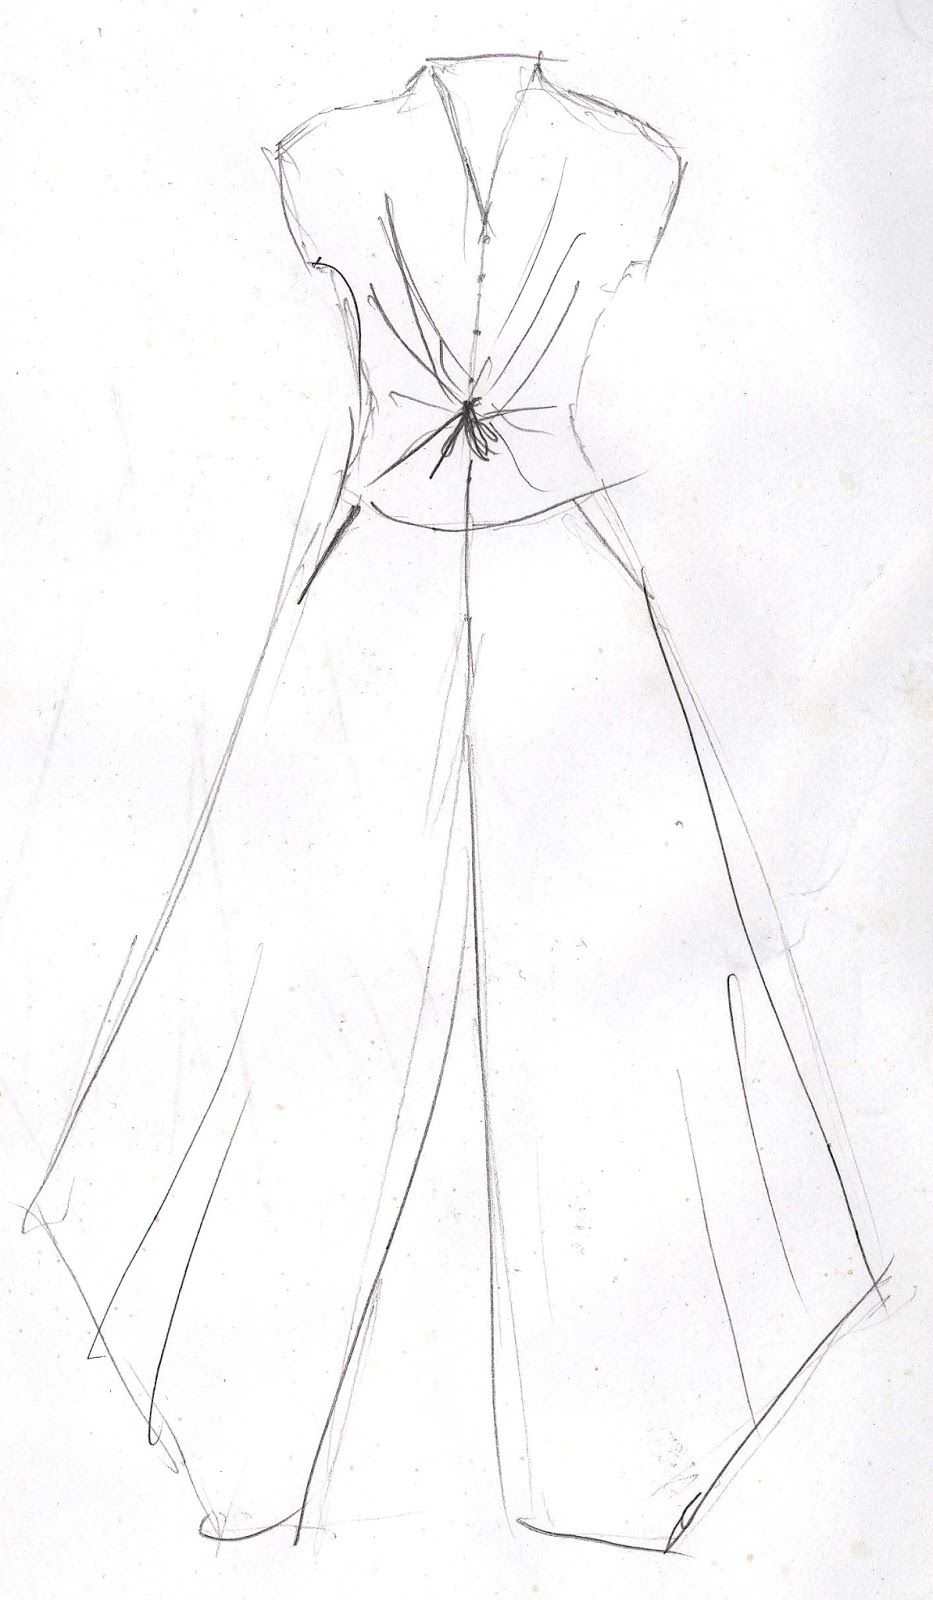
This week isn't bringing quite what I thought it would. I had hoped that, with emergency sewing for E out of the way and work getting a bit more quiet, I would have a chance to work on my long-anticipated crazy projects.
First of all, work didn't get quiet. I had reason to expect that, but this year, I will be busy well into September. Secondly, I did something silly/had some bad luck.
I bought a new laptop. I needed a new computer, my old desktop was getting rather slow and couldn't communicate with certain much used websites anymore (like my bank's). With the things I want from a computer and from the available space in my house now, a laptop was the best choice. The first time I used it for a longish time (other than set-up), I managed to try and type for some time while sitting on the couch with crossed legs, and the computer on my lap. This triggered a spot of old RSI (repetitive strain injury) in my right arm...
That was last week. I've been trying to rest my arm and find a better working posture ever since. On the computer, the arm is fine now. It's when I'm behind the sewing machine that it starts to act up. I have some reason to hope it may be better if I adjust my seat but this is getting me worried. No sewing is just no option but I don't want to damage my arm either...
So, it's dreaming about sewing much more than actual sewing.
I have started drafting something new though. Something from the crazy project list.
The idea of a cowl-legged jumpsuit must have been at the back of my mind for a while now. I certainly have quite a number of sketches. I will share my rough sketches now, so please don't complain about the quality of the pictures.
One of the triggers to really try and make it must have been watching Parade's End. I thought the (rather inappropriate) hobble dress Sylvia wore to the funeral of Christopher's mother was wonderful. In fact, like so many not-to-likable female characters, Sylvia has a great wardrobe anyway.
Unfortunately, this was the only picture I could find of that particular dress.
In trouser- rather than skirt shape, that would kind of look like this.
Which would be rather close to a dress I was already making...
So, I went on brainstorming on paper.
My next sketches took inspiration from what I read about Mesdames Gres and Vionnet. These three ideas were supposed to have draped bits mounted on sturdy underpinnings. And then I remembered certain of the practical considerations with jumpsuits... Such as: You can not have only a very fussy closure which you can barely work yourself.
Because I liked the draping and thought the last of the sketches above was too fussy, I moved on to this:
Kind of a wrap design without the need for serious hidden layers. I hadn't really worked it out though.
What I'm drafting now is based on that final idea, but I altered it for several practical reasons. Like fabric width, the wishes to limit the depth of the cleavage and have pockets.
So far, I've only tested the fit of the bodice and sleeves. Next, I'll be adding the tied drape based on a Pattern Magic design and draft those trousers...
I don't know how many of you used to follow my blog using Google Reader (I never used it myself, so I never quite figured out how it worked). And I don't know what other services, if any, you have moved on to.
Bloglovin seems to be the one most mentioned so I added its button to my sidebar a little while ago. Now, I've actually decided to try and use it myself. It may even enable me to keep up-to-date with those interesting other blogs I tend to forget about after visiting once through a link on a blog I often read...
This is just a quick post to mention the good intentions and to place the link to allow me to claim my own blog on bloglovin. href="http://www.bloglovin.com/blog/1337674/?claim=egbs2mxx2bc">Follow my blog with Bloglovin
I've had to put the red bra on hold for now. I still plan on getting it right but something else had to be done first.
E. is leaving this Saturday for a three week work trip. To Shanghai. He doesn't like hot weather and temperatures over there are higher than those here, even during the current heat wave. So, even keeping in mind that 'proper' dressing is probably kind of required when attending classes, he wanted to be sure to have enough hot weather clothes.
Because we've been experiencing a heat wave here in the Netherlands this past week (and some nice summer weather before that) he's been wearing his me-made bermuda shorts and thin trousers quite a lot. And just this week he completely tore the back of one of the pairs of shorts. Not at the seam but from the corner of the (welt) pocket down half the leg. And the center front seam on the oldest pair got undone right to the zipper and to the cross seam. I thought I might be able to repair it but when I studied the fabric, I noticed it had gotten very thin at the crotch.
So now, he was down to only two pairs. By the way, let this be a lesson to anyone who considers making the occasional item for a loved one: If you really get it right, the recipient may get hooked on the look and fit of the clothes you make which will kind of oblige you to keep them coming...
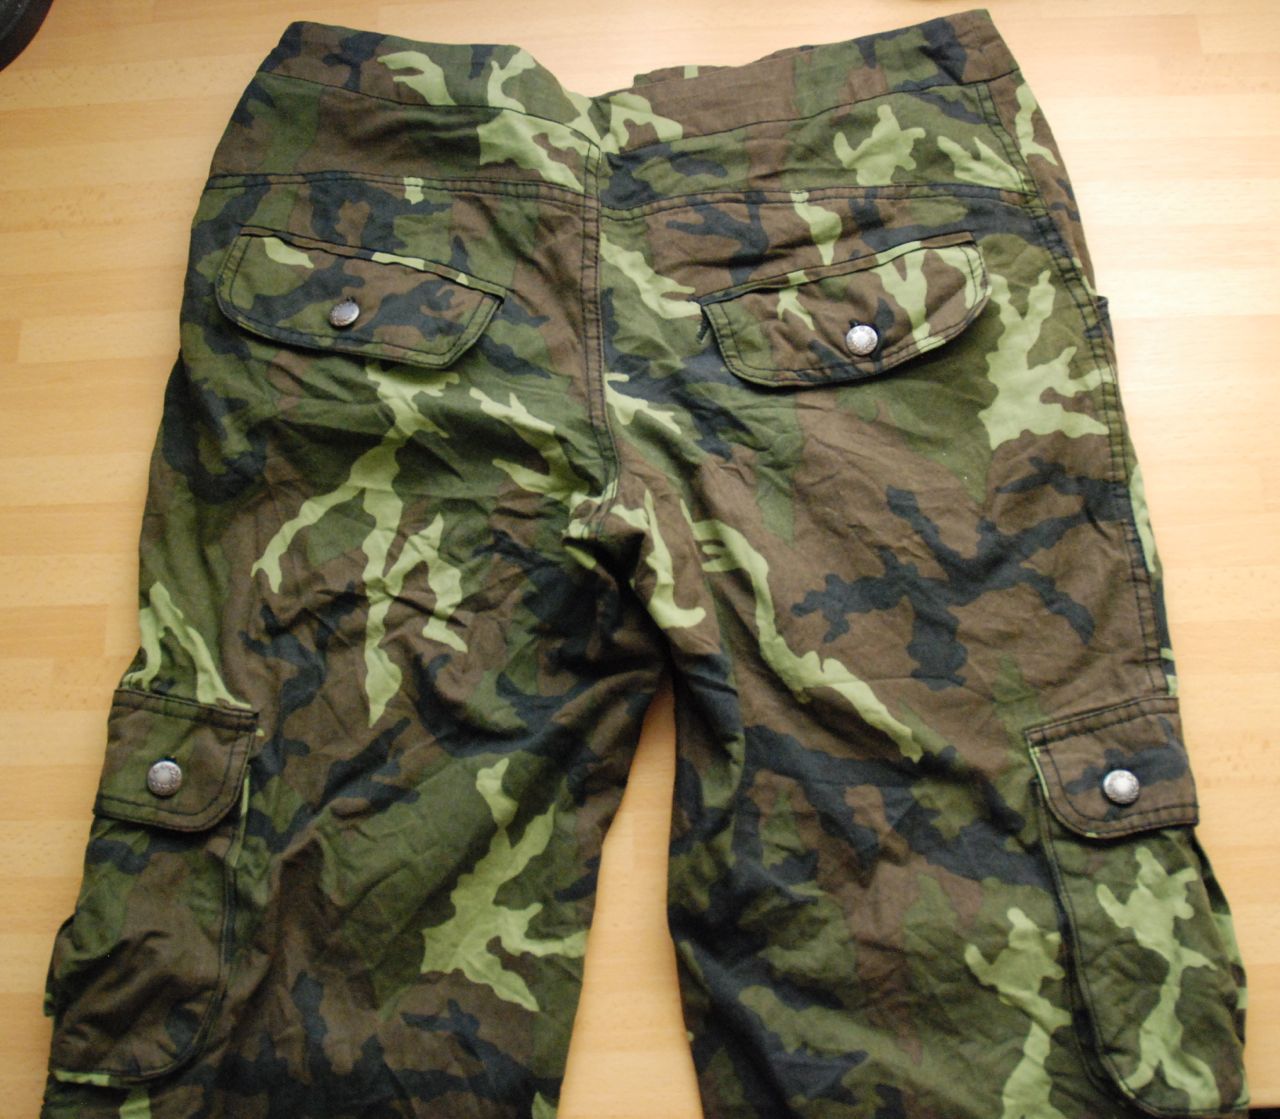
This is the oldest remaining pair of shorts I've made for E (the first one was exactly the same but when I finished those, they were too small. Which I fixed later by adding 2 cm wide strips of black along the side seams). They're not normally this wrinkled, I've just plucked them from the line and haven't ironed them yet.
It was my first attempt at making him trousers. I drafted a sloper, tweaked it and then made this from it.
I had found the camouflage print at the market and went all out on the details. Front pockets, cargo pockets at the sides and welt pockets with flaps at the back. And flat felled or hong kong finished seams throughout (to be honest, I made this just before I bought my serger/overlocker).
I found all those pockets to be too labour intensive and he didn't really need the ones on the side. In wearing, the welt pockets got damaged quite easily. Oh, and E really missed belt loops. The black shorts he tore this week were like these, just without side pockets (and with serged seams inside, rather than the more labour intensive ones). The pair after those had patch pockets at the back instead of welts. After that, there were no new shorts for a while, but I did make four pairs of long trousers using the same basic pattern (the first two were made last year, the latest one last week). These all had front pockets, patch pockets at the back and belt loops.


This is the latest pair of shorts. I made two of these on my day off, yesterday. The first in thin black linen and then, after dinner, this one in heavier linen with narrow pinstripes. This is the simplest design I could think of: same pockets as be recent trousers but no fly. Instead, I made the fit a bit more loose. Which is nice in hot weather and works well in a thin and loosely woven fabric like light linen. Instead of the normal shaped waistband, I made a straight one in pointe knit which I stretched to fit. In it, I made two buttonholes for the drawstring.
These are ridiculously quick to make. On this last pair, I spent no more then two and a half hours, including cutting and fusing and looking for the drawstring which I had accidentally put in the drawer with the interfacing (just in case you are wondering: Of course a design like this doesn't take a lot of interfacing. I just used some fairly light fusible stuff on the facings of the back pockets, the slanted edges of the front pockets and to stabilise the place on the waistband where I wanted to put the buttonholes. Oh, and my sewing machine does a special buttonhole for stretch fabrics which works rather well). Just what I needed with a busy schedule for the rest of the week and a very clear deadline.
I would definitely not make all his trousers like this from now on, but for the height of summer, this works so well I might even consider making myself a pair like his...
Ehmm... Do I really want to talk about this?
Maybe not, but because I already announced it, I guess I should.
This is where it is now. Which, apart from its odd angle, does look like an almost completed bra.
Until you notice this:
And know that those vertical drag lines don't disappear when the bra is put on.
What happened is this: Me being me, I wanted to make yet another bra design. The hardwear sort of dictated my choices: of the underwires I have (six sets), I thought the plunge one would be a bit too vavavoom for this fabric and lace, and two of the three slightly larger ones (for use with foam padding) were already earmarked for specific other projects, so I went with the "normal size for unpadded bra" wires. I also didn't have any stronger elastic in red for the bottom of the bra and decided to try a different solution from the one in the sage green bra.
For this red bra, I would create a stand-out bottom band by encasing 3 cm wide elastic in the red lycra. Incidentally, this would also make the bra close a bit lower on my back. To avoid making the front of the bra look like one big block, I decided to try and leave out the normal bridge piece. I thought this would be possible because, to get a correct fit, I have to have the wire casings so close together that they touch at the top in any bra.
So far, so good. I then decided to go with the cup pieces from the sage green bra because those had already worked before. Makes sense, right?
Construction seemed to go smoothly as well although I worried a bit about the very stretchy lycra covering the hardly-stretchy-at-all net fabric lining in the lower cups. A justified concern, as it turned out. The bra in the picture was already taken partly apart to deal with baggy bits of lycra.
But that wasn't the worst of it. Those weird drag lines and the odd curve of the whole thing are caused by one thing and one thing only: there just isn't enough room for the wire.
I remembered from sage green one that the wire was a tight fit but I didn't worry about it. It fit them, so it would fit now. I certainly didn't measure it.......
BIG MISTAKE. The space for the wire, in both patterns is almost 1 cm shorter than the wire itself (and you need a bit of space to close off the ends of the casing, so you'll typically want the space for the wire to be about 1 cm longer).
I suppose I got away with it in the previous bra because a large part of the underwire casing was only connected to the cup and not to any other pieces. Here, on the other hand, there was that big solid band at the bottom which doesn't really allow for cheating. And now that I'm talking about it anyway: when I wear it, there are some minor horizontal drag lines at the bottom of the lower cup of the sage green bra. These are likely the result of that same wire issue.
To make a long story short, I'll have to re-do the entire thing. Fortunately, I have enough material, but I do not like it. (E. suggested cutting a bit off the wire, but I don't like that idea because I don't know any reliable methods to give the cut end a nice blunt edge again)
Have you ever seen the movie Miss Congeniality? In it, Sandra Bullock plays a butch FBI officer who has to go undercover at the Miss USA pageant. Obviously, she catches the bad guy, while getting in touch with her feminine side. However, it's the road there that counts. Whenever I consider making or even buying red underwear, I am reminded of a scene in which SB's character is bonding with her roommate, a sweet somewhat naive fellow contestant. The other girl tells her she was never allowed to wear red panties, because, according to her mother "that's the devil's colour". When she wins the contest, SB congratulates her by saying "now you can wear devil's panties!" (or something like that, it's a long time ago that I've seen the movie, so the details I describe may not be accurate).
Anyway, I made myself a pair of "devil's panties" today. Red lycra from my stash, satin edge elastic which I bought at Kantje Boord when I was there with Melissa and red lace from the market went into making them. I used the pattern I made for my black lingerie set.
Later this week, I want to make a matching bra, but I'm still considering design options for it (and wondering why I forgot to buy any shoulder strap elastic...)
Thank you for all the nice comments on my dress!
At the moment, I'm working on another pair of trousers for E. I'm not going to blog about those because I'm using the exact same pattern I used for the last pair. Just different fabric. The dark blue/black cotton/linen I used for his trousers and my jumpsuit last year...
It's not a very exciting project but he would really like some more thin trousers in the warm weather (he can't always wear bermuda shorts to work, after all). And it's nice he likes my sewing so well.
Today, I wanted to show you another little gem from Libelle nr.10 from 1956:
Did I mention I love those old colour photographs? Without them, you never quite realize how much colour their was in a lot of vintage fashion.
This is actually a knitting pattern....
And it is in my size. Well, it is in my size now, but as I would (optimistically) estimate the time it would take me to knit something this big and complicated at about half a centure, I doubt it would fit me when it's done.
It's knitted on nr.3 needles (mainland Europe 3, I think the English and the Americans each have their own systems of numbering knitting needles, but I'm no expert). Normal ones for the front and back bodice and four double tip ones for the skirt. Which makes me suspect the entire, nicely flared, skirt is to be knitted in the round. Which would makes sense because that would be the only way one could get both the length and the fair isle/jacquard design right.
Ehm... wow. Did anyone actually ever knit that?
My striped dress is finished! And just in time too, because next week's weather forecast is about sun and sun.
In fact, it's a rather simple dress: Bodice fitted to the waist, big gathered skirt with wide hem. Invisible zipper at the side, faced neckline. Slightly elongated shoulder/cut-on cap sleeve (a detail copied from the Marion dress). Four darts at the back, center front seam with front darts from there.
The real attraction is all in the placement of those stripes.
The fabric is a thin, fairly loosely woven cotton with red and dark blue/black stripes of various widths woven in. It's pretty ideal for a hot-weather-dress: thin enough to be cool and light to wear but just heavy enough not to be see-through. And, as I wrote before, if I tire of the bright colour, I can always dye the dress without having to worry about the topstitched hems. For now, I like it though.
Here's the back. You can see how carefully I stitched those back darts: they're not even visible in the picture. Normally, I use two wide back darts on a bodice with a waist seam but here I thought making four would allow me to make those horizontal stripes look uninterrupted.
There are no pockets (yet). In my vintage fashion magazines, dresses like this one usually have patch pockets with the stripes running in a different direction. I thought about that but was afraid that might make the whole a bit too costume-y. And I could always add them later. Or make patch pockets with the stripes matching those of the skirt, or in-seam pockets...
Again, E was willing to take the pictures. In fact, he was so enthousiastic, he got started before I was quite ready...
P.S. - Yes, that little balcony is the largest outdoor space belonging to our appartment.
- And yes, that corner of my work room near the door is a mess.
- No, I don't usually sun-bathe on that table. It was their already and adding a chair would have made the balcony too full for pictures. (in fact, I'm not big on sun-bathing anyway. I get sun-burnt so easily)
- No, it's not all my hair. Well, the hair is, but I bought a ... eh... thing which fills up most of that bun. It makes it surprisingly light and easy to wear. Strangely, it's much more comfortable than a normal up-do. And I enjoy the look.
- I made that belt last year. You can see it in detail here. So far, I didn't wear it often but it matches this dress perfectly.