December 7, 2014

A new sweater

Last week, when my sewing machine had its little problem, I decided to try and knit something. On the knitting machine, of course.
I looked at some of my vintage machine knitting patterns but I always struggle to match patterns to the gauge I can knit to with the yarns I have. In the end, I decided to try and make a pattern myself for a very simple little sweater.
I used two of the really thin yarns knitted together: a red one and an olive/beige one with slightly irregular thickness and a bit of shine.

I'm pretty pleased with the result. I made a couple of swatches to decide on the perfect settings for this combination of yarn and the result is light and soft but not too loose. I used the right swatch for my calculations for the pattern. I tried that before, last year, but I guess that time I had over-blocked the swatch. The striped sweater ended up a bit more snug than intended and a bit shorter too.
I did very little blocking on the swatches this time and the resulting sweater is very close to the measurements I wanted (2 cm shorter, to be honest. The width is spot on).  


The design is quite simple: straight body pieces with the flat double edges which are easy to make on a single bed knitting machine. A dropped shoulder and a straight neckline which mean the pattern doesn't require any reduction of stitches except at the shoulders. And tapered, three quarter length sleeves.
The cable-like detail which decorates the front is actually made using re-hung stitches. It's easier than making real cables and you don't need rows of purl stitching along them but because it is made by pulling the material in, that piece of the knit-work becomes a lot less stretchy.   
I'll try to make an illustration about how this works next time I use it.

In the mean time, I still haven't decided on a Lutterloh pattern and I'm working on a top for my grandmother. It should be a fairly simple jersey blouse using a block I made for her last year. However, the design and fabric she picked don't really work that well together and I'll have to unpick the collar because I made the top of the facing too narrow. I'll show it later.

December 5, 2014

Lutterloh choices

For the past two days, I've been pondering my options for the next Vintage Pattern Pledge item. I want to use my other pattern-enlarging-to-size system this time. You may be familiar with this one: Lutterloh.
I've seen it mentioned before on blogs and definitely on We Sew Retro so I assume this system has some international fans. The earliest publications I've read about (I haven't researched it, this is purely based on what other people blogged about) are from the 1930's. And it's still there. Unfortunately, that modern website doesn't have any information on the history of the brand but the system is still basically the same.

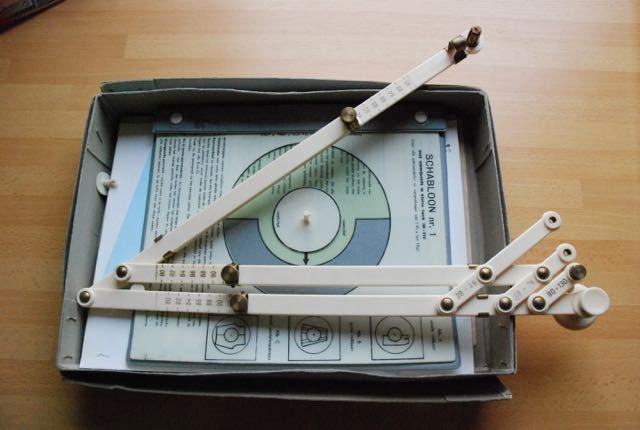
Like Frohne (which is, by comparison, probably no more than a short-lived competitor), Lutterloh offers its customers books with pictures of the designs and miniature patterns. To scale these up to size, Lutterloh relies on a special grading ruler.

This little thing. You have to attach a tape measure at one end, overlapping the 8. I'll take some pictures of how this works when I start on enlarging my pattern.
The system seems to rely on the idea that the human shape obeys certain rules, which has me a bit worried. This text comes from the introduction to the system in my books: 

When a human being is fully grown, the most important measurements of his limbs barely change anymore. One will only, based on predisposition, get fatter or thinner. Every human being only gets 3.5 times as large as he was at birth. Per size, there are, on average, just 3 groups (not counting dwarfs and giants). To make the sewing patterns usable for these three groups, it is desirable for very slender tall people and very short fat ones to adjust for the differences in waist length, sleeve and skirt length by lengthening or shortening the pattern pieces.

Okaaayy. So according to Lutterloh, there are no different body types (since the rest of the text suggest that the three groups refer to 'tall', 'medium' and 'short')... And where does that "3.5 times" thing come from? I'm pretty sure everyone, as an adult, exceeds 3.5 times his or her birth weight and height.
And that was also all the information given about height adjustments. Basically, you should just figure it out as you go along. And then we should remember that making muslins was certainly not common practice in the past.
Of course, this system doesn't enlarge in the same way as Frohne so its 'false' shortening or lengthening might be less. I'll tell you when I find out. 

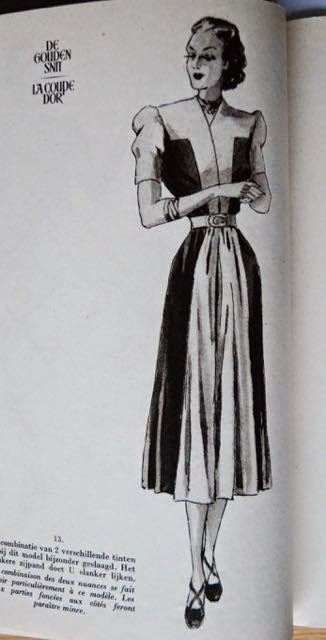
So, now I just have to pick a pattern. I own three Lutterloh books, one from 1954 and two without date which overlap partly. Those two are definitely earlier. The designs there are an odd blend of 1940's and sort of 1950's which leads me to date them to 1947 or 1948. The time when the New Look was slowly gaining fashion ground. 
Ideally, I want to make something which is not just nice but also appropriate for this time of year, a sort-of-new-to-me style and can be made in a fabric from my stash. And that wish-list makes things difficult.

For one, it basically rules out the many wonderful things in the 1954 book.

Even though I quite like this sporty little jacket...

Then, this dress became my favorite. Cute look and basic enough to make weirdness in the sizing easy to spot and fix. But really a summer dress.


So. Other options. I love these but I'm not so sure I've got the right fabrics for them. 


Or of course, I could be sensible and make a blouse...

This one shouldn't even be on this list. It has plissé and that means it's impossible.

And how about this dress. A real 1940's look but not really 'me'.

I really don't know. Every time I look through the books again, something may leave the list and something else may be added. What do you think?

December 3, 2014

1965!

Yes! It's finished. My dress from the summer 1965 issue of Frohne. I haven't decided yet whether to call this my second or third item for the Vintage Pattern Sewing Pledge... I guess I'll let you know at the end of the month.

My sewing machine is back in working order. The good folks of Mulder Naaimachines fixed it while I was there yesterday (there are good reasons why I always recommend them and obviously, none of those have to do with compensation, they don't even know I blog...).  
So, I could finish that last bit of stitching.

As you may remember, I used the Frohne pattern enlarging system to make this design. 
I made a muslin first. That showed me I had to lower the bust darts by two centimeters (which means that when using Frohne, I have to add all the extra length above the bust... interesting) and the front shoulder was about 1.5 cm too wide. Otherwise the fit seemed fine but I decided to add back darts because I didn't like the sack shape there.

I made the dress with those changes. I used a peculiar fabric from which I have quite a bit in my stash: really heavy linen in a black and grey herringbone weave. Not the greatest material for winter but then, this is not the greatest dress for winter, so I don't mind.

Today was the lightest and brightest day in a week but still it was pretty drizzly and gloomy. We took these pictures at 2 p.m. and there were only a few without blurriness. At least E could help me because he was still at home (so rare for him to take sick leave, or need it).
We tried to have a bit of 1960's style fun with the styling and posing but I fear it's all very fake. 

I tried a large size hair donut to imitate a beehive and only kept it because E thought it worked. He suggested using the kitchen as a decor, and then I insisted on me having a drink in that case (no alcohol was actually consumed during the taking of these pictures. It's soda in the glass). It's not a retro kitchen so really, it's a bit silly.
The yellow tights are not wrong though. There was a craze for brightly coloured hosiery in the early 1960's. I know this from a magazine article from 1962 discussing the trend (and coming to the rather tame conclusion that it's OK to wear things like that if you have pretty legs, are young enough and it suits you...).

Frohne patterns don't come with instructions of any kind. I'm very much used to sewing without instructions but that is usually with my own patterns. In which case I've been thinking about construction since before I put a pencil on the paper. In this case, the muslin helped me think about how to sew those little pleats at the corners of the front yoke in such a way that the seams could be finished. And I could test whether or not I needed a zipper. I didn't, even with the back darts. 

I attached the center front panel using sew-in snaps. This makes it easier to get in and out of the dress and it gives me an option which was really popular in the 1950's (not sure about the 60's, clothes were getting a bit cheaper then): using panels in different fabrics. I ran out of snaps, so I haven't made any yet, but I will.

I am happy with the finished dress. A semi-fitted sleeveless design like this may not be the strictest test of the Frohne system, as a first experience, it is encouraging. I can definitely see myself making that 1970's suit after all...

And the look... Another new silhouette for me and I like this one as well. This is kind of a transitional 1960's silhouette. No more figure hugging hyper feminine looks but no waistless mini either... It actually looks kind of modern. 

Now, I think I'll have to decide on a Lutterloh pattern to try next...


December 1, 2014

Just checking in

Ok, this is not what I had planned. Despite ending last week with a not very serious but energy draining cold (which I then, unfortunately, passed on to E), my 1965 Frohne dress was almost finished on Saturday. But just when I was doing the last bit of topstitching, the thread got stuck somewhere around the bobbin. This is annoying but it can happen. So, I switched the machine off, cut off the bits of thread attached to the dress, took the bobbin out and carefully pulled free the rogue bit. So far so good. Then, I wanted to put the bobbin back in. It wouldn't go in. Despite not having used a great deal of force, it seemed like I had dislodged the housing for the bobbin. 
That was on Saturday, late in the afternoon, so the only thing to do was to make an appointment at the sewing machine store at the earliest possible moment. Tuesday.

With my poor sewing machine out of action, I have started on a new project on the knitting machine. It's coming along nicely but I don't have anything to show yet.
I should have taken pictures of my 1965 dress (it's only missing a bit of topstitching under the left arm) but winter is really starting to set in now and the last two days were of that depressing kind on which it doesn't seem to get light at all. So, not the best time for taking pictures.

Hopefully, there will be a quick return of daylight, energy and a functioning sewing machine. 
For now, I'll leave you with one of the more unexpected images which I found while taking pictures (last week or so, when the light was better) for my Pinterest boards:

Yes, it's a lady from 1951 wearing an elegant knitted suit but look at that CUTE KITTEN!!

November 27, 2014

Sewing Frohne

With the deadline looming, I've decided not to give up on my Vintage Sewing Pattern Pledge. I could come up with a whole bunch of reasons why I've only made eh... one and a half of the promised five garments so far. And some of them would even be good reasons. But why waste time on that? The year isn't over yet and I think I will have time to work on this in the coming weeks. I may have to count the 1930's wadder to make five but I think that's OK. After all, it was made from a vintage pattern from my collection...

Anyway, I chose to start out with a design from the Frohne patterns-to-size system. I've blogged about this before and shown you pictures from the book for summer 1961 and winter 1972.
I looked through all the Frohne patterns in my collection (the longlist got its own Pinterest board). Originally, I had always planned to make this great suit from 1972.

Which I still love... but a suit is quite a commitment when following an unknown system.
I also had some 1950's options available but that didn't really go with my goal of using the Pattern Pledge to try out some new-to-me fashion eras. Then, I thought I could be clever and make something which would help me fill a gap in my wardrobe. Make a top. But who wants to make a top when there are so many cute dresses?
This left me with a choice between two designs:

The dress in the middle, from 1961. Very cute but definitely a fabric hog with that pleated skirt.

And one on the left here, from 1965. Simple but sweet with that collar. 
That's the one I decided to go with.

As a system, Frohne is related to Lutterloh. You get miniature patterns with dots on them and, so they claim, you can use a special tool to enlarge those to whatever size you need. Lutterloh's tool is a special ruler (I will make a Lutterloh pattern next, so that's when I will try and show that in more detail), Frohne's is a bit more complicated:

This is the Frohne toolbox.
It contains the tool, templates which supposedly make its use easier, an instruction book and a book with basic patterns (a new on-trend pattern book came out twice a year).

To make a full-size pattern, I scanned and printed the mini one (I guess you were supposed to cut it out but no way that I'm doing that). After that, I followed instructions.

You set the tool by adjusting each of three interconnected sliding rulers to the number of your bust measurement. Then, you take the template and position it over the miniature pattern (it may be possible to put it in one position which will work for all pieces but I moved it a couple of times) and secure it with a plastic pin.
On the top of the pin, you place the tool itself.
Now, all you have to do is 'walk' the pin, near the joint of the tool, to every dot on the pattern. 

This will put the pencil in position to make a dot for the full-size pattern for your size. This is not difficult at all although you have to be careful. A slight wobble of your hand can easily move the pin a millimeter or so, which could translate into a bit of a problem. 

This is not all though. Everyone who has ever graded a pattern, will know that the vertical difference between sizes is only a fraction of the horizontal one. And this system treats all measurements equally. The good people at Frohne have thought about this though. The instruction book contains tables with back length measurements. You can just compare the one given for your bust size with your own and add or substract according to need (the book even tells you how to do that). Frohne seems to consider a bust circumference of 96 cm as 'normal', so that got their 'normal' back length of 39 cm (less than today's patterns where it is usually 40 or 41 cm). My size, bust 90, ended up with a back length of 36.5 cm. Since I have a modern normal height and back length (1.68 meters in length with a back length of 40 cm), I had to add 3.5 cm to all pieces above the waistline. 

The book contains more tables which can be very useful to adjust a pattern to size but luckily, I didn't have to use those because my proportions are, apparently, very normal by 1965 standards. Those tables show the relationship between bust circumference and other measurements according to Frohne. You can check your hip size, upper arm circumference and neck size there. If your measurement are closer to another size than the one you were using overall, the book instructs you on the adjustments you can make.

I thought that was really good. Recognition for the fact that all bodies are different and a fairly easy way to deal with that. Frohne is by no means a pattern drafting system but the way the patterns and instructions are presented makes it, I think, easier for an unexperienced seamstress to start making necessary adjustments.
Nevertheless, I don't think I'll completely trust the theory. There are just to many variables to any human body. I'm going to make a muslin first.

November 25, 2014

Lovely new coat

Finally! Pictures of my new coat. 
In retrospect, it's silly I hesitated for so long to re-make my favorite coat. Really, it should have been a no-brainer. From the moment that this new version was far enough in its assembly that I could put it on, I've loved it. 

We took these pictures at about a quarter to five in the afternoon so the light was already starting to disappear which gives all the outdoor pictures a blue-ish hue. I've decided not to meddle with it because, in my experience, although you may get the blue out, you won't get a 'normal' coloration if you do. 
Just for the record, the colour of the fabric is much closer to how it looks in the picture on stairs. 

As I've told you before, the first version of this coat was made way back in 2009. It was inspired by Balenciaga's 'barrel' coats from the 1950's. Since then, I've learned a lot more about 1950's fashion and I know now that although there were plenty of loose, wide coats, most of those were long. And short wide coats were usually either straight or flared. I'm still convinced I have seen an example of a tapered coat by Balenciaga somewhere, but I wouldn't know where to look. 

Anyway, I didn't look into the inspiration again when I started on this coat. I've worn and loved the first one for years so I knew how I wanted it. I kept that large signature collar (which wasn't in my inspiration, I think) and the back pleat and the square set-in sleeves. 
I also knew what needed work. A bit more room at the hips so it wouldn't pull there when worn over layers of clothing. I moved the collar notches up by 1.5 cm so they would be further away from the overlap (just for the sake of the look).

The fabric is a not-stretchy wool knit in burnt orange and off-white which I found last year. I backed it with a very lightweight fusible throughout and used horsehair canvas in the collar, lapels, front edge and hem. In a design like this, I would never use a firm interfacing like horsehair canvas on large parts of the front. The bulk of the coat has to stay soft so it can flow around the wearer. 

Finding buttons and a lining was a bit of a challenge. These sort of salmon coloured buttons surprised me by being the best match for the fabric at my favorite haberdashery store (they started out a few years ago as a haberdashery store but have now moved into a bigger space and sell lots of fabric as well) but none of their linings even got close.
   
I finally found this material, a fairly dark burnt orange satin, after looking at all fabrics, which might be used as lining, at all the fabric stalls at the market.
I kind of worried it wouldn't match the buttons but I didn't really have much choice. In the end, the lining and the buttons do match. The lining is a bit darker but they are clearly in the same colour-family.

I've shown you the construction of the collar before and I made the lapels in the same way. I hesitated about stiffening the coat's edges. I wanted to keep the soft shape but prevent it from looking shabby or sagged out or curled any time soon (the main reason why I used horsehair canvas in the collar and lapels as well. The old coat was a bit too soft there). So, I finished the sewing first, so I would be able to judge its interfacing needs. Then I decided to put 4 cm strips of horsehair canvas in hem and the front edges. Of course, I had to tack those it by hand.

Oh, and one more construction thing: On blogs, I often see people sew linings to coat hems by hand. I wonder why. I would only do that if I suspected the two fabrics from behaving so differently that I couldn't possibly predict it. If that is not the case (an usually it isn't), I bag the lining on all sides, including the bottom (where the lining should be about 2 cm shorter than the outside), turn the coat out through a gap in the lining side seam, press the hem up (usually 3 cm to the seam where outside and lining are attached, turn it inside out again and then sew the coat hem by hand. After that, you turn it right side out once more and close the gap in the lining. This gives you a perfectly secure lined hem with only one bit of hand sewing. (I should add that I've always been taught not to bag the hems of wide flared coats. Their skirt-like pieces tend to fall better when the lining is kept separately like in most skirts and dresses)

I'm really glad I made this coat. Once more, I will have to remind myself that I have other coats which deserve to be worn as well because this one promises to be every thing its forbear was: a garment like warm embrace. 

November 23, 2014

Aging gracefully, 1950's style

Ok, I had really planned to have some nice pictures of my new coat to share with you today. However, life and circumstance intervened once more. Other things to do, low energy and the weather which turned at the very moment I could have gone out for those pictures, to be precise.
However, with some luck E's schedule will allow us another try on Monday or Tuesday when he should be home fairly early.

Instead, I thought I would share these images which I added to my Pinterest boards today.

I don't have a separate board for 'vintage style at a certain age'. I picked both of these images from magazines from the 1950's simply because I liked the styles. 


Of course, this first one is incredibly glamorous. It must have been back in 1951 and it still is today. Who wouldn't want to age like that... 
Obviously, girdles and the like, which were common at the time, would have helped one to keep and show off a figure like that. We wouldn't consider such things very comfortable but at the time, they were credited with providing welcome 'support'. 
I also love her super-sophisticated hair-do with the grey bits clearly visible and just adding to the overall air of distinction.


This second one, from 1956, is a bit more 'lady of a certain age next door'. Which makes sense because this image illustrates one of the patterns offered by the magazine while the first one belonged with an article about fashion. This lady doesn't have such a killer figure and her dress has the sensible long sleeves which can be used to hide a variety of beauty issues. But despite being a bit more sensible and covered-up, her dress is very much in line with the fashion trends at the time (that type of skirt drape was a hit that season) and she looks both comfortable and rather dignified in it. 

I'm not a specialist on this topic, mostly because, let's face it, I don't have to. Not yet. However, three years in the bridal business (where you also get to meet many mothers of brides) and countless conversations with my mother and aunts have told me about the minefield of dressing when you get older. Depending on style, circumstances and body type, most women can only follow 'regular' (=for young women) fashion up to anything between 40 and 55. 
After that, it's hard to find really good looks. Mainstream fashion is for younger women but the only alternative often seems to be aimed at a much older audience. There is the option of embracing a certain 'signature look'. That can work really well but carries the risks of becoming a bit of a cliche. 
Of course it's dangerous to jump to conclusions based on just a few magazines, but it doesn't seem like there was such a great gap 60 years ago. Mainstream fashion and the reigning beauty ideal looked less 'young' so following those from a distance might have been easier for longer.

There are major differences in media treatment as well: These 1950's magazines were primarily housewives with young(ish) children living at home but (based on the reader's letters they published) read by all kinds of women, from teenagers to grandmothers. And they tried to address the issues each group might be facing with dressing advice being for the student-nurse on a tight budget one week and for the upcoming mother of the bride the other. In all my vintage fashion, sewing and knitting magazines, there is a mixture of designs for all ages.
Nowadays, you may still find that mixture is sewing or knitting magazines but never ever ever in fashion ones. 

Again, I don't claim to really know what I'm talking about here. I just know the ladies in these vintage pictures look great and just about every present-day mother-of-the-bride I've ever met was really struggling.